In my previous article I have discussed about deploying Web API application into AZURE using Azure Web Deploy. In this article, I am going to discuss about managing the Web API using Azure API Management.
Login into the Azure Portal and select the previously created Resource Group and click “Add” button and then search for “api management” and select the “API management” in the results displayed. A new blade with the details about API management will be displayed. Now click on the Create button at the bottom of the blade as shown in the figure 22.
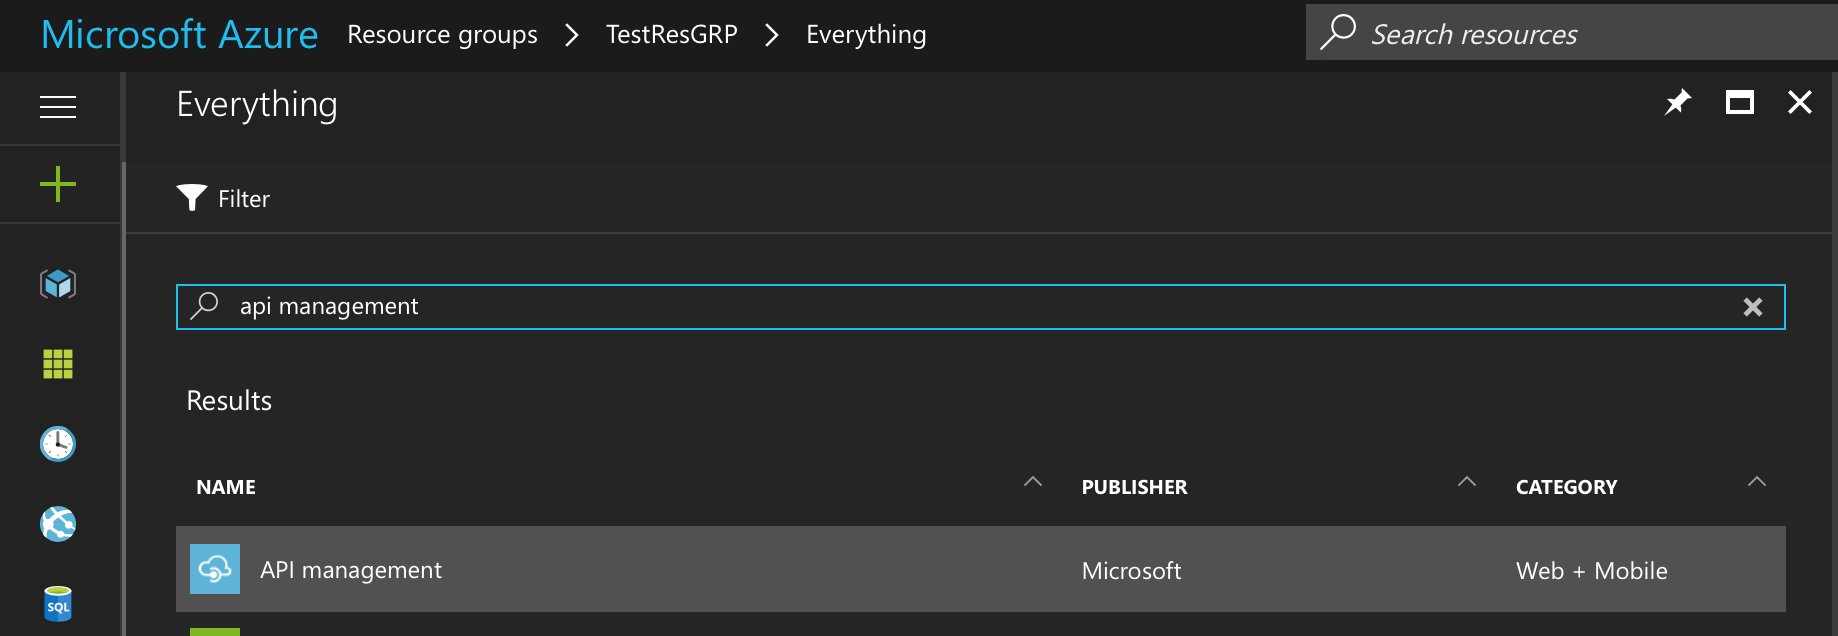
Figure 21 – Search for API Management
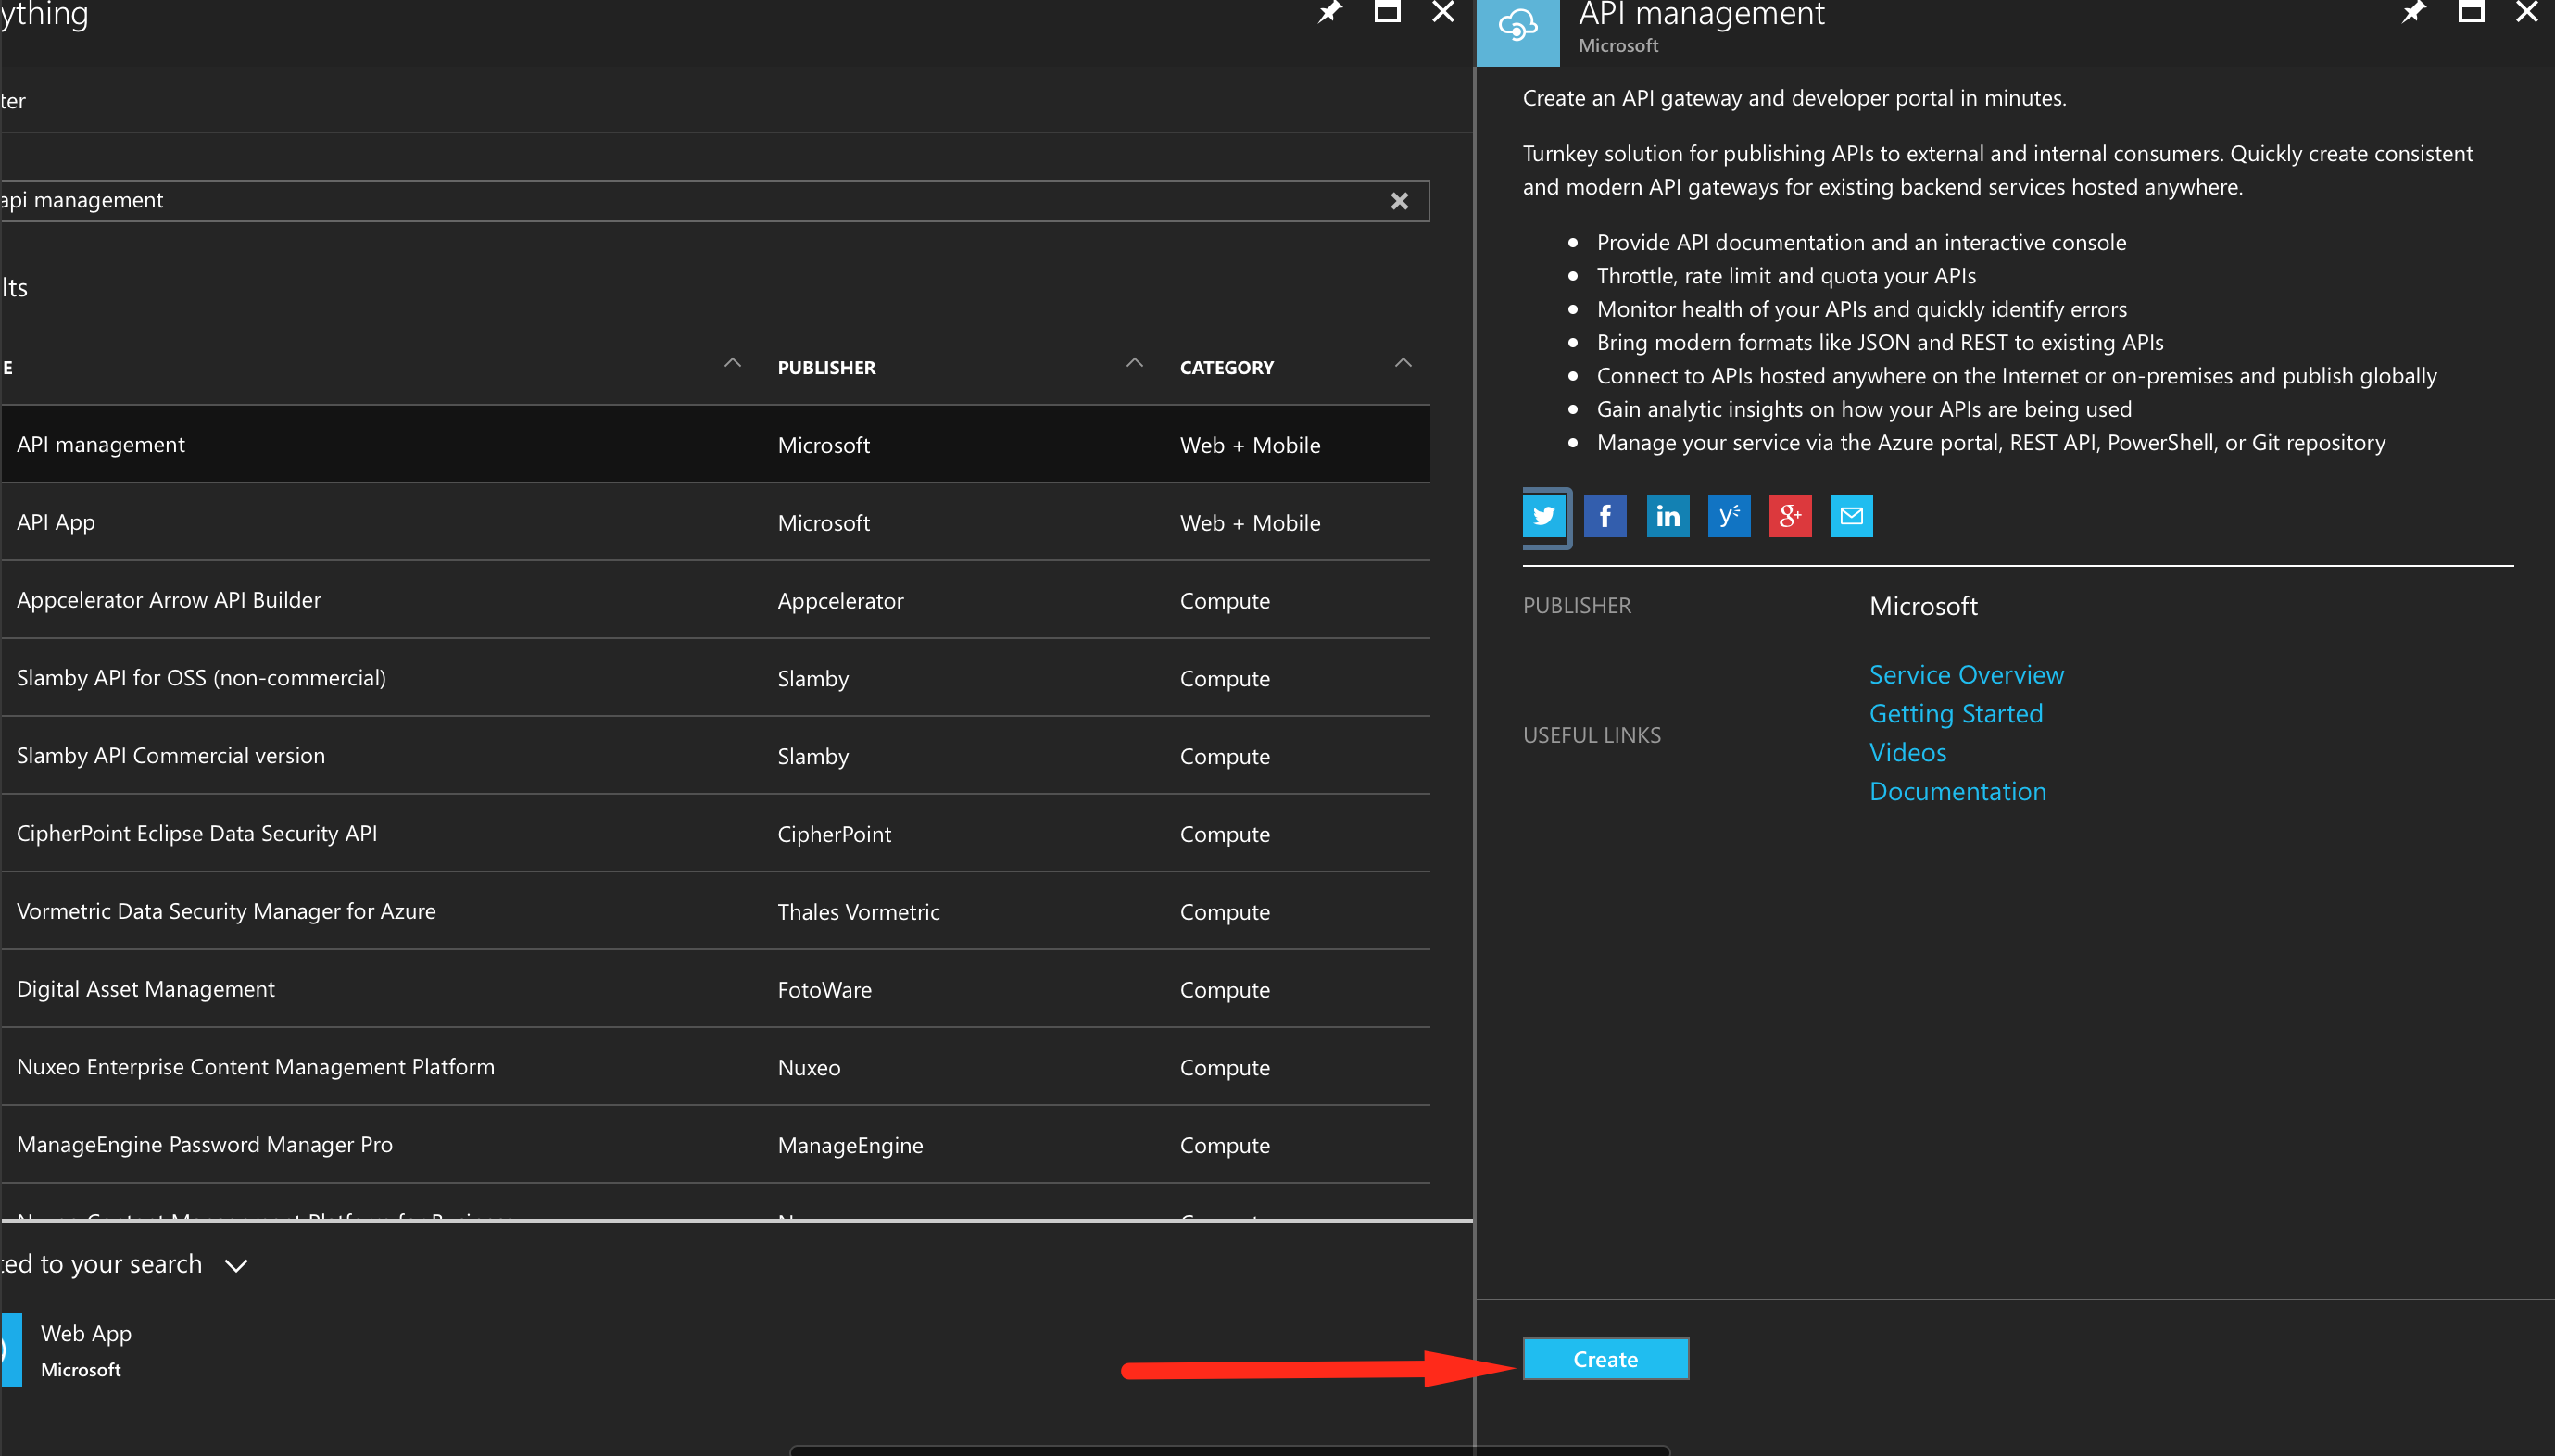
Figure 22 – Create API Management
You will be present with some input fields to be filled for creating the API Management Service. Enter unique name and select your subscription, Resource Group (New or select existing) and location, company name and the pricing tier. Finally click the Create button located at the bottom of the blade. It will take few minutes for the creation of the API Management Service and be patient till you see the Publisher Portal and Developer Portal links are enabled.
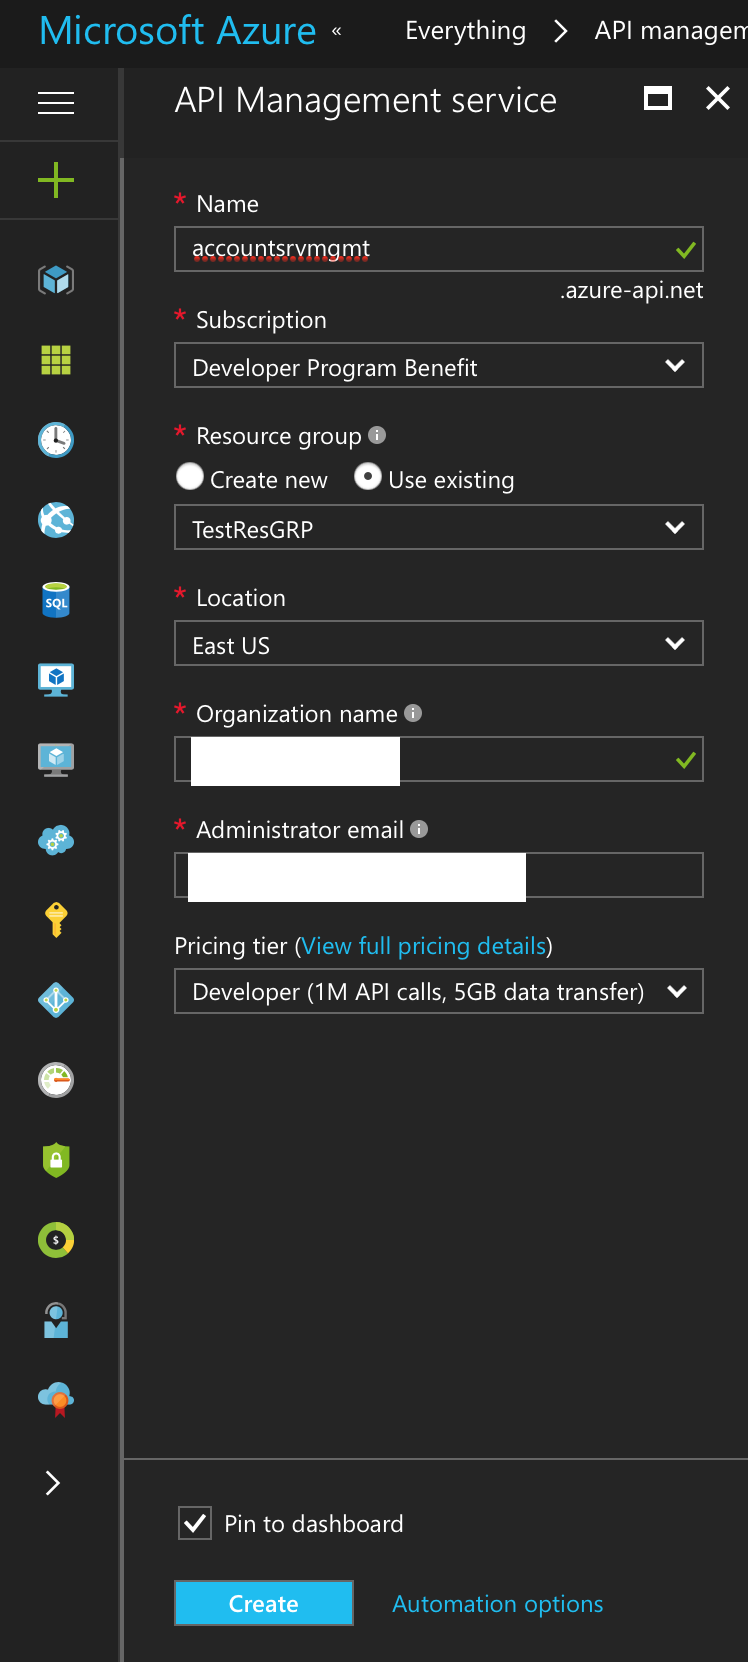
Figure 23 – Create API Management Service
If you would like to know more about API Management, please refer to the following links:
http://www.technicalblogs.sentientmindz.com/2017/01/14/api-world/
http://www.technicalblogs.sentientmindz.com/2017/01/16/explaining-api-management-to-a-lay-man/
Once the API Management Service is created, then you should see Publisher Portal and Developer Portal enabled in the Overview page.
Publisher Portal is for the administrators or the owners of the service who controls everything like who can access, how they can access and all. They create APIs so that interested parties can subscribe for the APIs, test them and then implement them in their projects. Developer Portal is for the outside parties who registers for the API access and can become future consumers with appropriate licenses.

Figure 24 – General View of API Management
Now it is time to create the APIs for our service so that outside world can access the operations provided by our service. By default, when we create an API Management Service, a Developer Portal URL and Gateway URL will be created as pointed out in the figure 33. Developer Portal URL is what we share with the outside world and the Gateway URL is where we define our policies for our service.
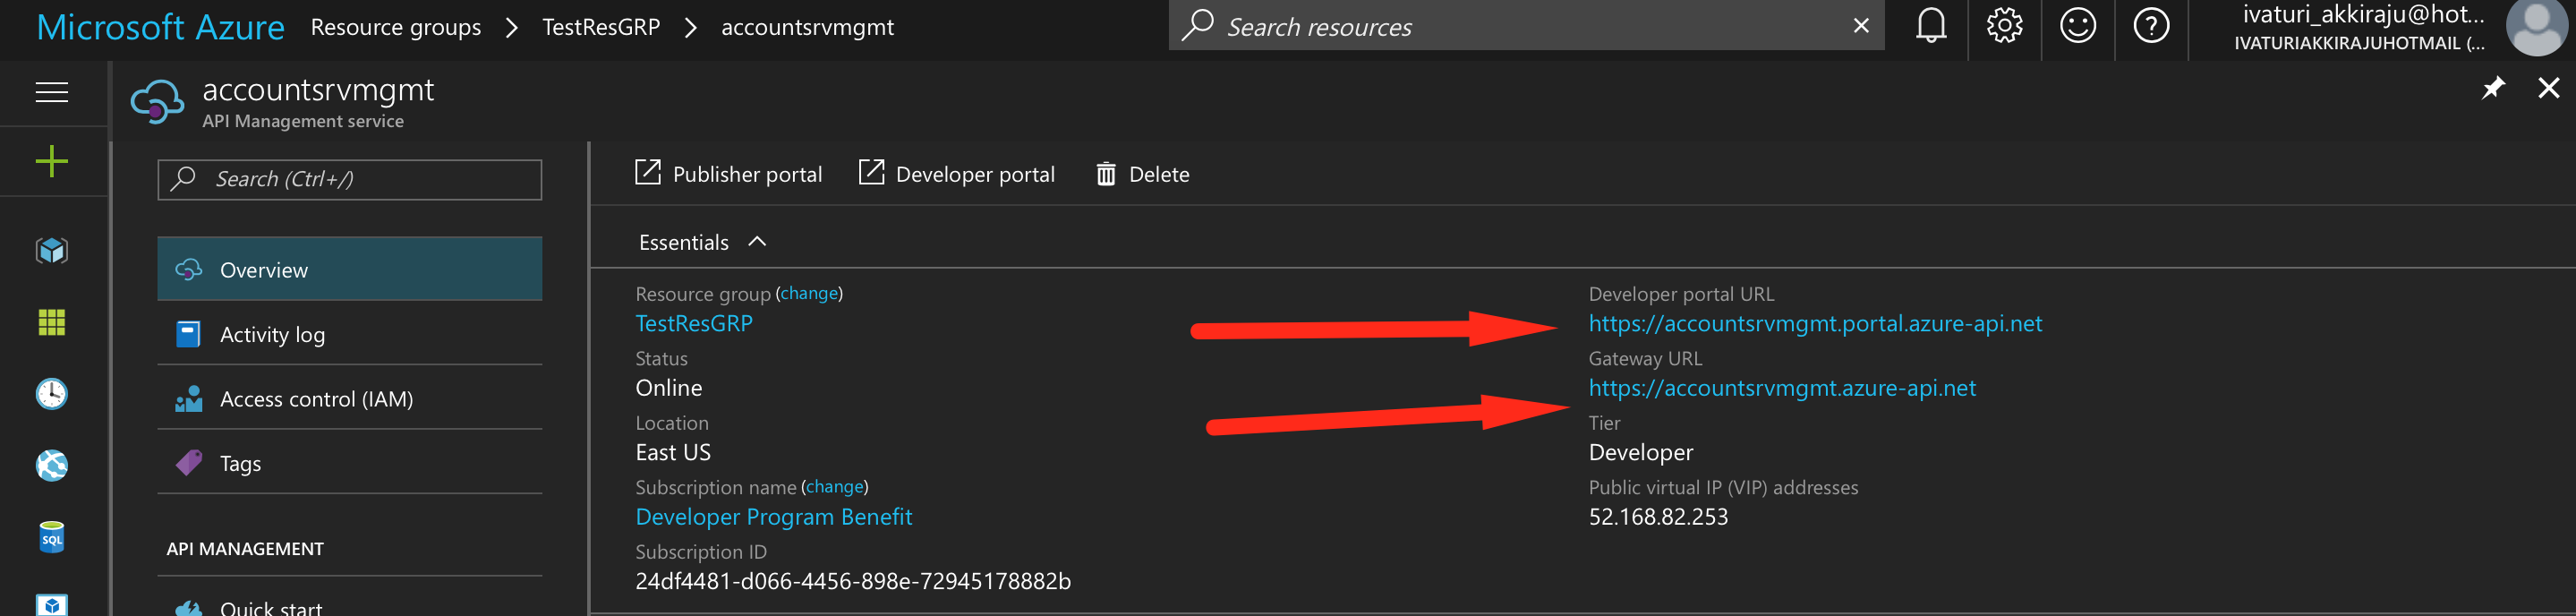
Figure 25 – API Management Portal
Now hit the Publisher Portal link on the top to define new API proxy for our service. By default, the Publisher Portal page displays the Dashboard Page with the following details:
- APIs created in the Portal
- Products
- Applications
- Options for Adding/Importing APIs.
By default, you would see the Echo API created in the Publisher Portal.
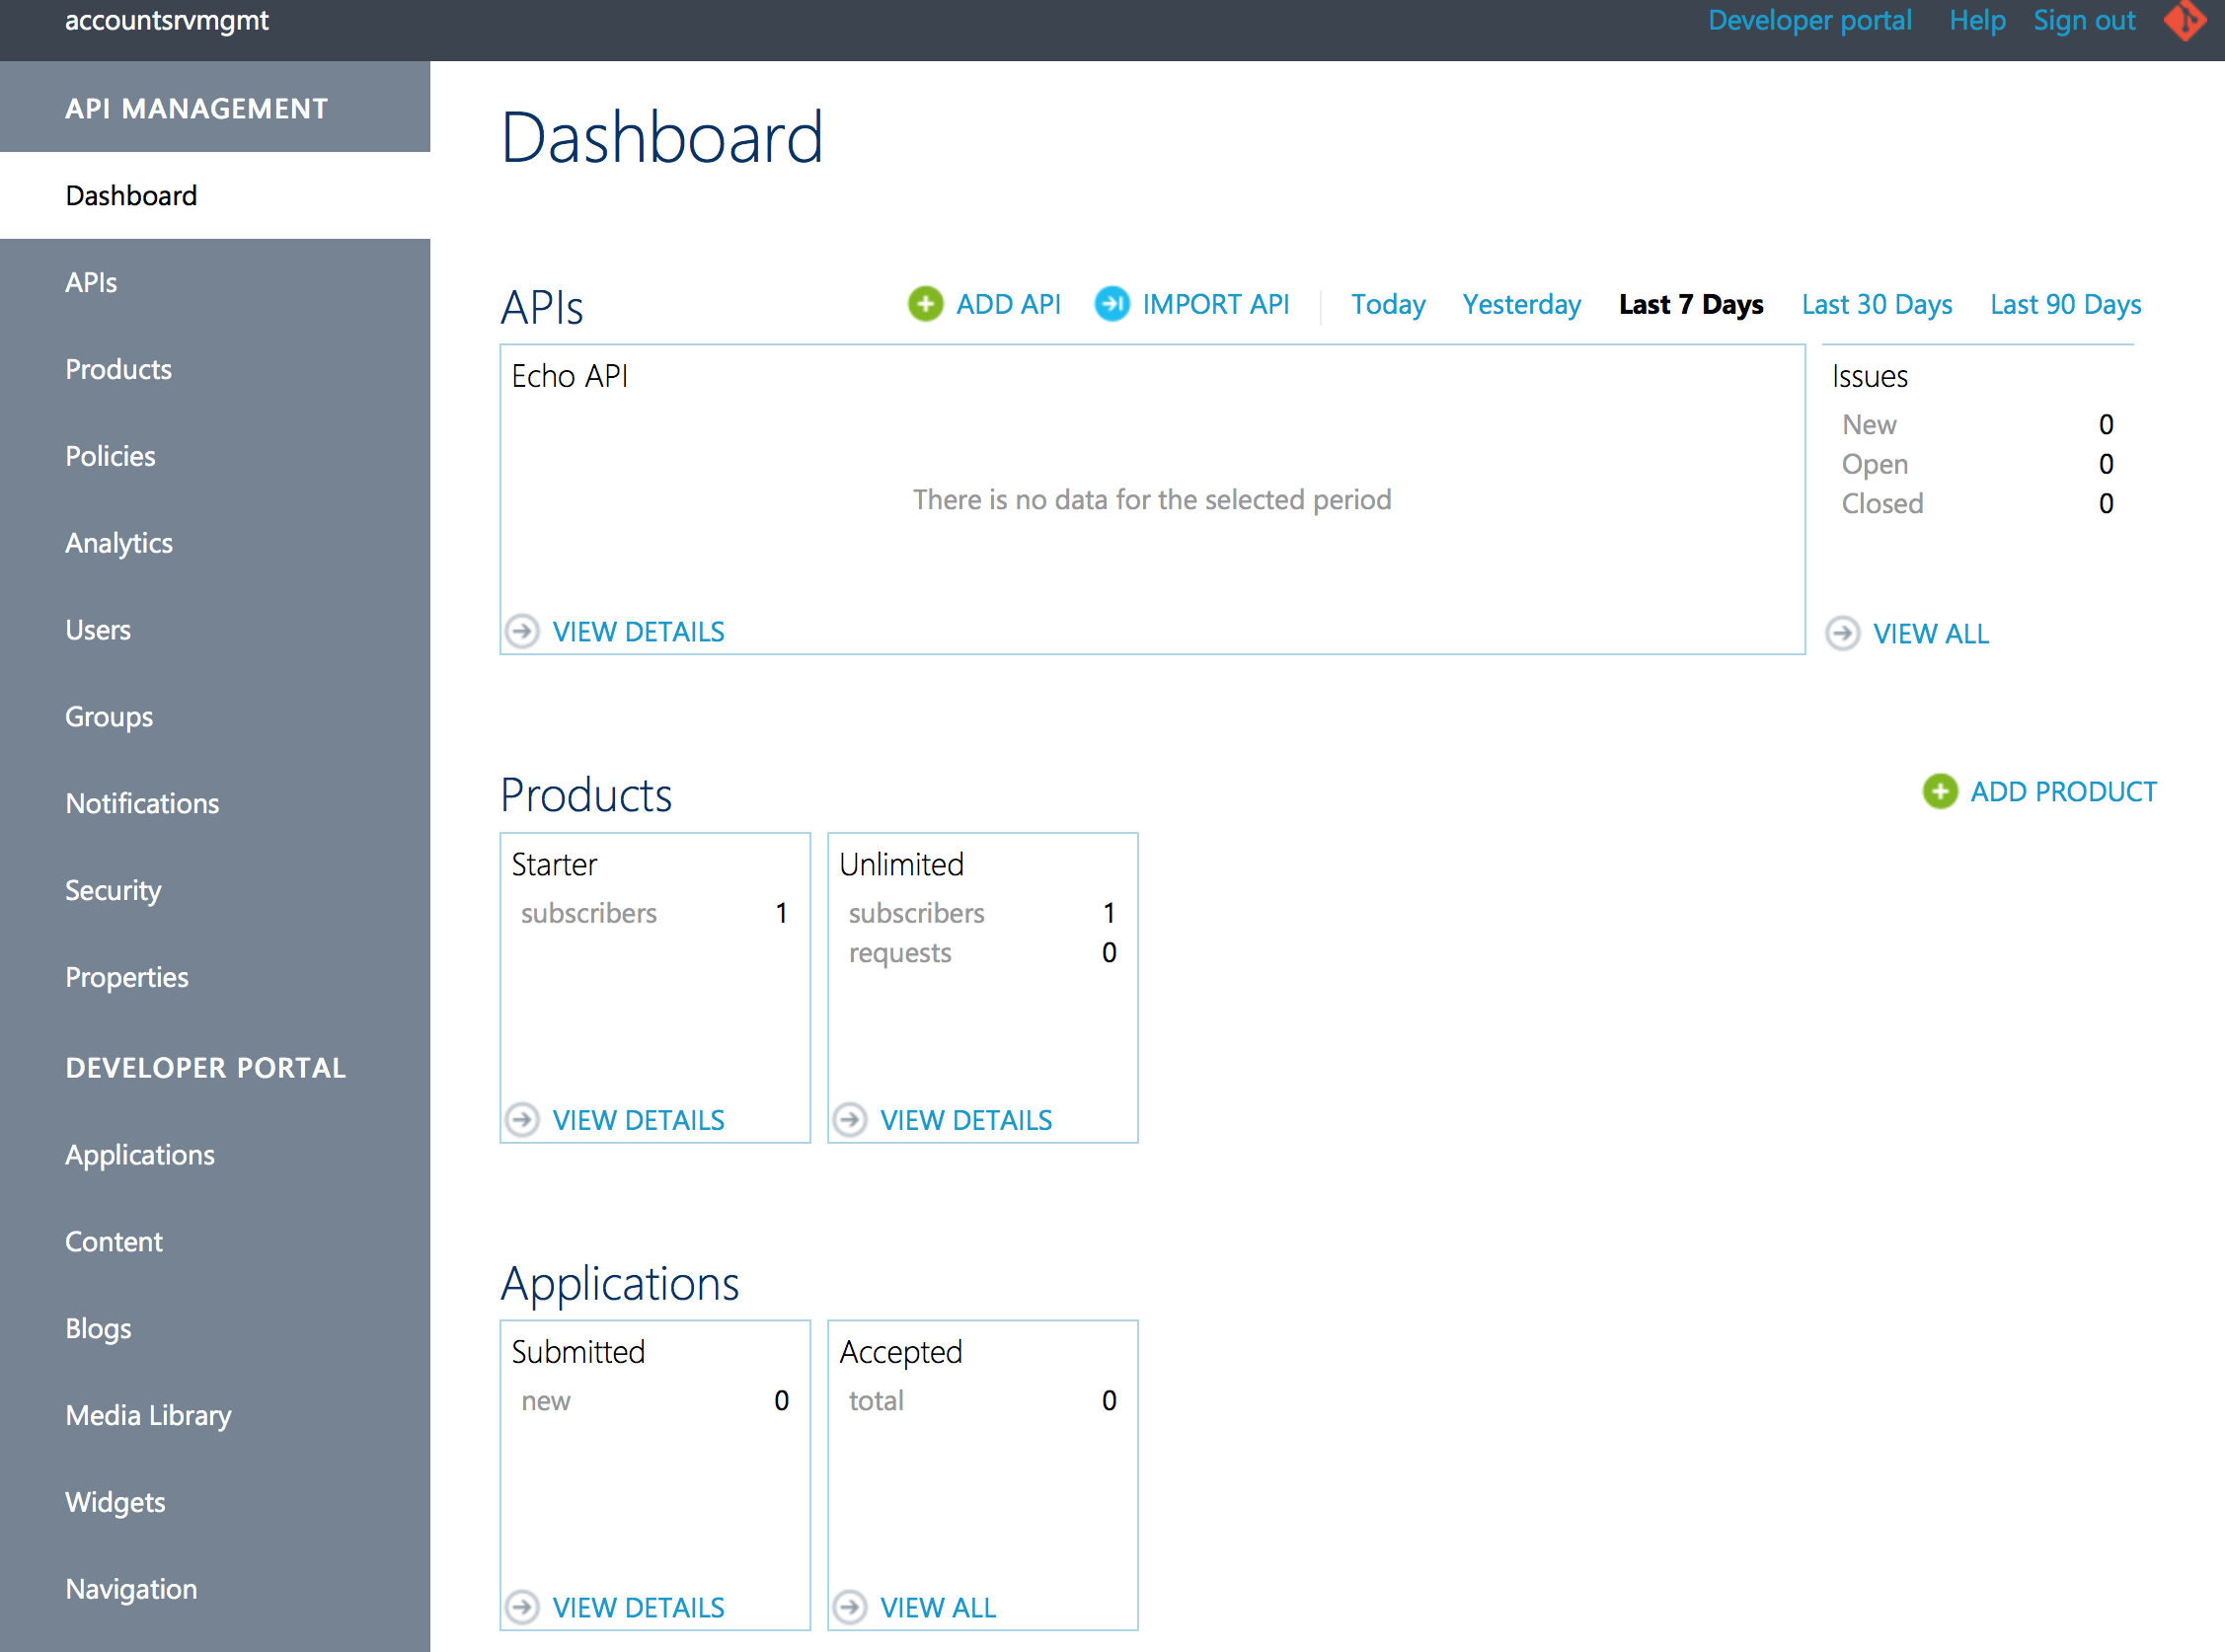
Figure 26 – Publisher Portal
Now I would be clicking “APIs” link in the side bar and then will be clicking IMPORT API.
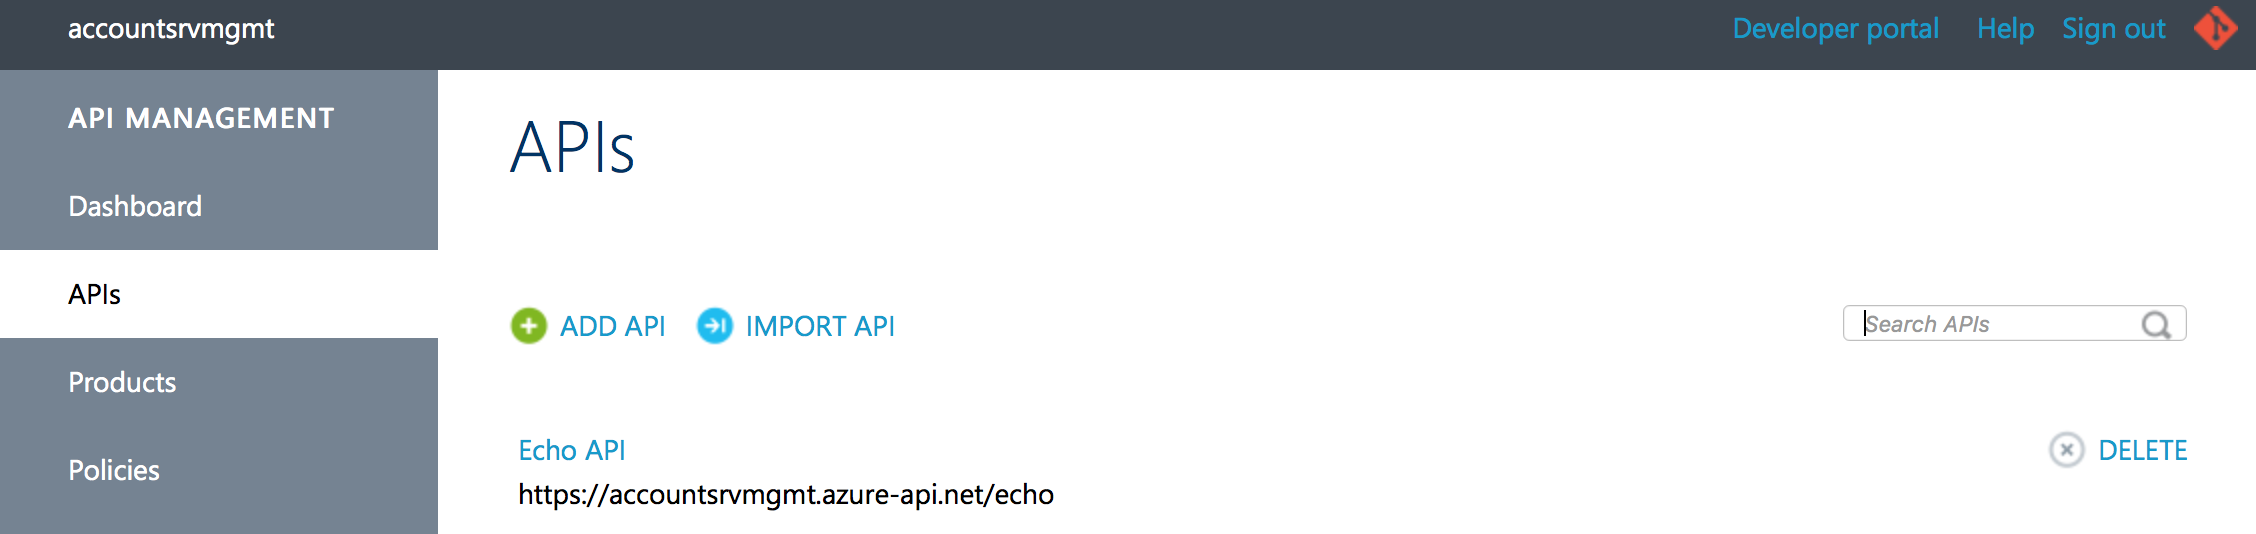
Figure 27 – APIs page
We have two ways to create the APIs for our service. One way is to add APIs manually. The other way is to import API through WADL document or Swagger or WSDL. These 3 specification documents are currently supported by Publisher Portal in Azure to import APIs without manually creating them manually. You can either paste the specification document content in the text area provided or select a file to take the specifications from or specify from URL if the service exposes the specifications by the URL.
We will be following the 3rd option i.e. importing APIs from URL http://accountsservice20170318103230.azurewebsites.net/swagger/v1/swagger.json.
So now click on the “IMPORT API” link in the APIs page and it should come with the page as shown in the figure 28. Enter the Swagger JSON URL in the Specification document URL by selecting the option “From URL” and specification format as “Swagger” and specify Web API URL suffix as “accounts” and that will be appended to the end of the gateway URL. Click Save button and now you should see that the new api is listed in the list of APIs.
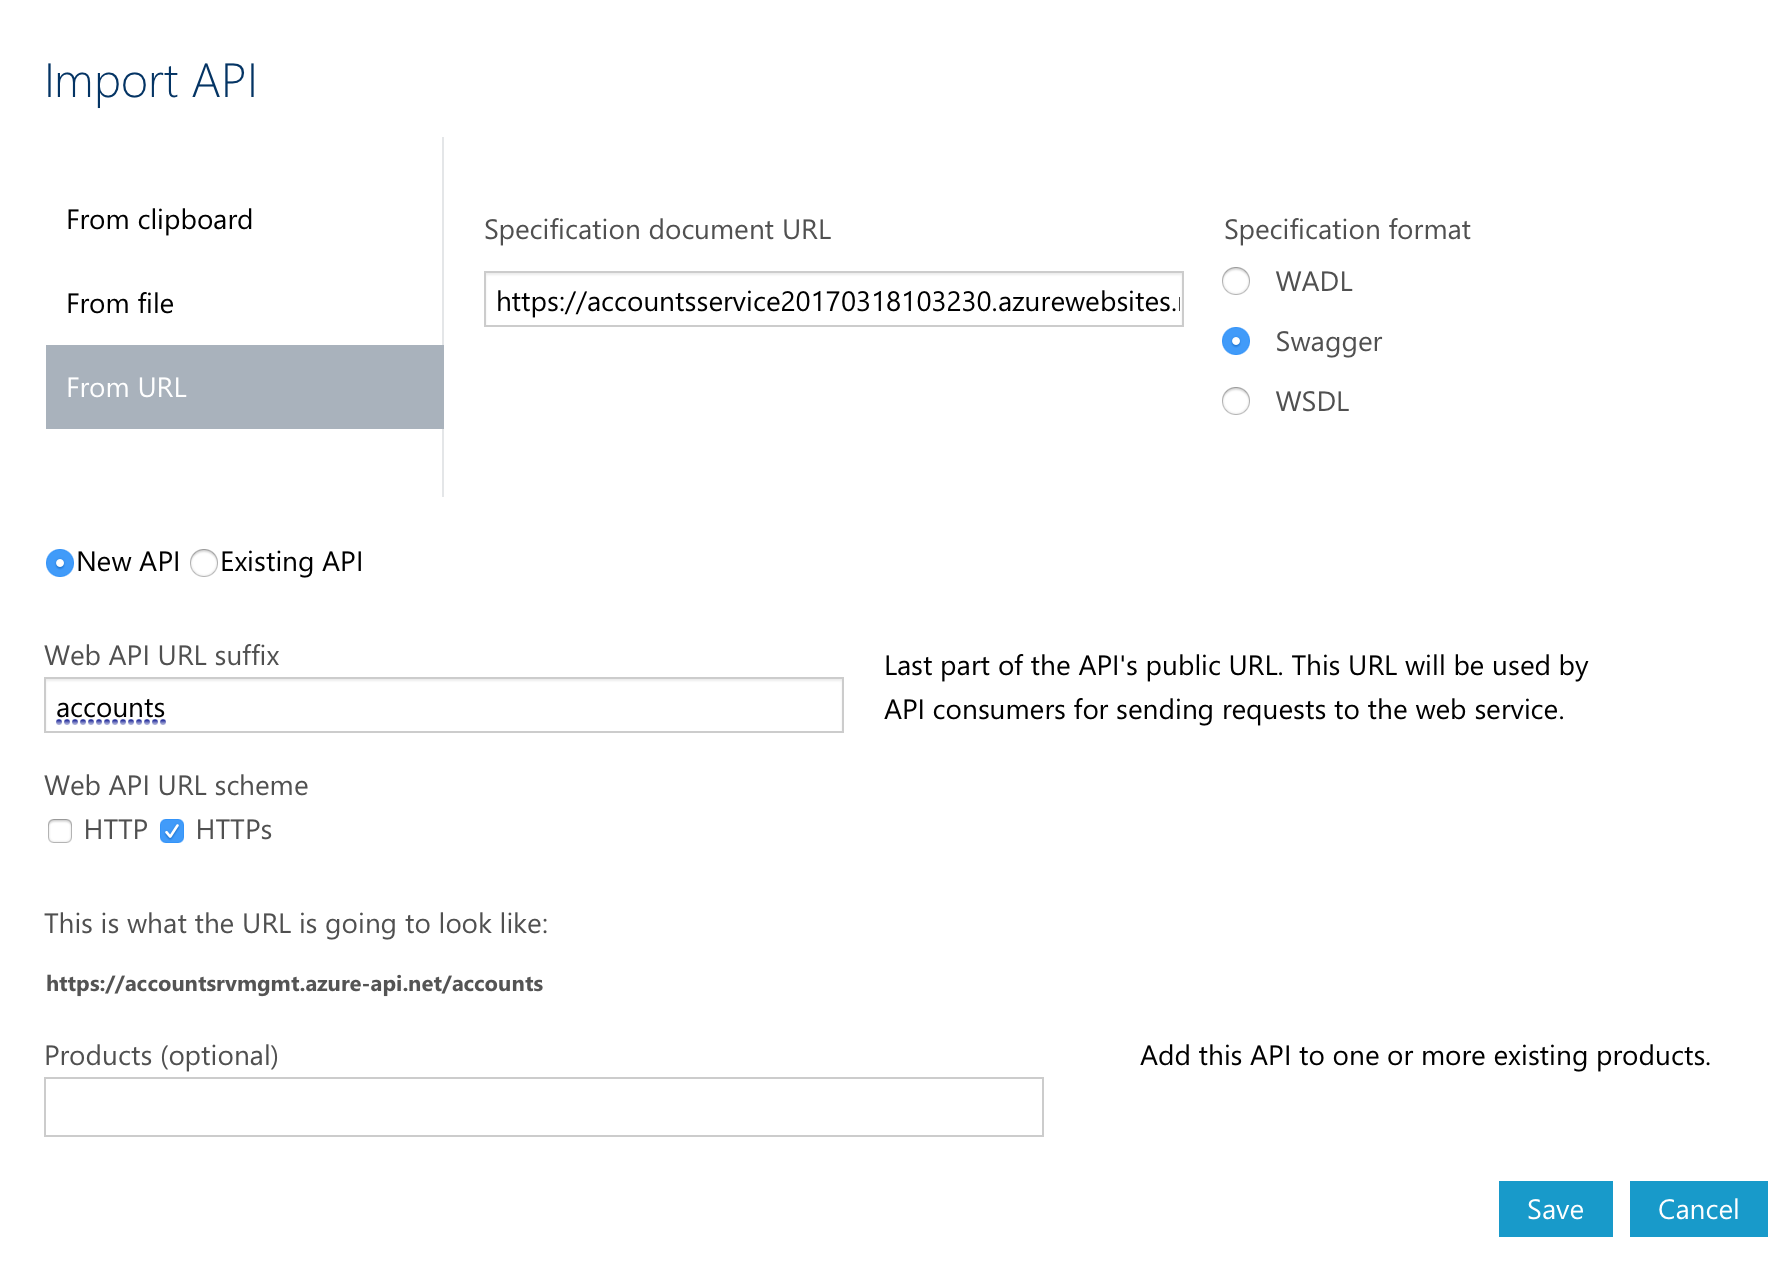 Figure 28 – Import API
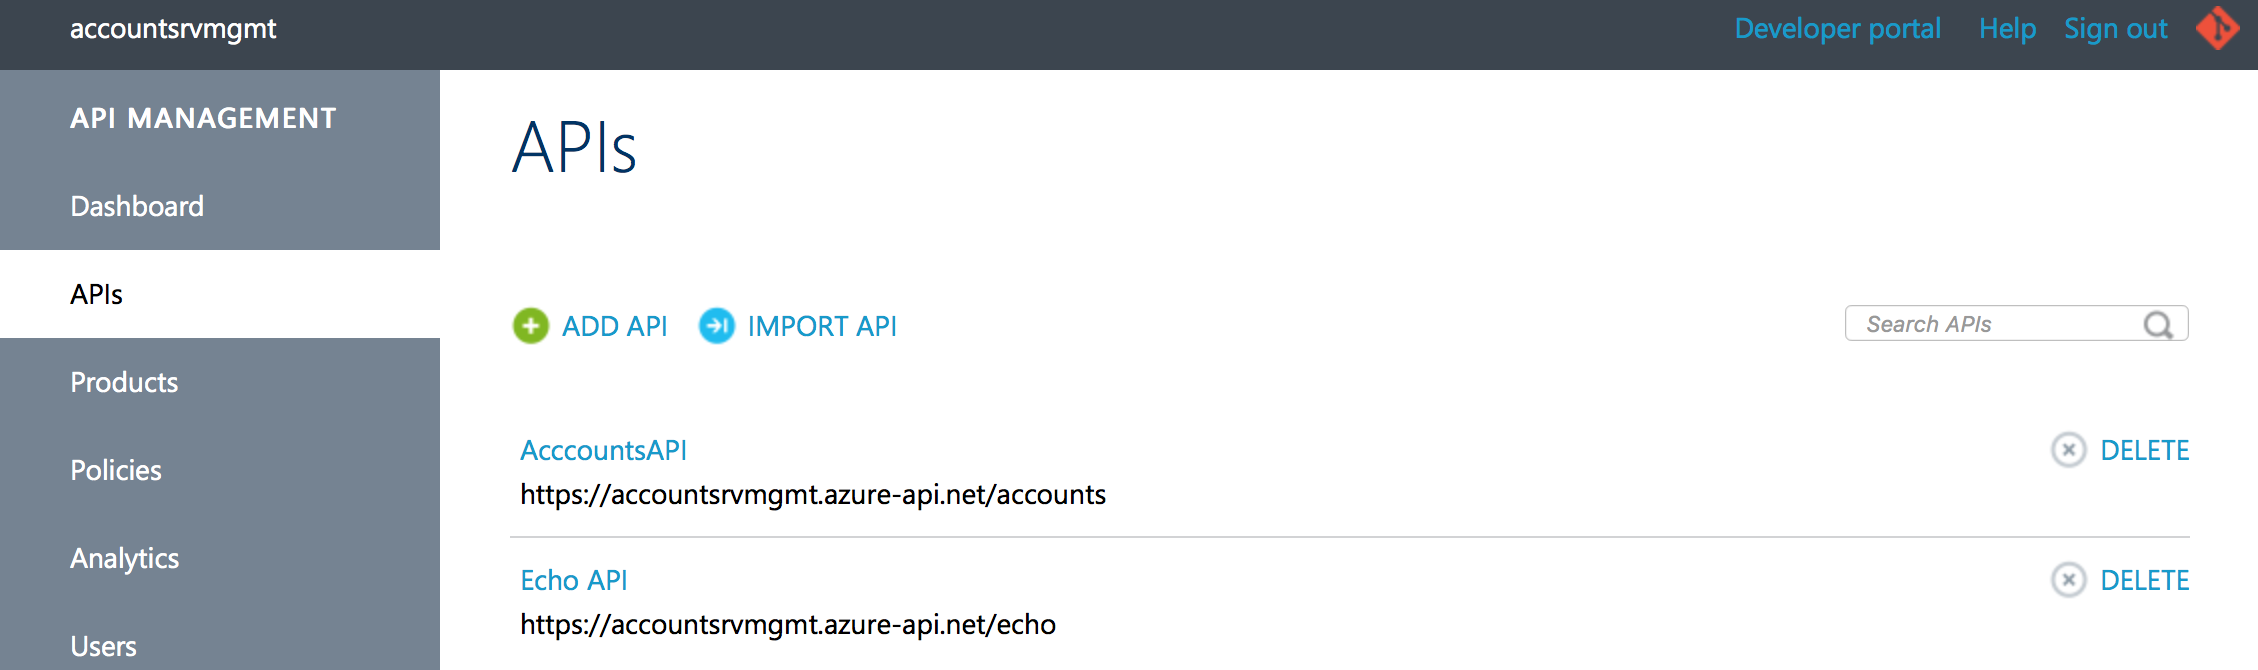
Figure 29 – List of APIs
Click on the link “AccountsAPI” and it should display the page with the following sections:
- Summary, this section shows the transactions per certain period, any issues new, open or closed.
- Settings, if you ever want to change anything in the figure 28 this is the right place like editing the Web API Name or description or URL or Web API URL suffix or the HTTP scheme.
- Operations, displays list of operations supported by the API and you can add/edit/delete the operations in this section.
- Security, this section provides feature to configure Proxy Authentication and User Authorization.
- Issues, displays list of issues if any.
- Products, list of Products that this API is part of.
Let us concentrate on the operations section first. When we imported the Swagger JSON, it has created the following operations shown in the figure 30. I would like to change the title of each operation so that it will be user friendly and understandable.
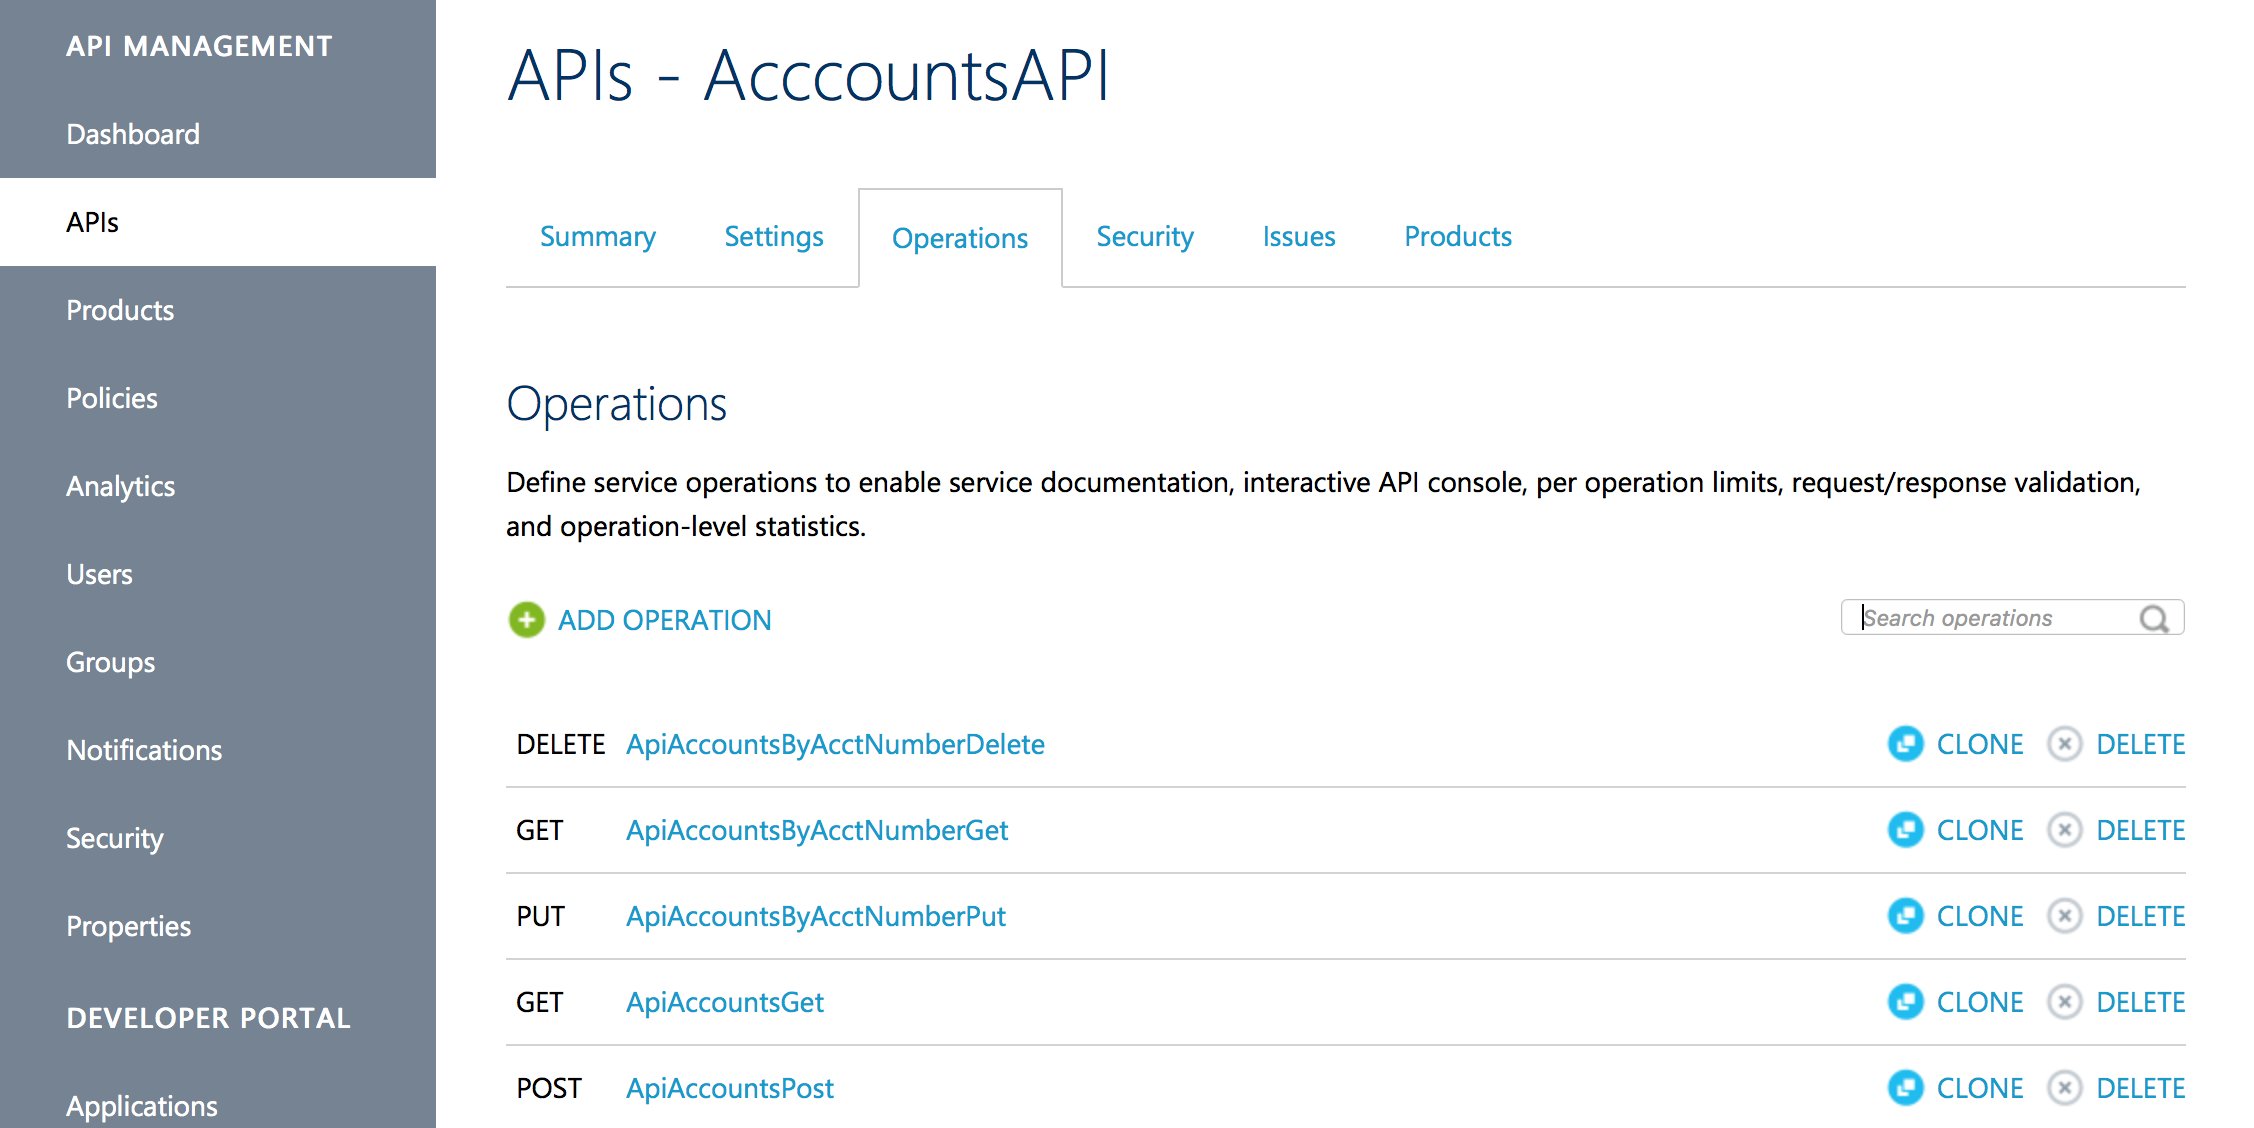
Figure 30 – List of operations
To edit the description, click on the operation name. For example, I would be clicking on the operation name for DELETE and in the edit page, I would be modifying the Display Name.
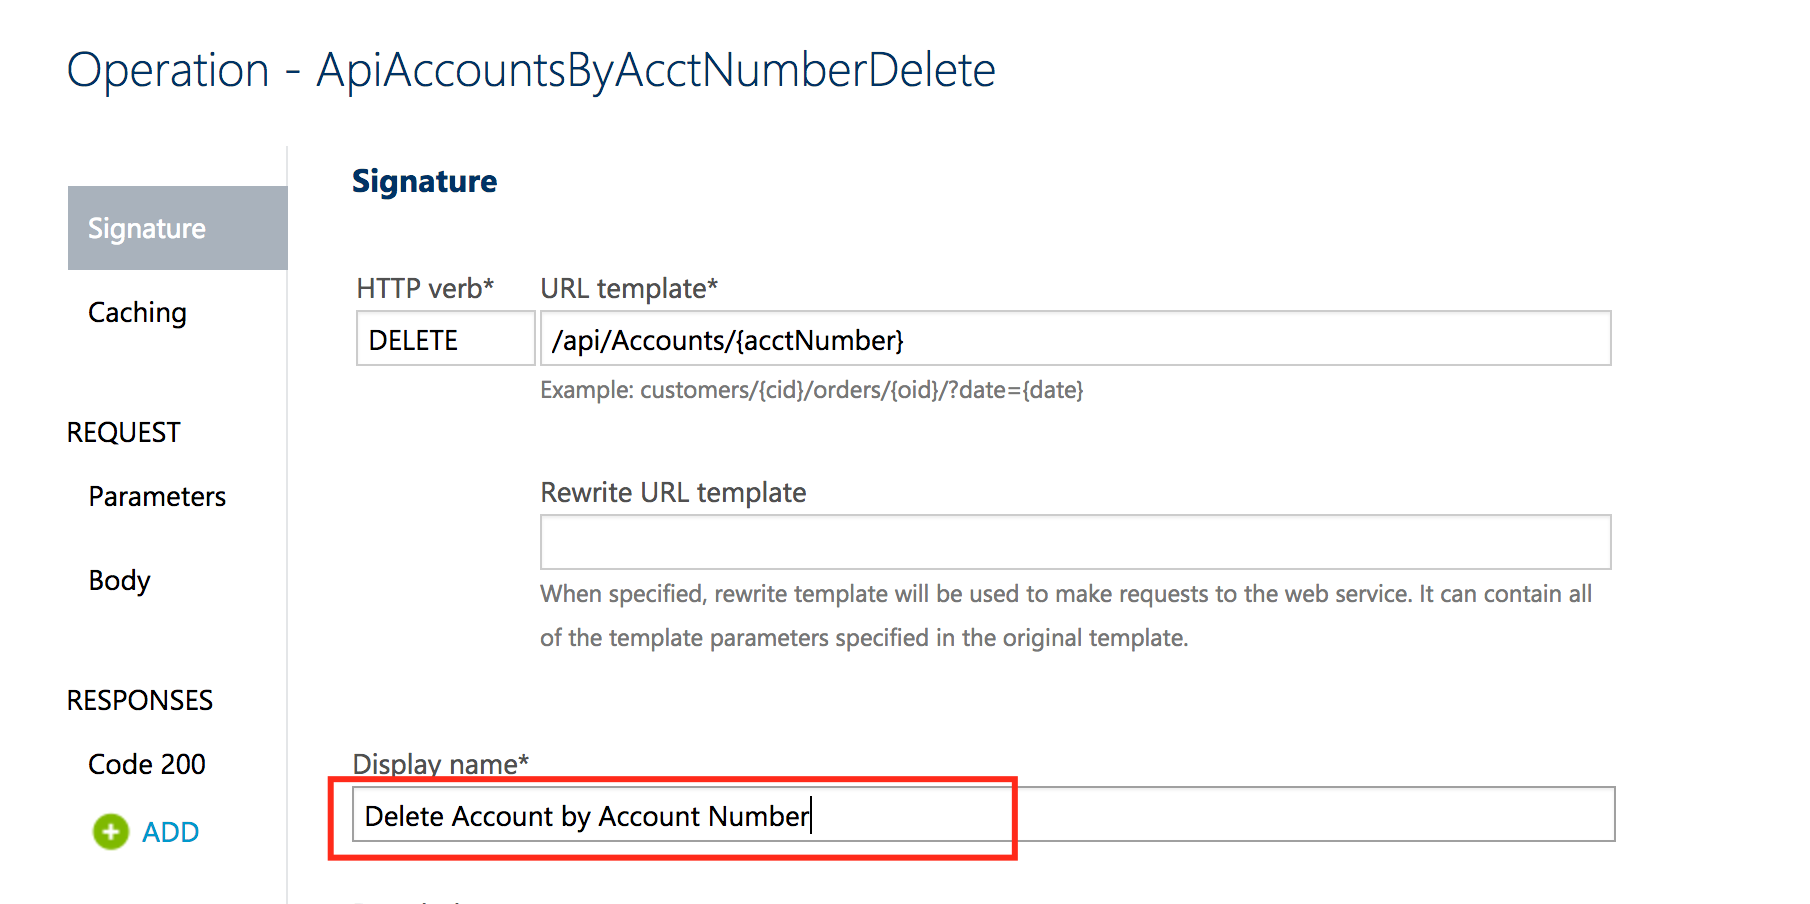
Figure 31 – Editing the Display Name for the operation DELETE
After editing the display name, click on the “Save” button. I would be editing the other operation display names and finally it should be in a more readable format as below:
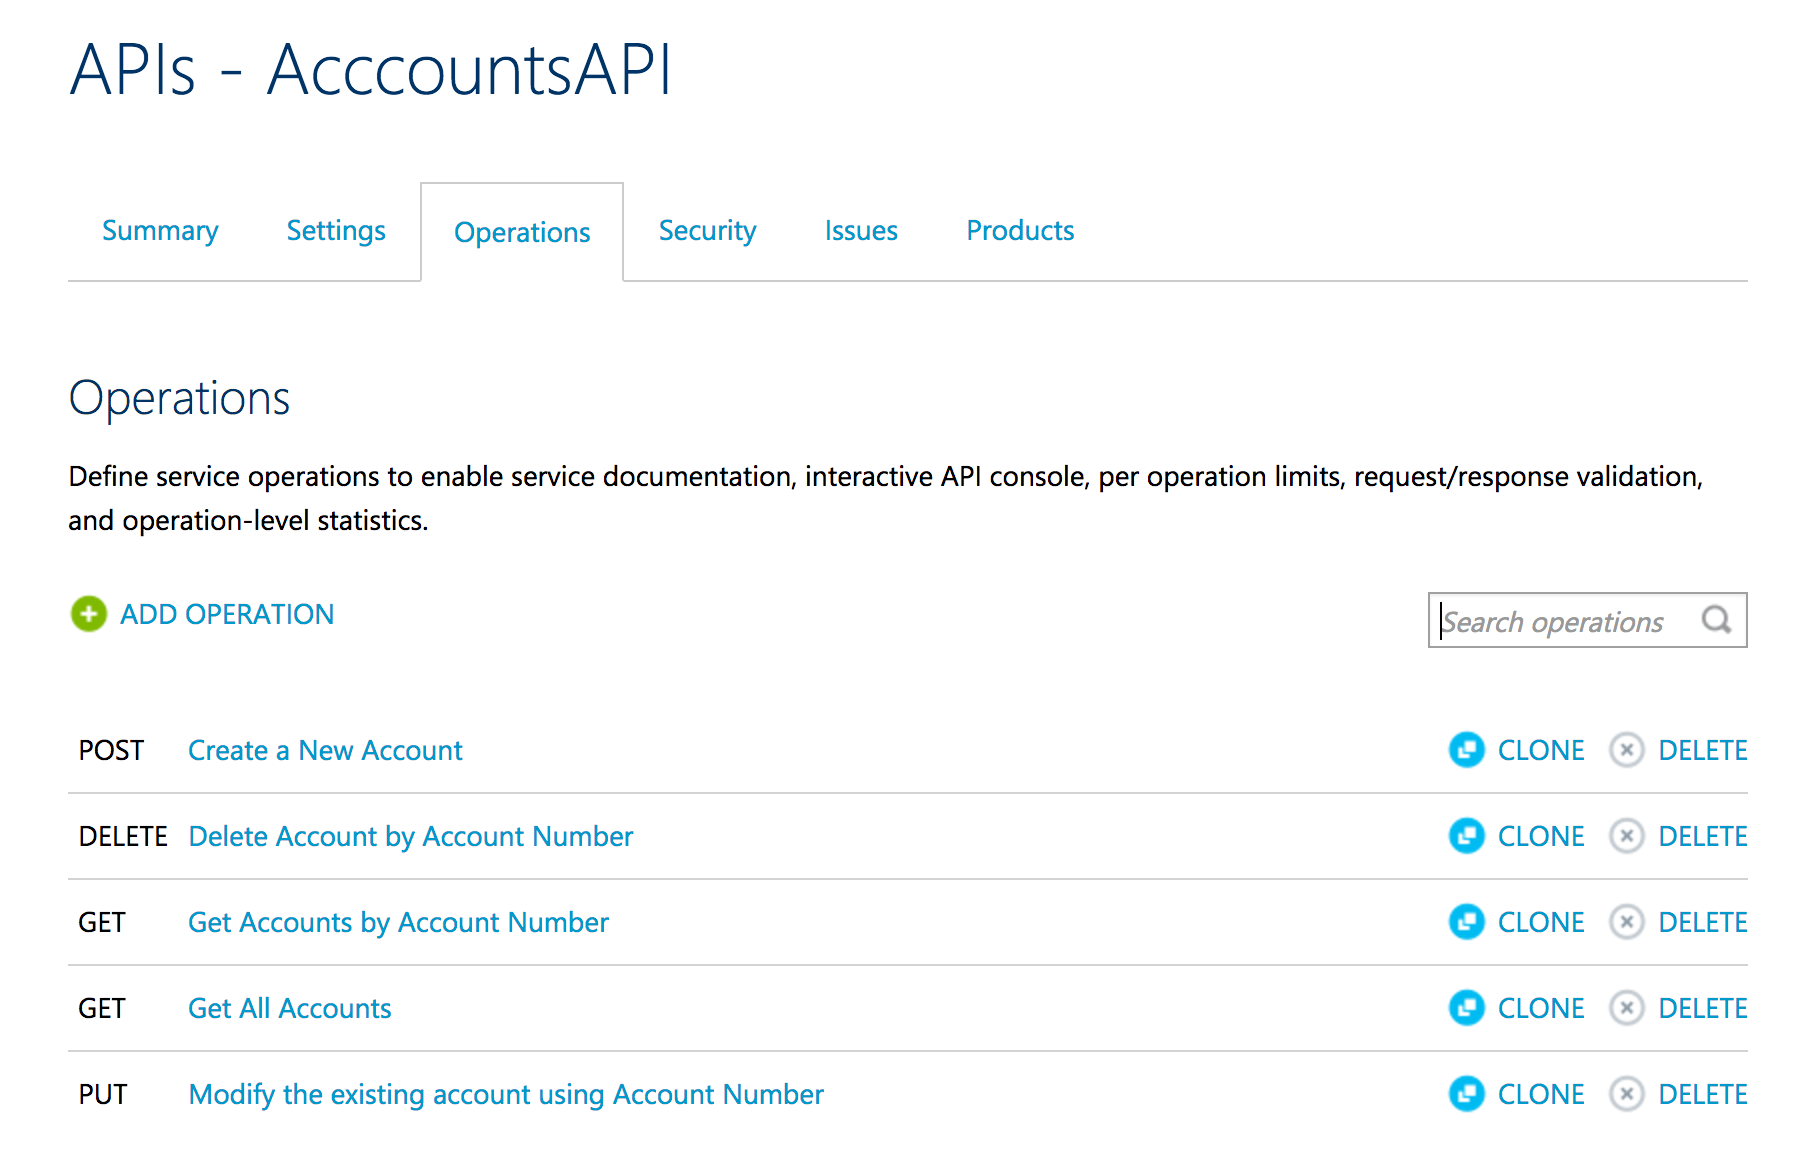
Figure 32 – Modified display names for each operation
Now our API is ready to use. In order for the developers to access the API, the API should be added to a Product. A Product can contain multiple APIs and it dictates the terms like if developer need to subscribe to get access the API and if the subscription needs approval. So, we now need to create a Product and publish it to the developers to try the API operations.
Now click the “Product” in the management section and you should see by default there are two Products “Starter” and “Unlimited” displayed.
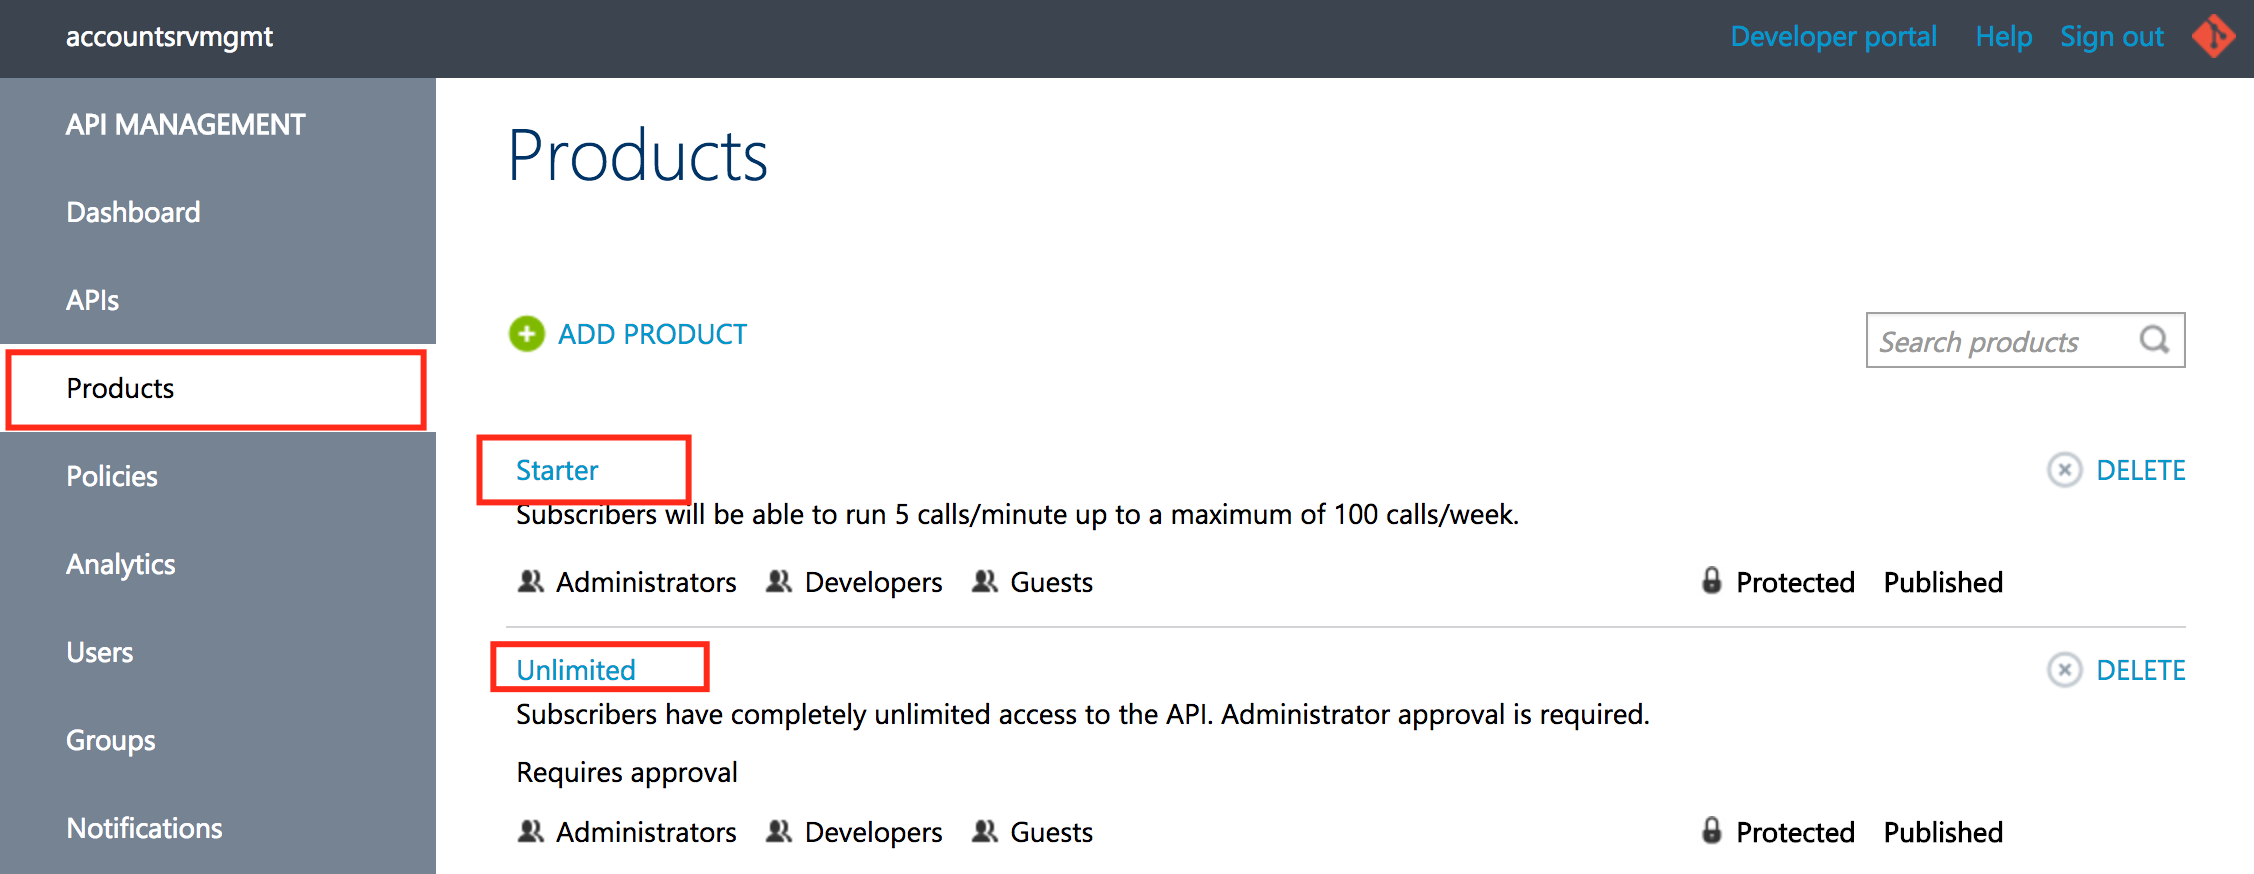
Figure 33 – Default Products
Let us create a new Product “Try For Free” and in order to access the API, developers need to subscribe and it should be approved by the administrator. Also, we need to provide access to the Developers group. By default, Administrator group users will have access to the APIs in the Product.
Click “Add Product” on the top of the Products page and add the details.
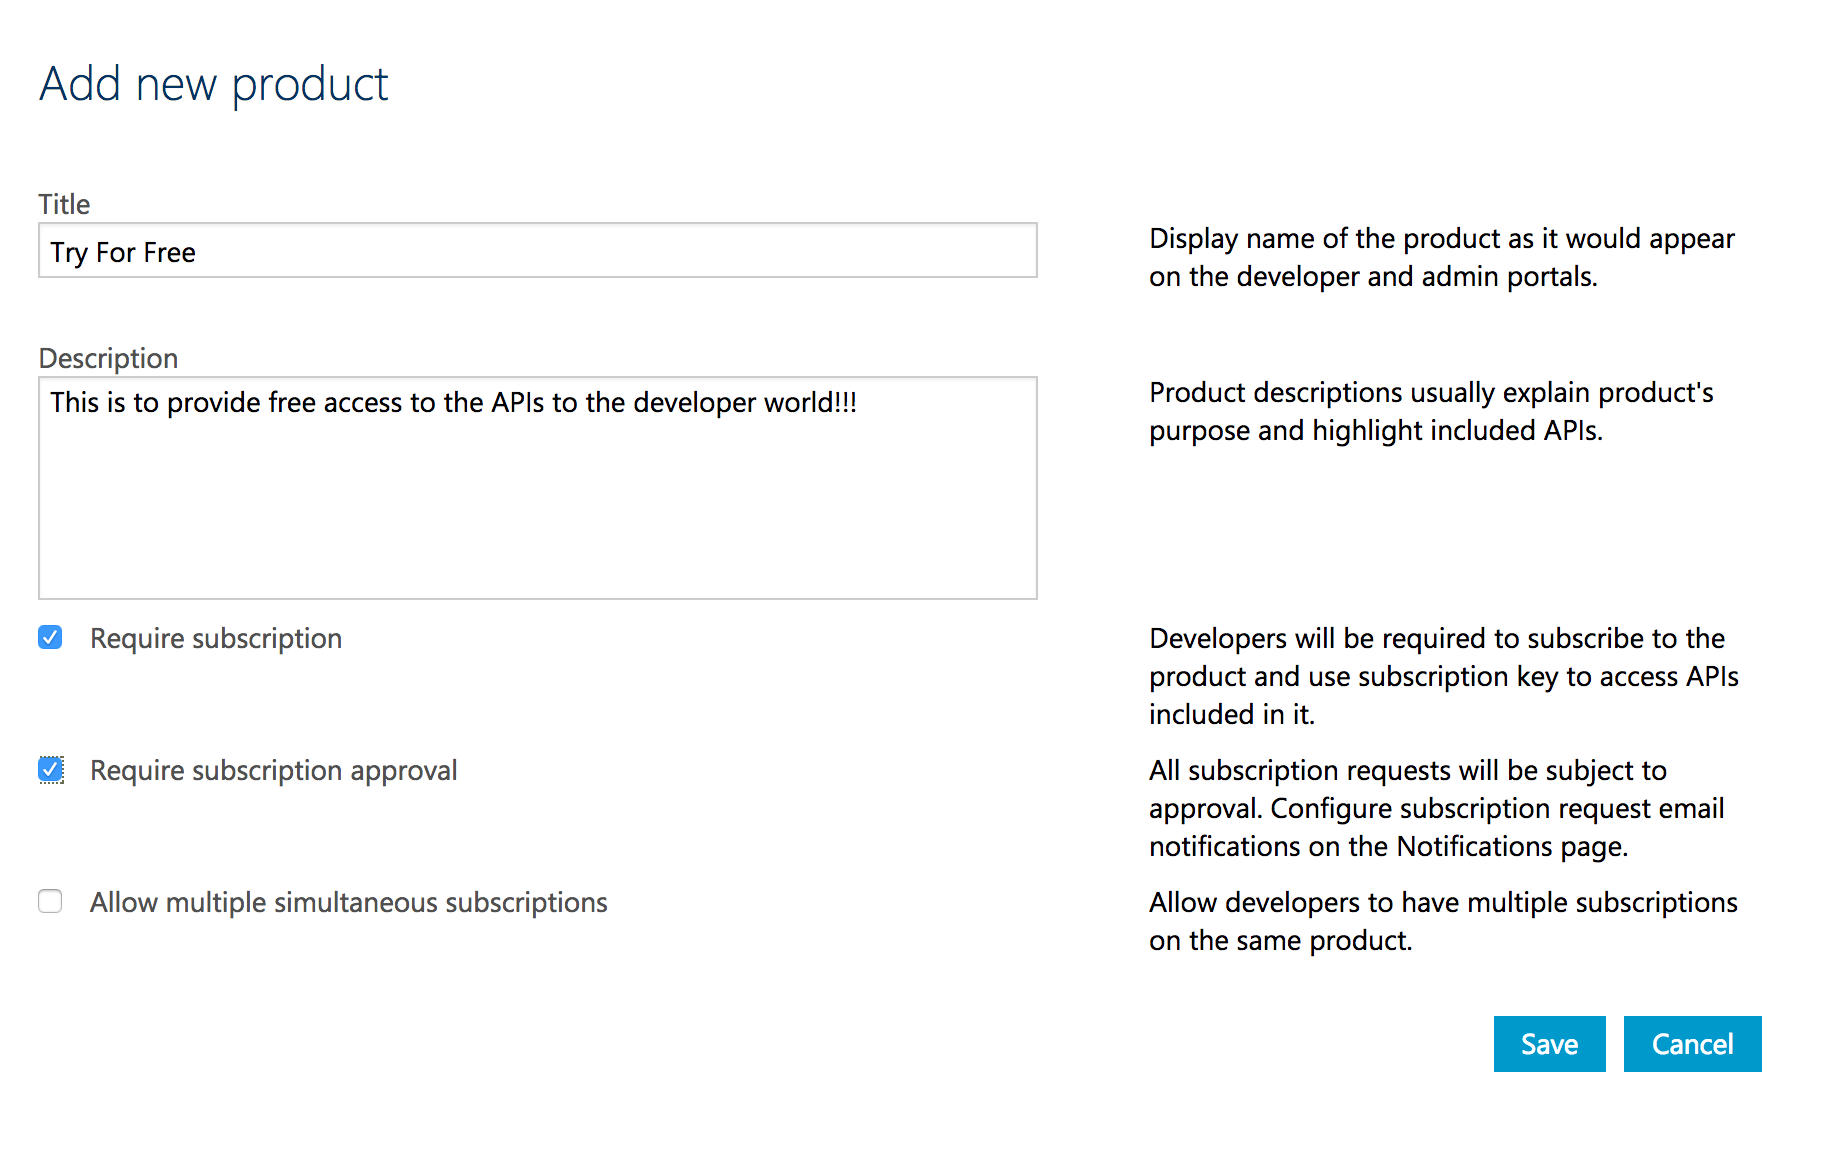
Figure 34 – Adding a new Product
Now the new Product should be displayed in the list of Products. Also if you observe, by default the access is available for the Administrators group and also you would see it is not yet published.
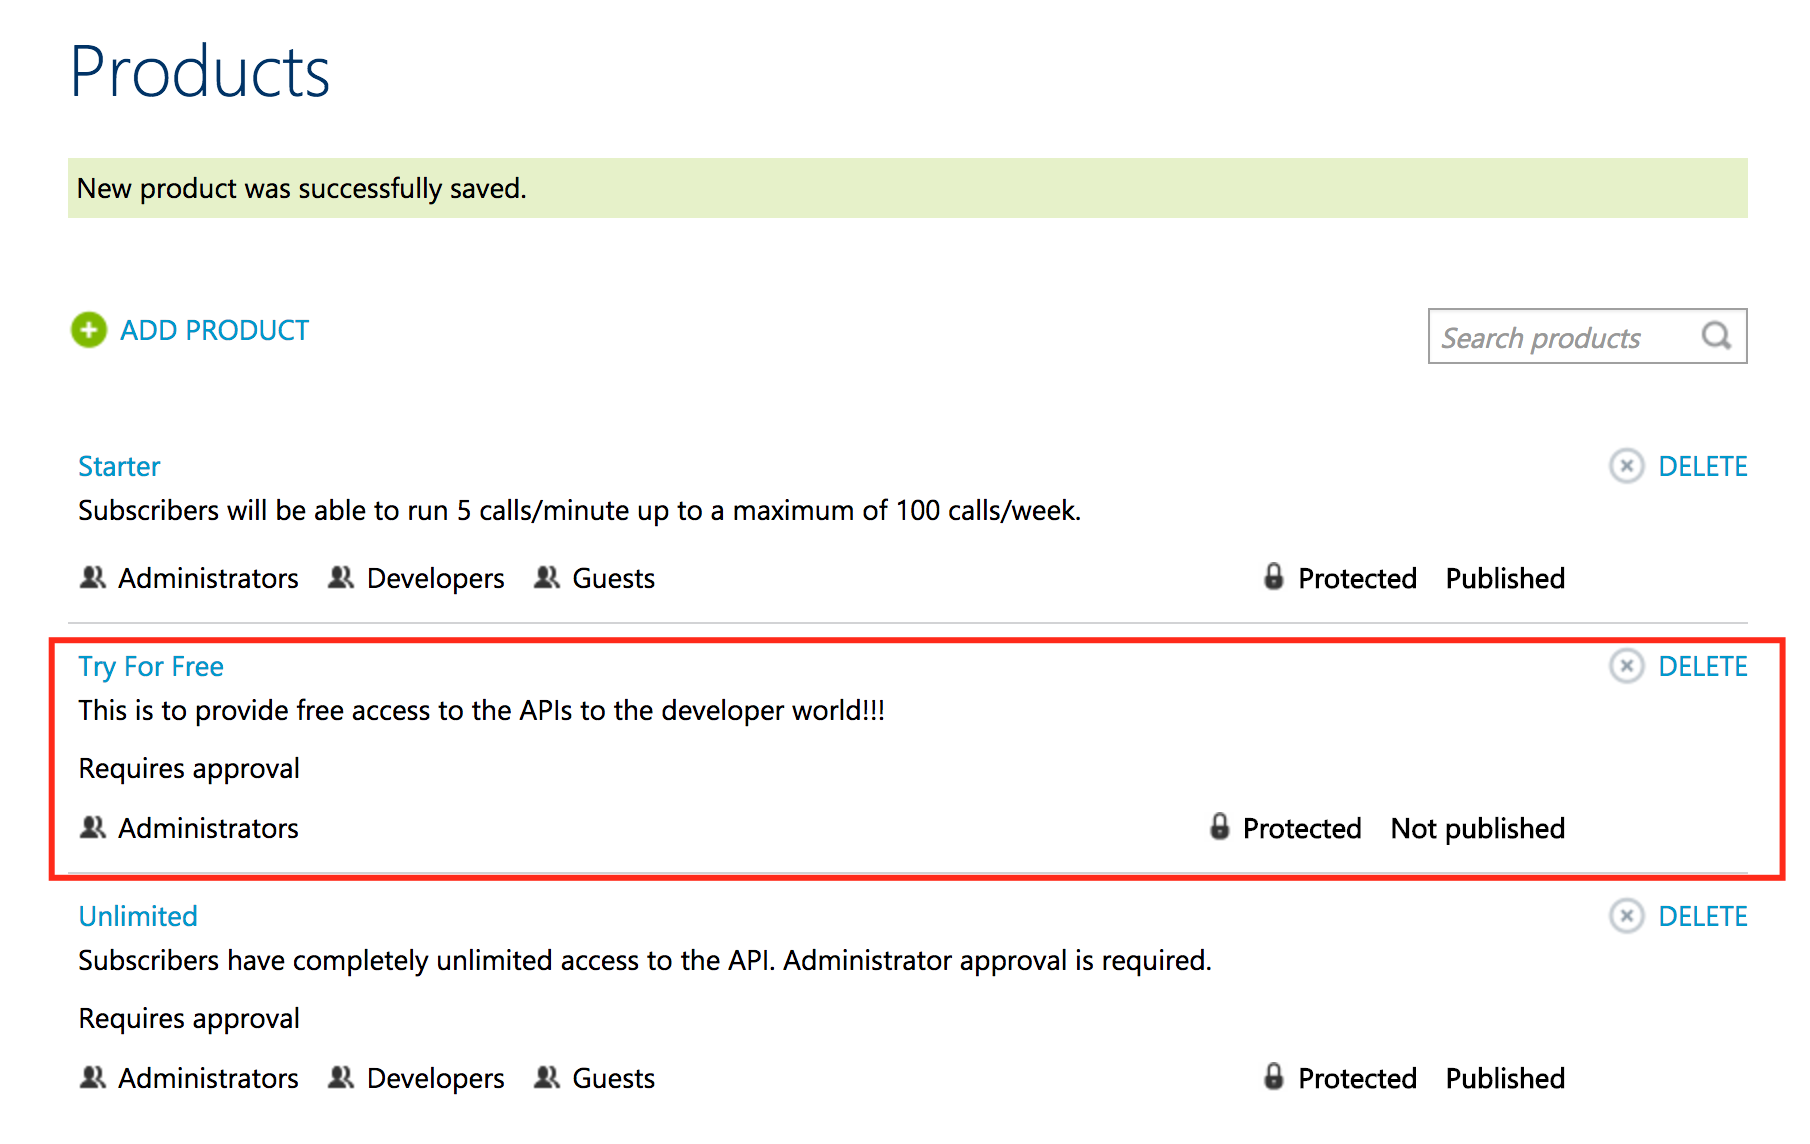
Figure 35 – List of Products
Now click on the Product created “Try For Free” and it should take to you to the Summary page. In the Summary page, you should see the list of APIs added to the current Product, Publish/Delete buttons to publish or delete the current Product. Also a link to add API to the Product.
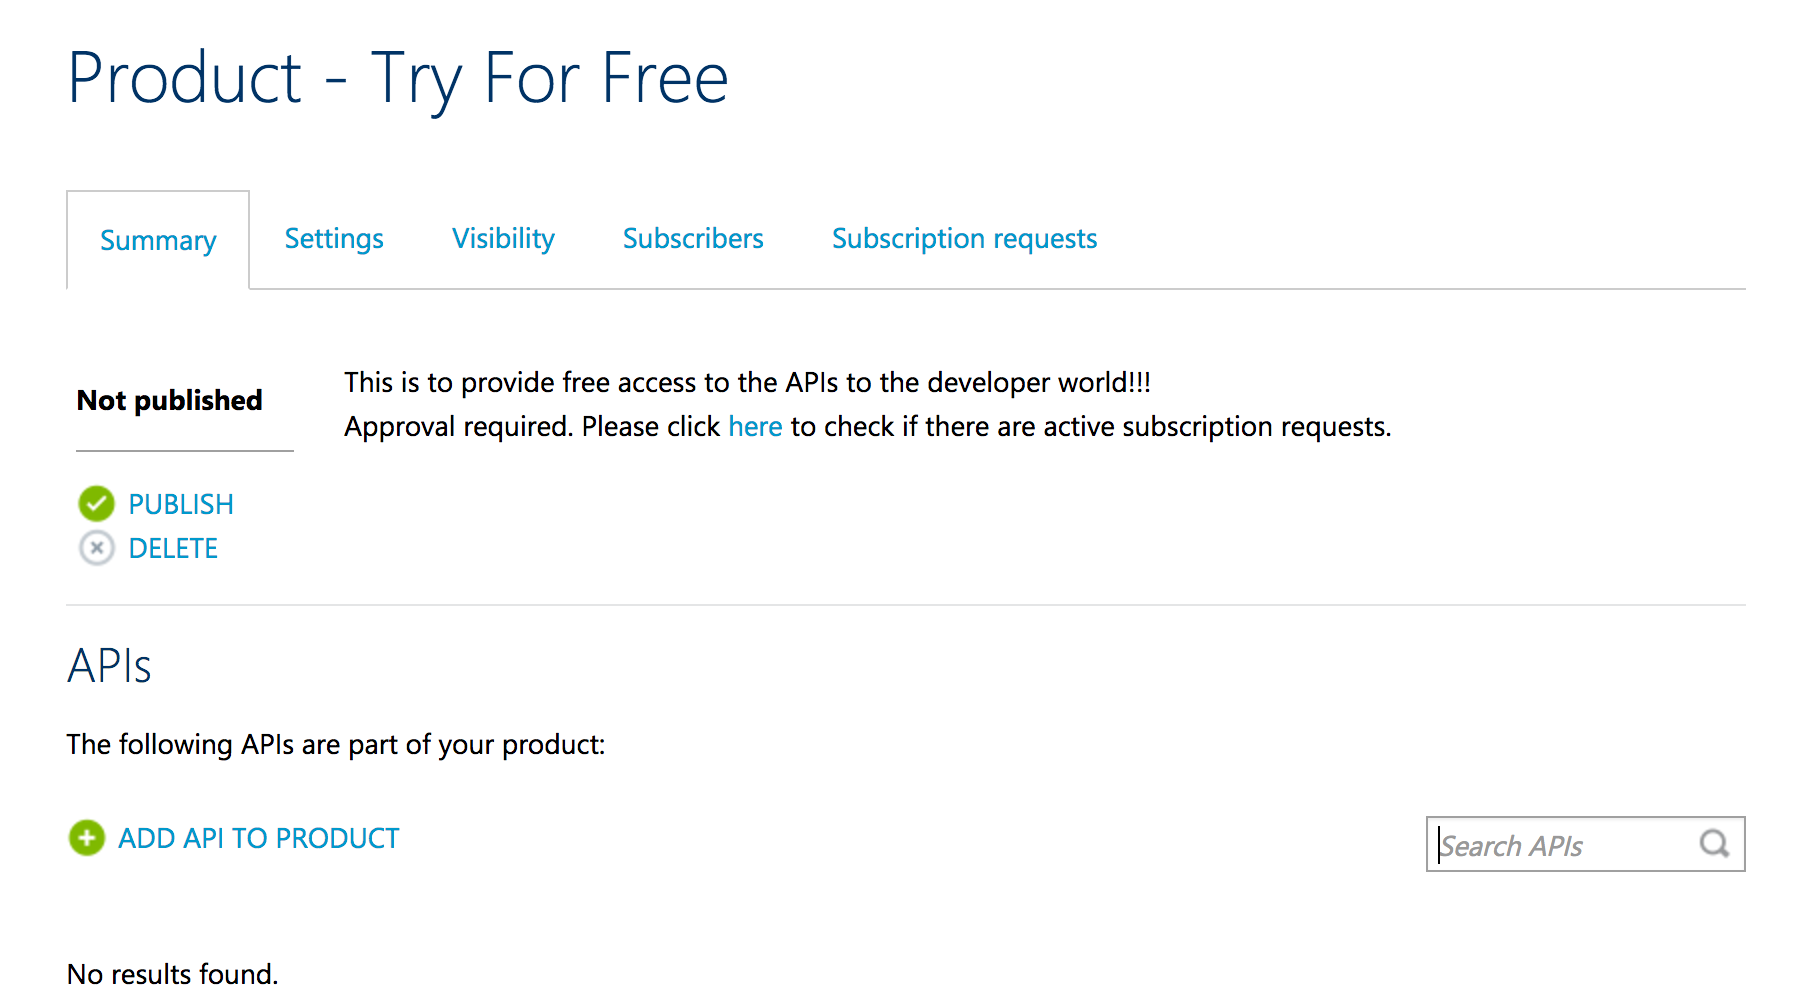
Figure 36 – Summary page
Let us add our API to the Product now. Click “ADD API TO PRODUCT” at the bottom of the Summary Section page. You should see two APIs available to be added. Let us select our AccountsAPI and click “Save” button.

Figure 37 – Add APIs to the product
Now AccountsAPI should be displayed in the list of APIs for the Product. You can click “Settings” tab if you need to change any of the settings for subscriptions/approvals for the Product.
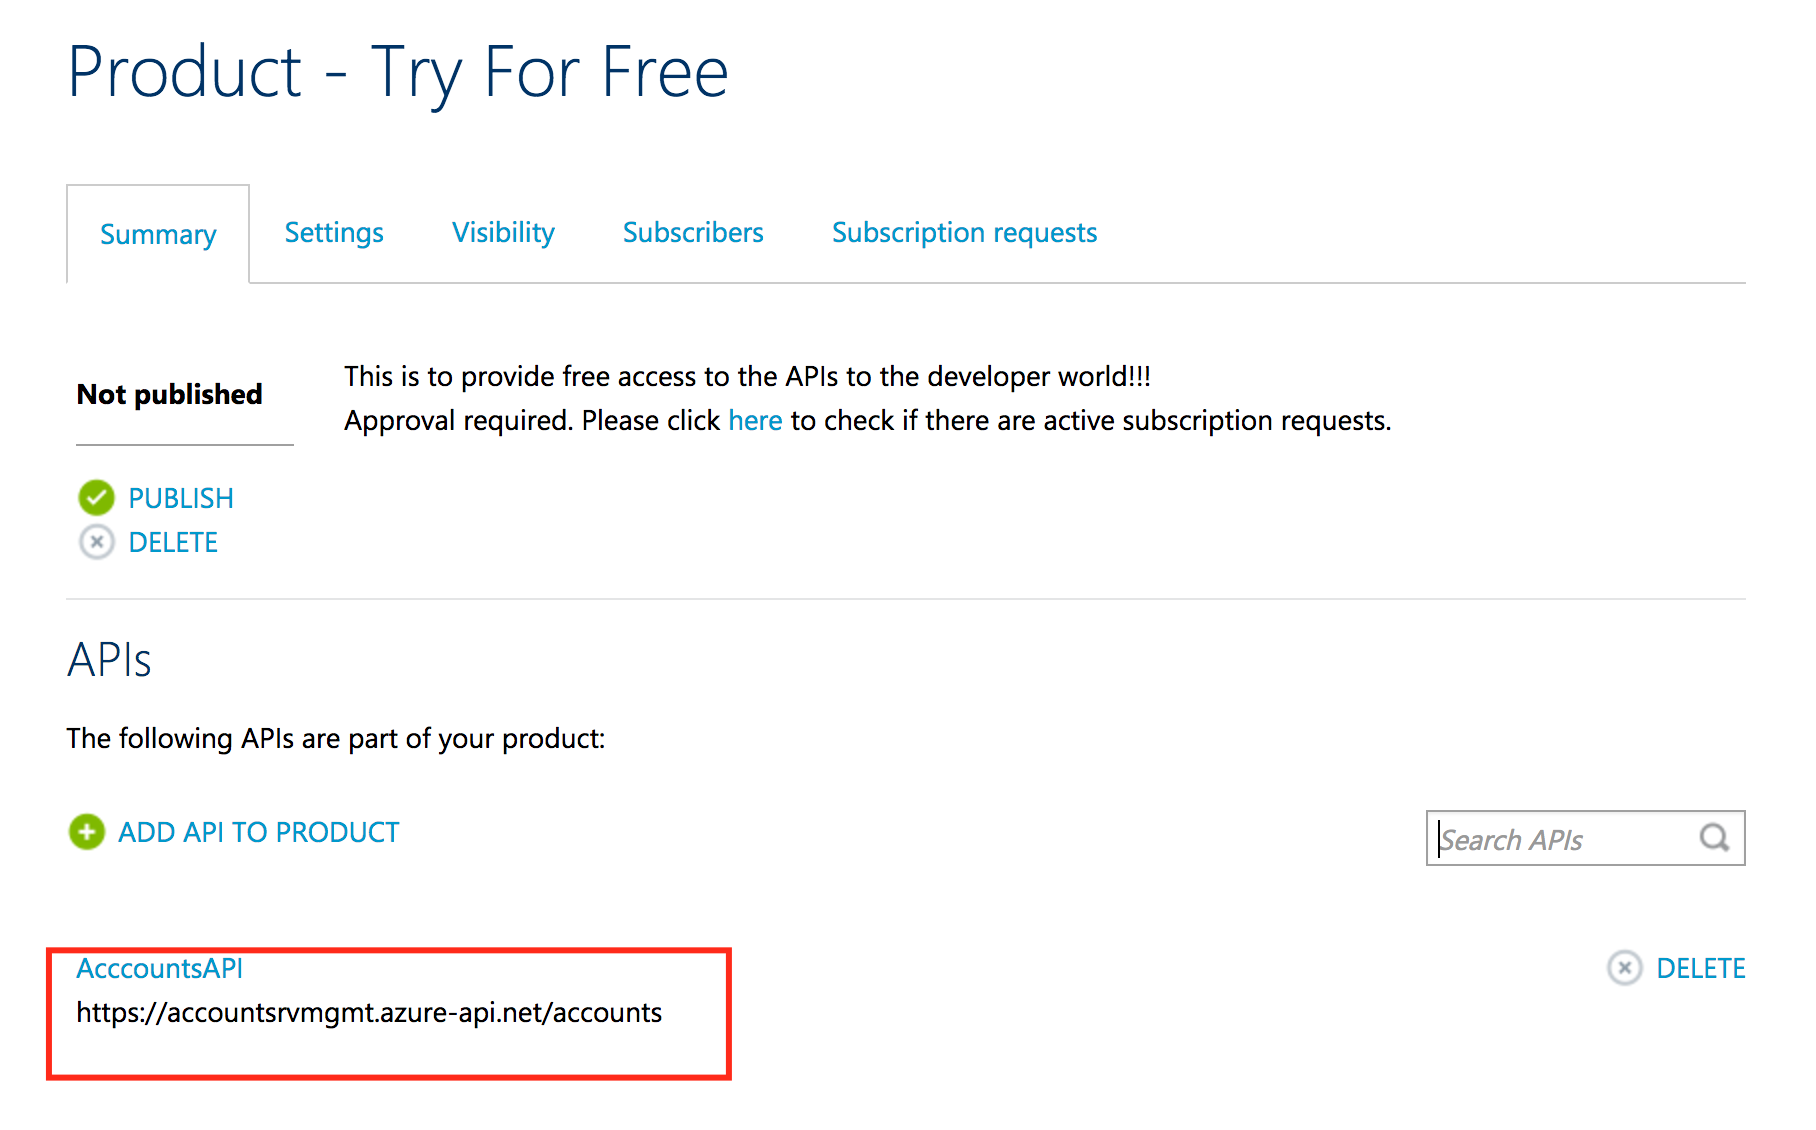
Figure 38 – AccountsAPI added in the Product
Now we need to provide access to the “Developers” group and so go the tab “Visibility” and select the checkbox adjacent to “Developers” and click the “Save” button.
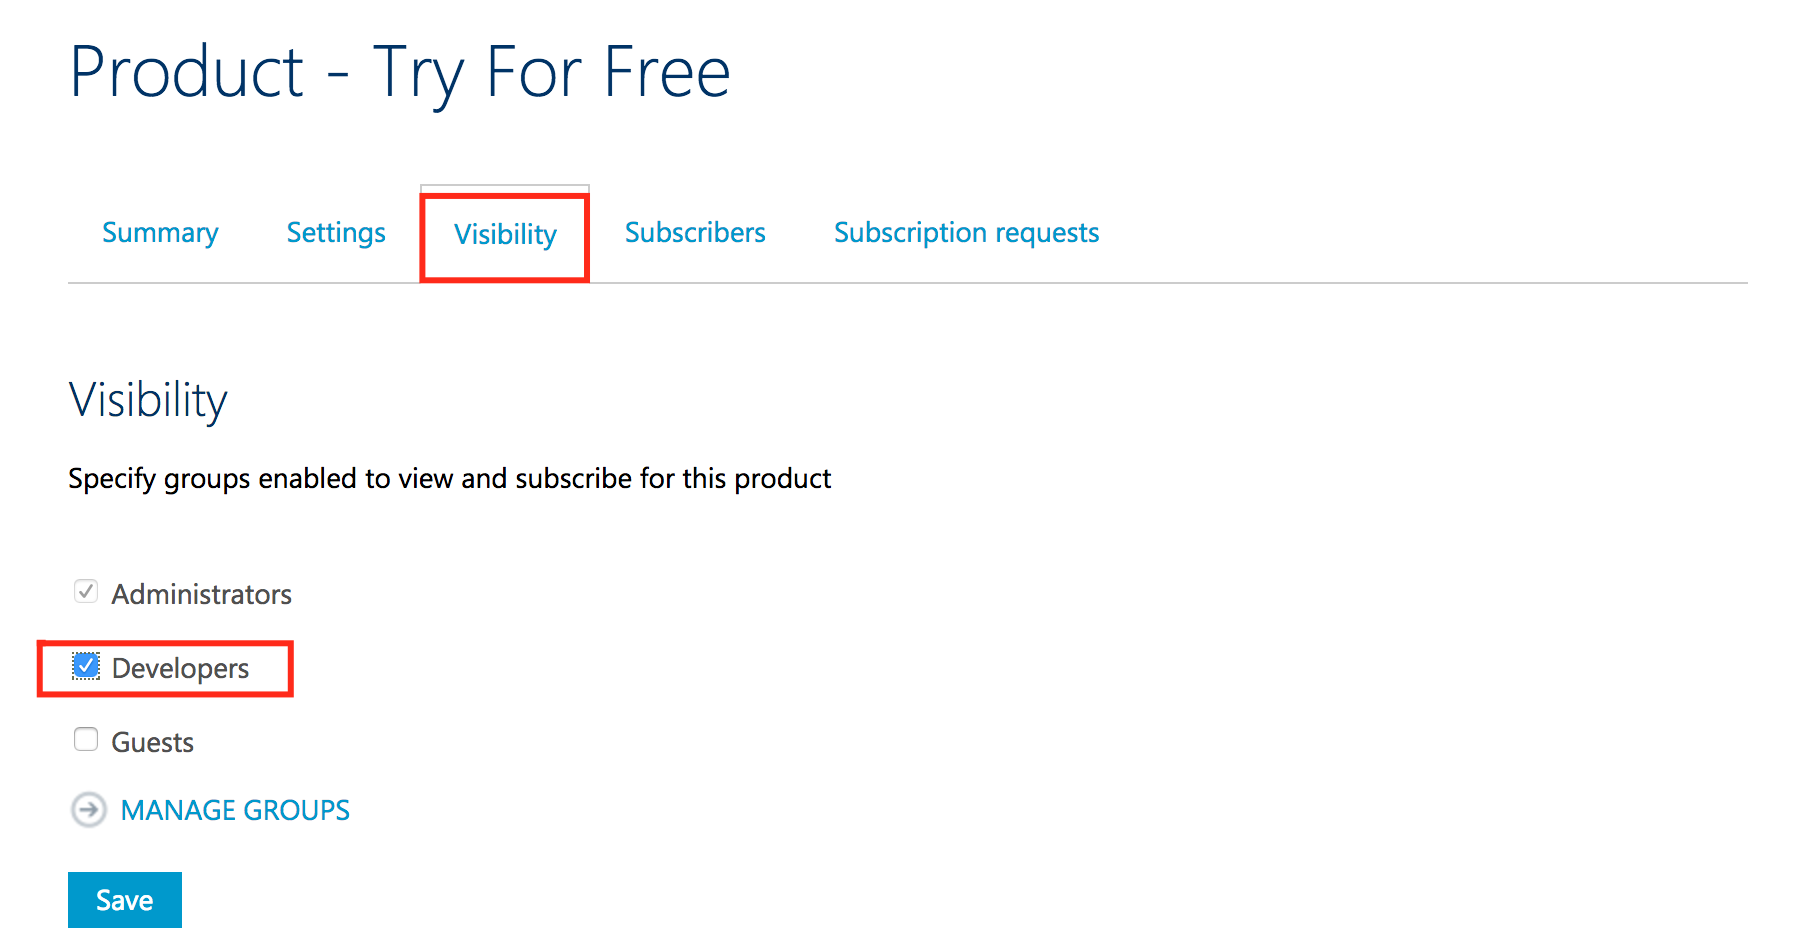
Figure 39 – Changing the Visibility of the API by adding “Developers” group as a part of it.
Now the final step is to publish the product and so go back to Summary tab and click the “PUBLISH” button.
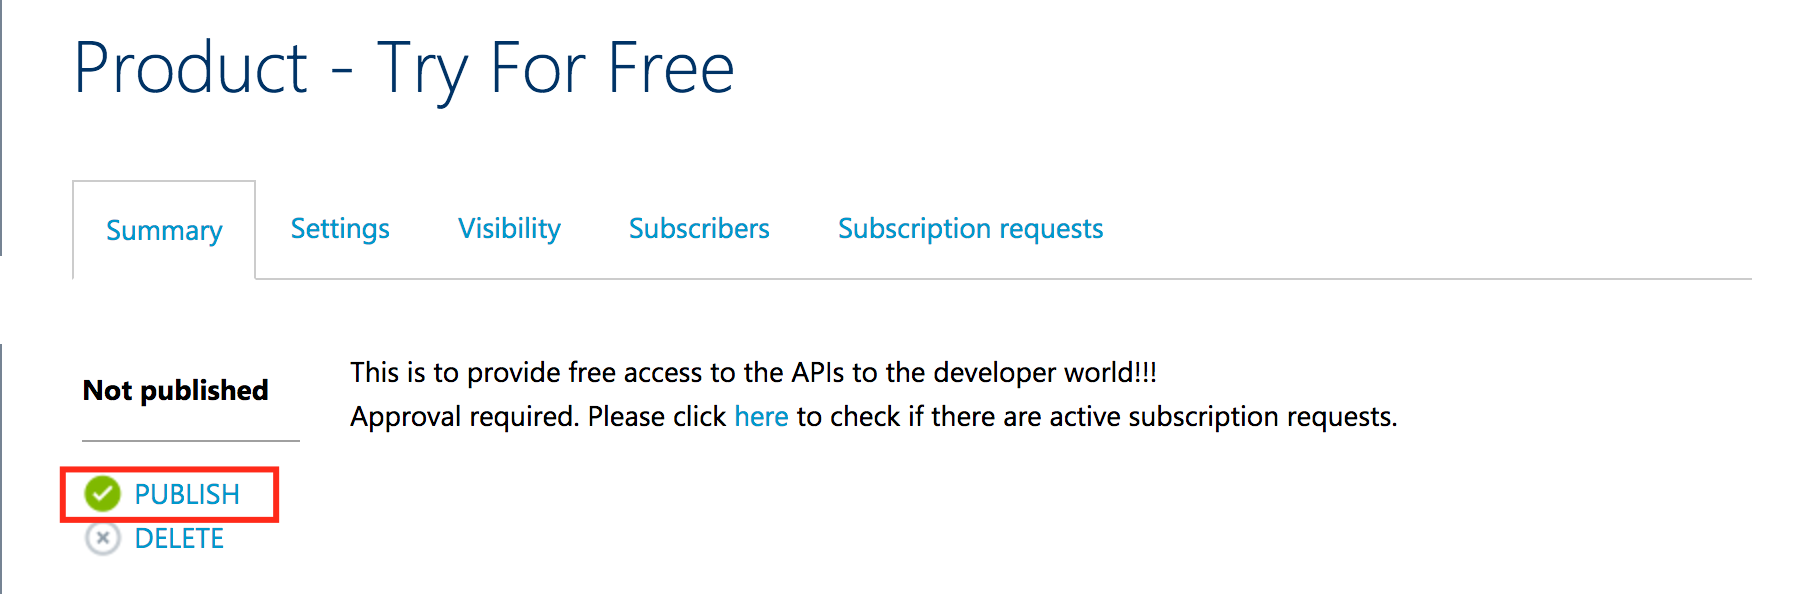
Figure 40 – PUBLISH button
A confirmation window will appear for us to confirm and click on the button “Yes, publish it” and now the Product should be published.

Figure 41 – Confirmation window
Now let us access the API using the Developer URL https://accountsrvmgmt.portal.azure-api.net pretending to be a new developer and it should take you to the home page. But if you click on the “APIs” menu item, AccountsAPI will not be displayed as we did not subscribe to the API.
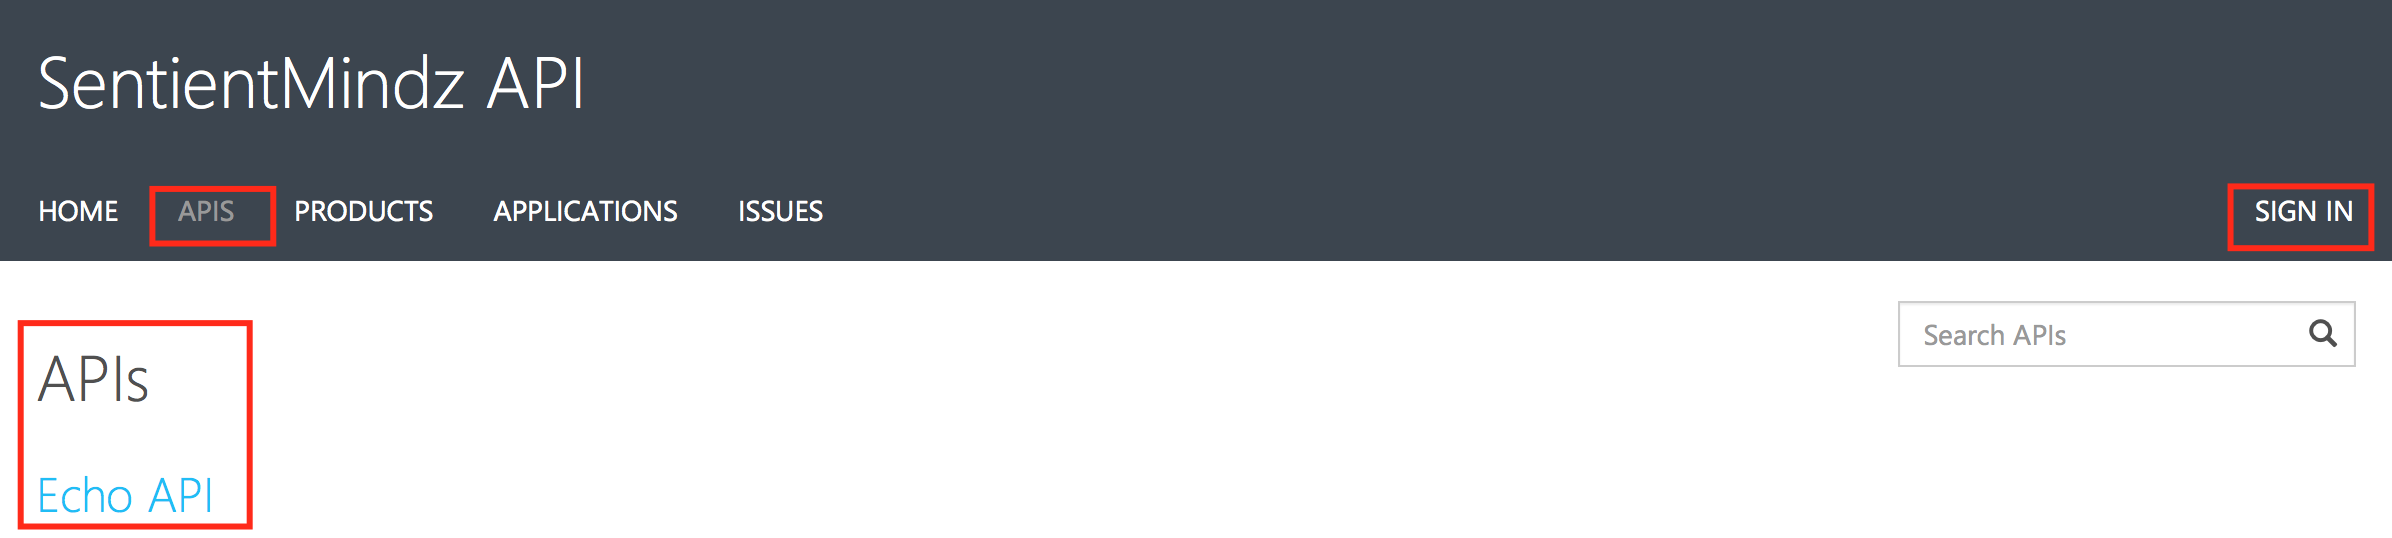
Figure 42- APIs page
Now click on the “SIGN IN” page in order to create an account first and sign up as a new user by filling the form with your personal valid email id so that you get a verification email.
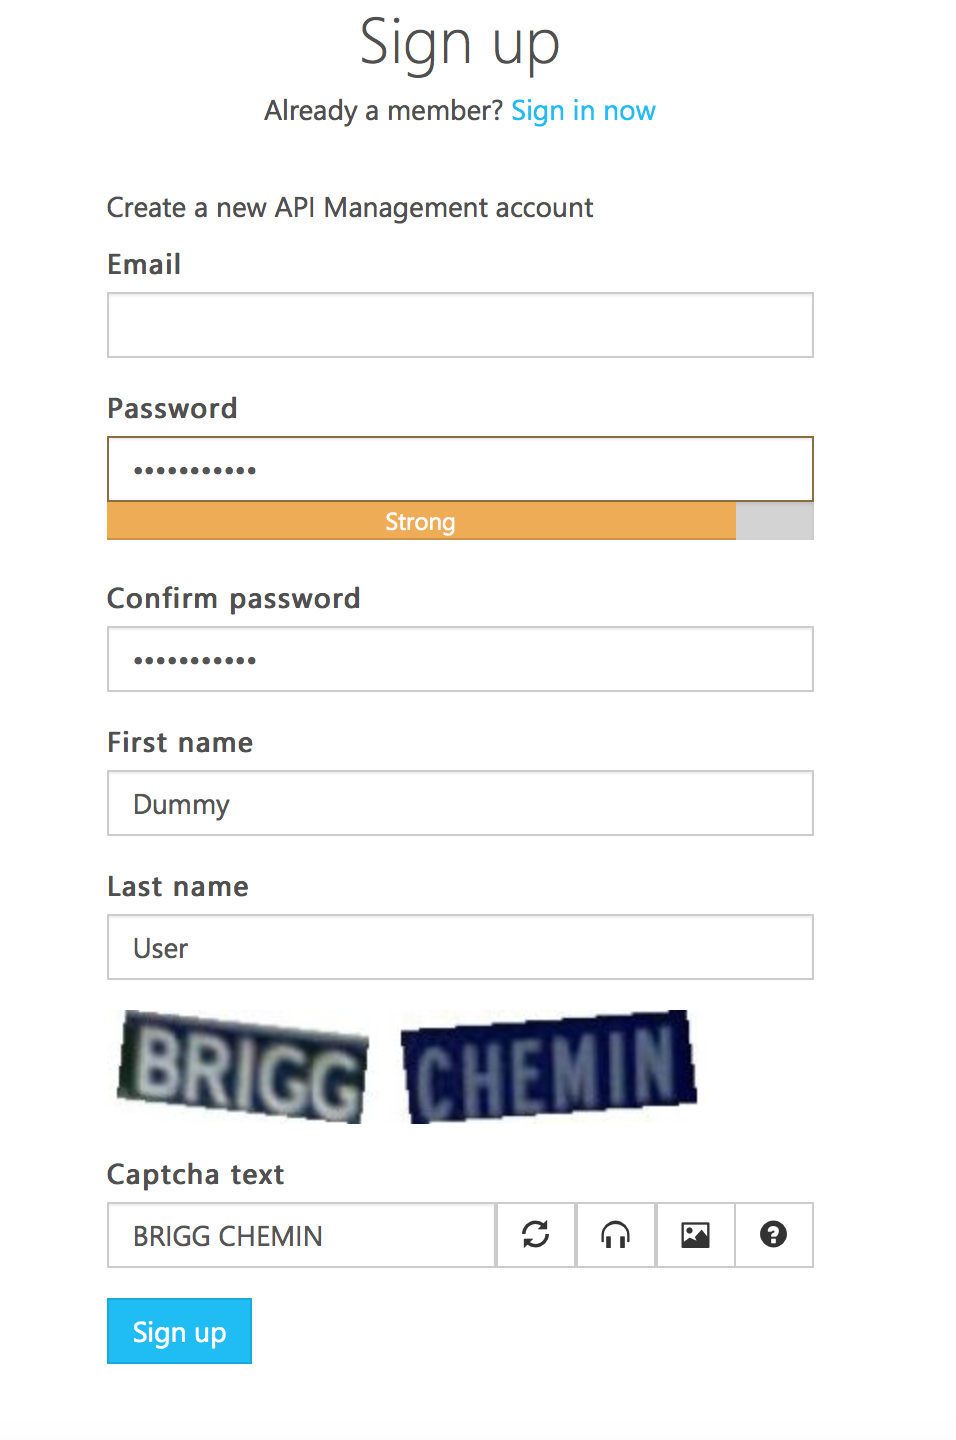
Figure 43 – Sign Up form
You should see a confirmation page asking you to activate your account.
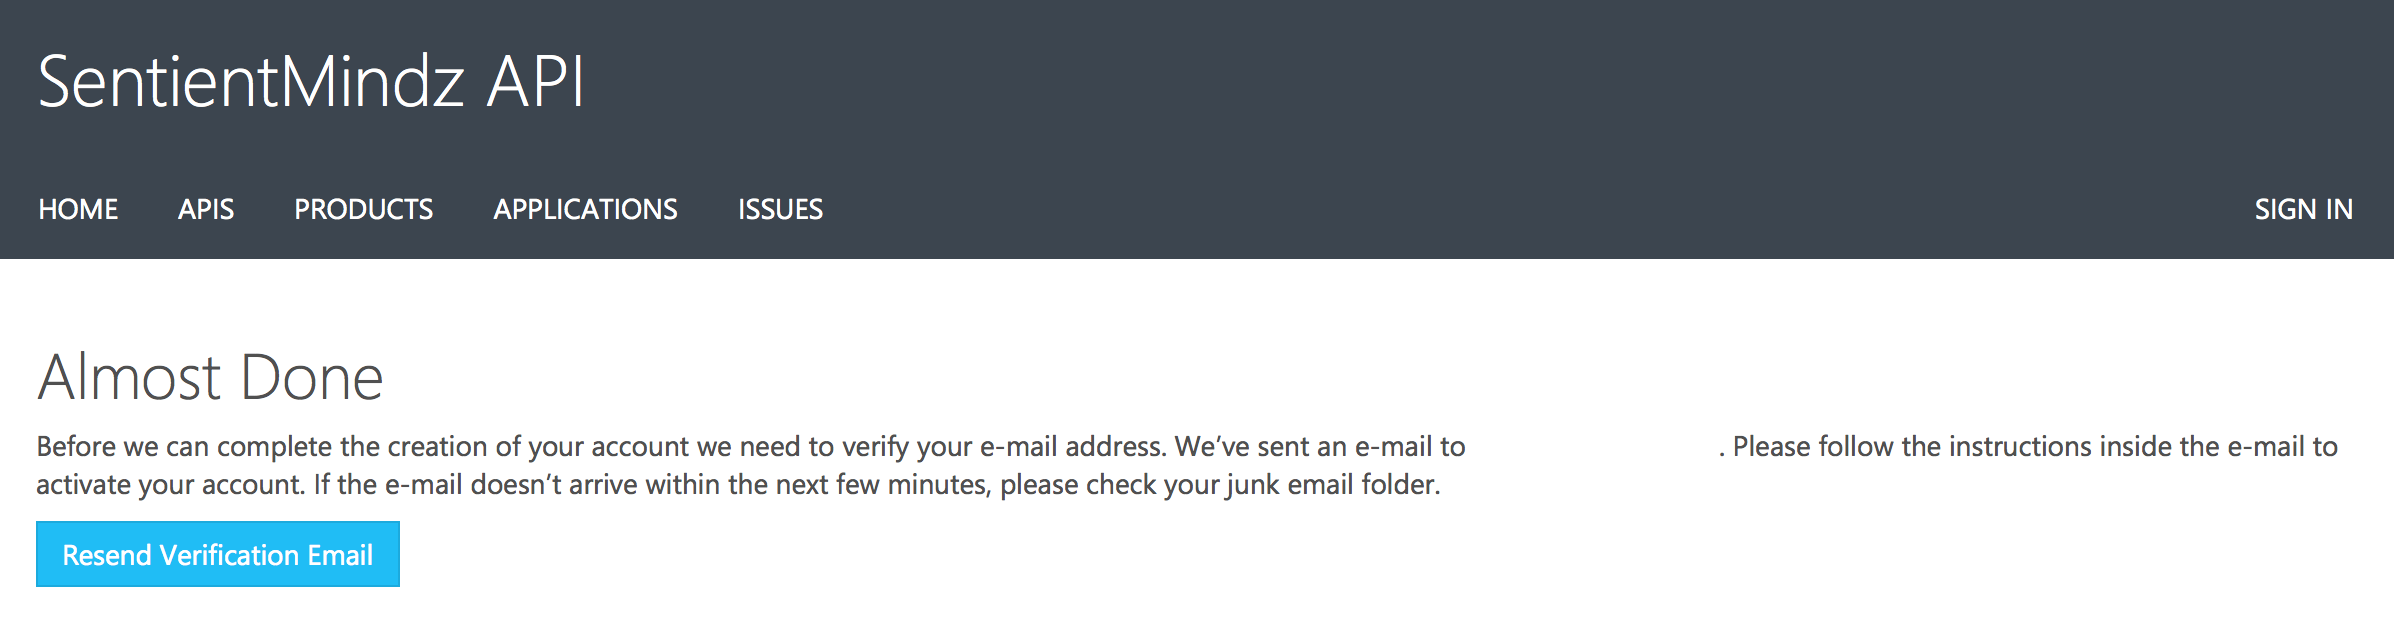
Figure 44 – Confirmation page
Now go to the open email client of the registered email and you should see an email from API management as below:
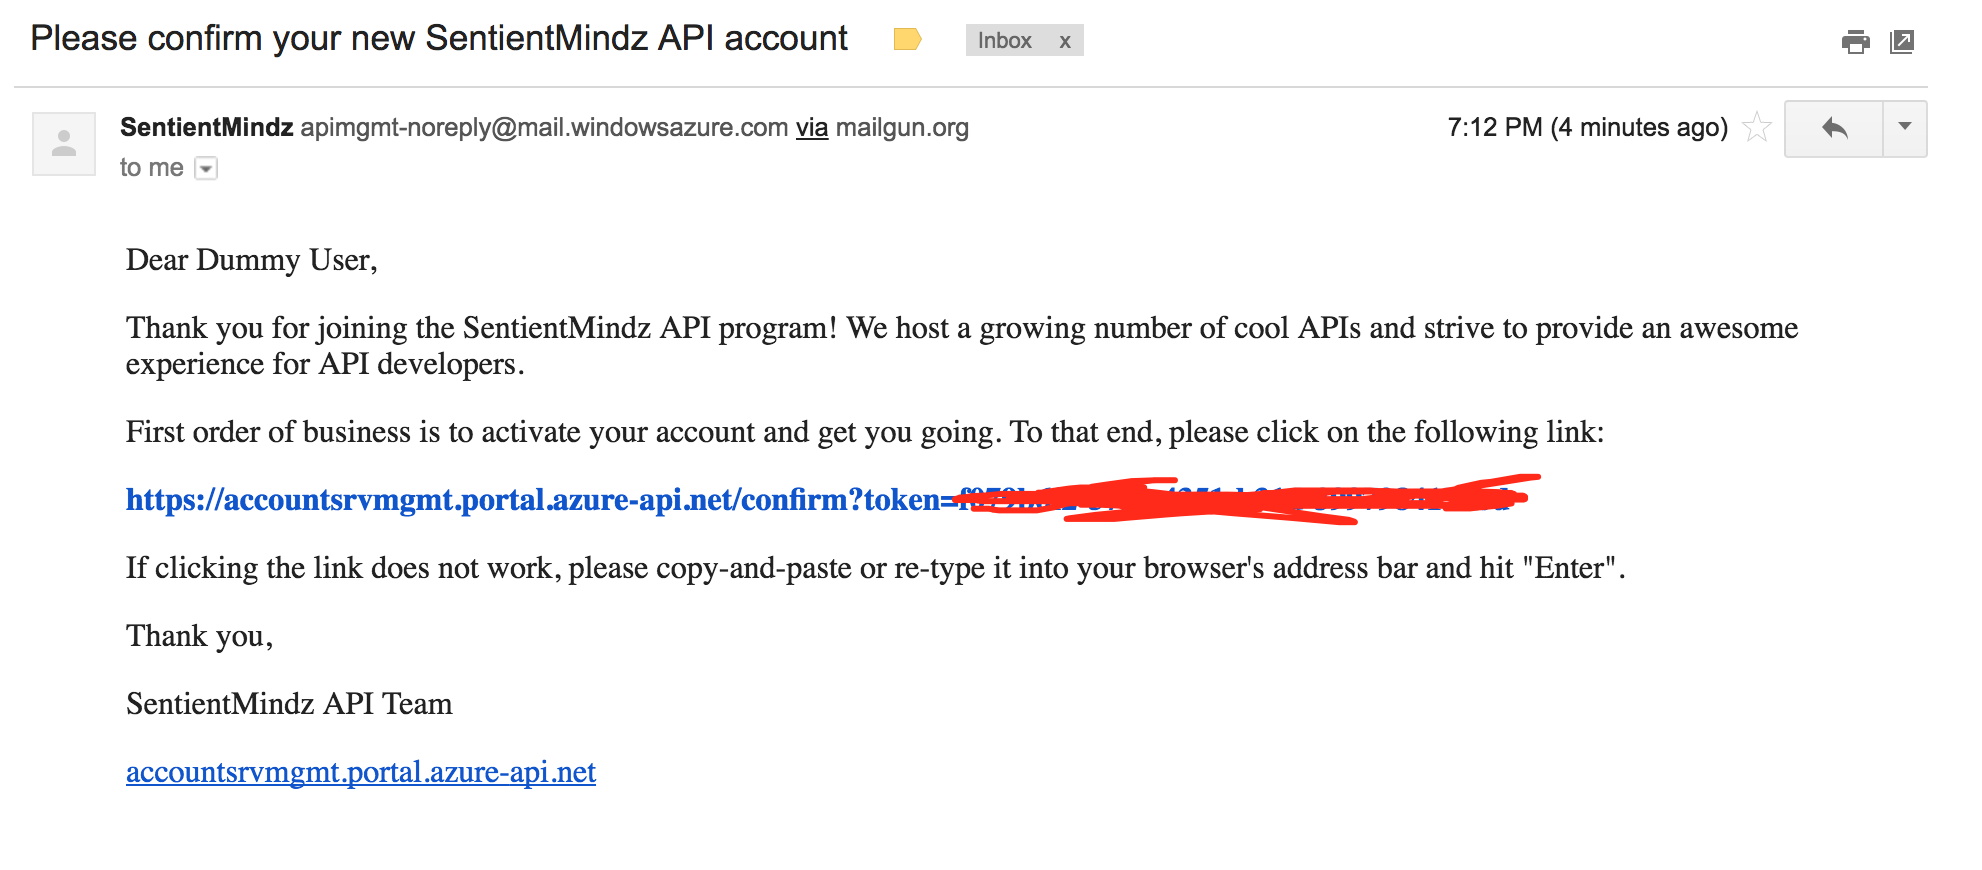
Figure 45 – Email
Now click on the link provided in the email and activate your account. Now click on the “APIS” menu item and the page displays “ACCOUNTS API”. If you click on the “ACCOUNTS API” link, it should navigate to the AccountsAPI page listing all the operations. Mind you, we did not subscribe yet to try the operations. Let us verify that by clicking the button “Try it” in one of the operation listed.
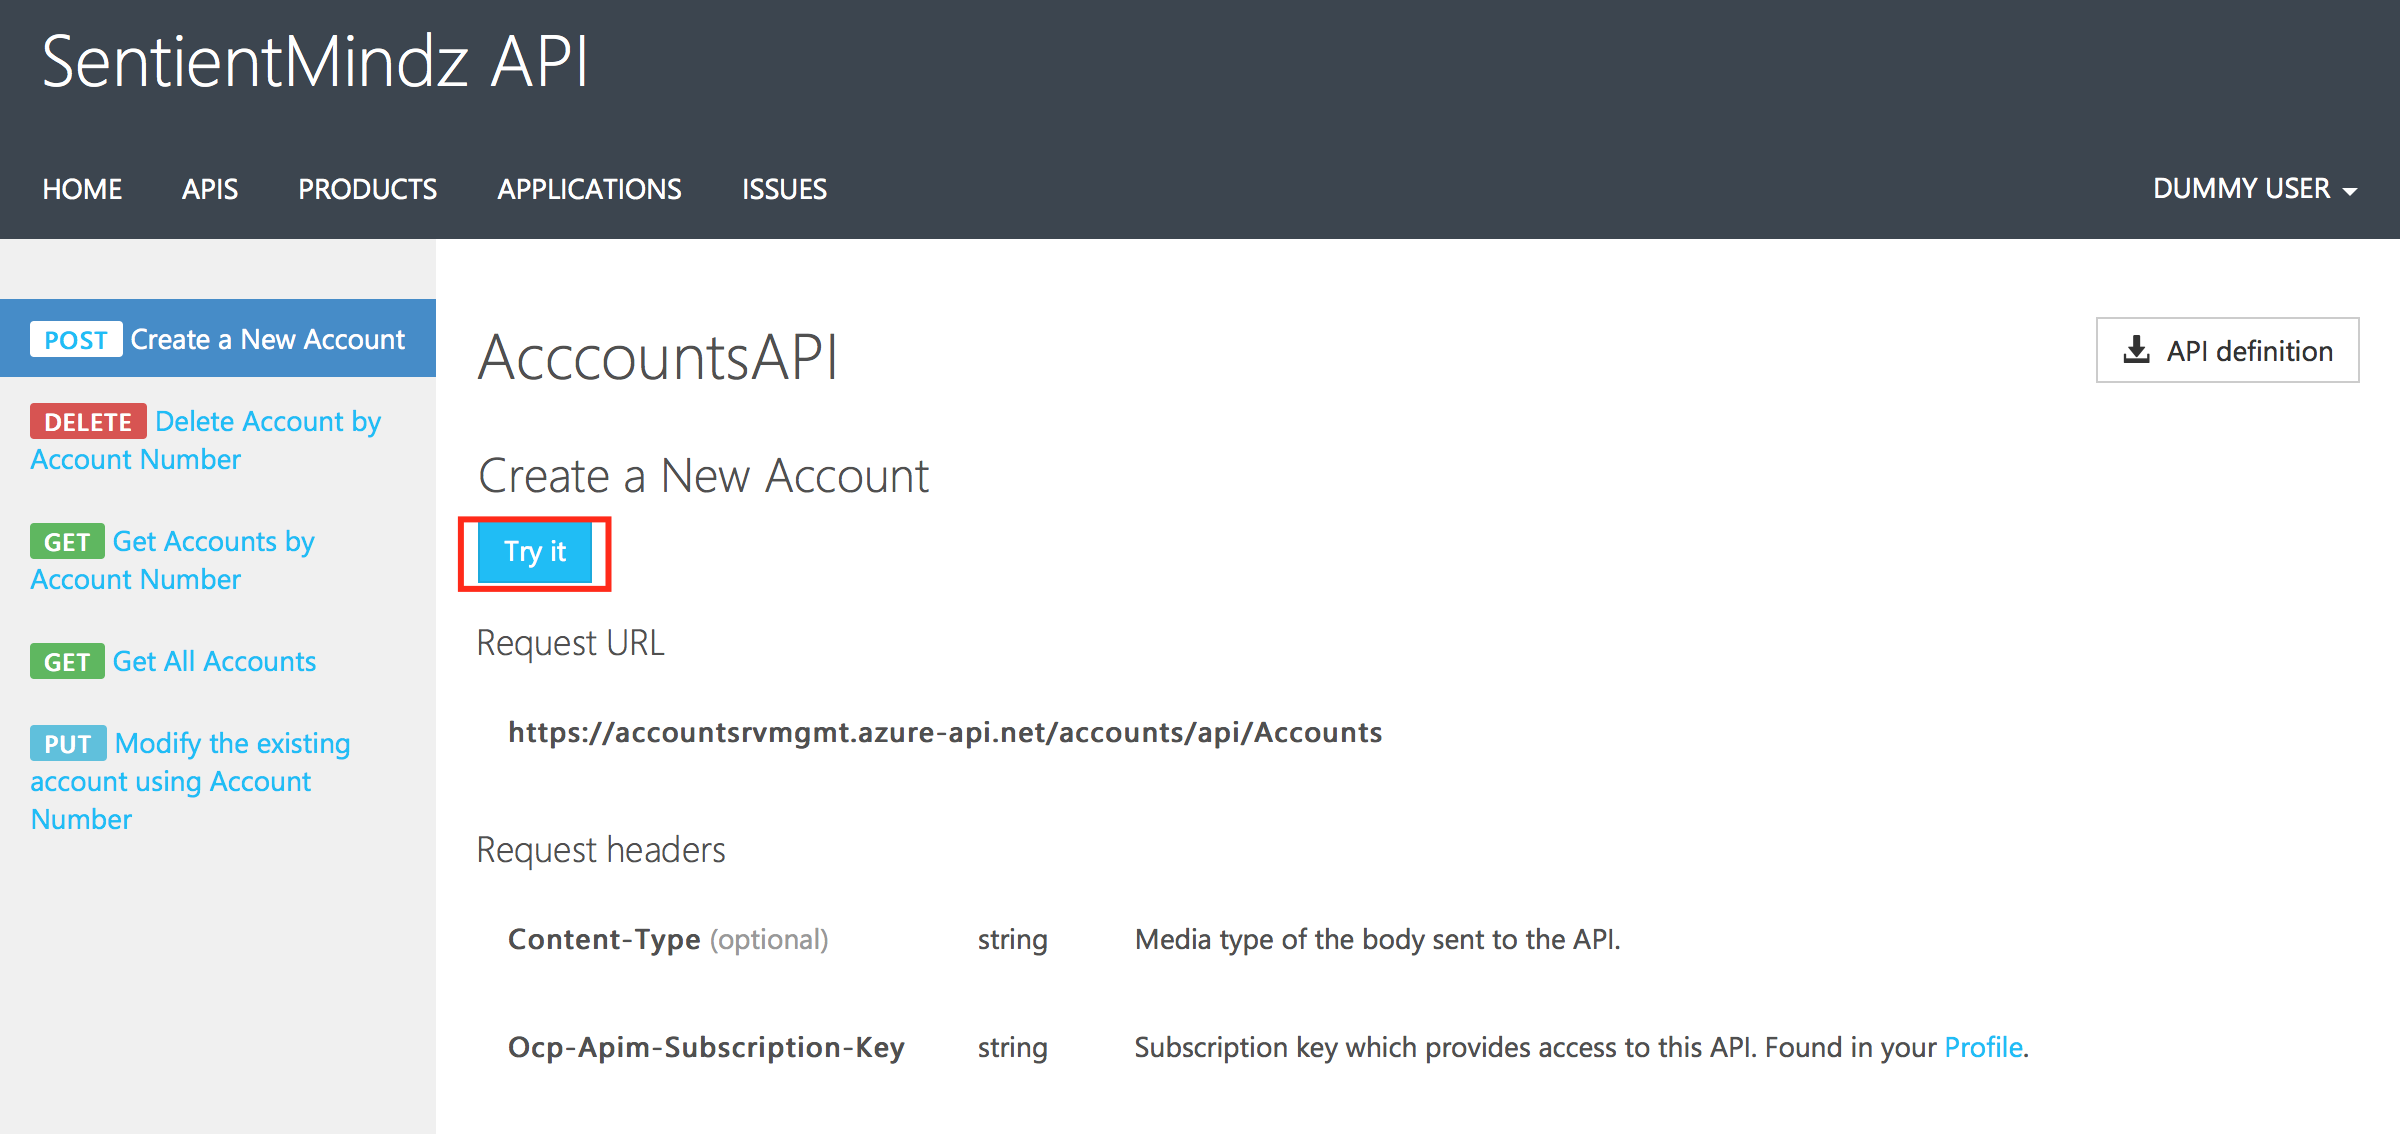
Figure 46 – Try it button in the AccountsAPI page
Now click on the “Try it” button and it displays error saying you are not subscribed and asking to subscribe by going to the Products page and click on the product that has the desired API.

Figure 47 – Error message
Now click the menu item “PRODUCTS” and on the Products page click the Product “Try For Free”.
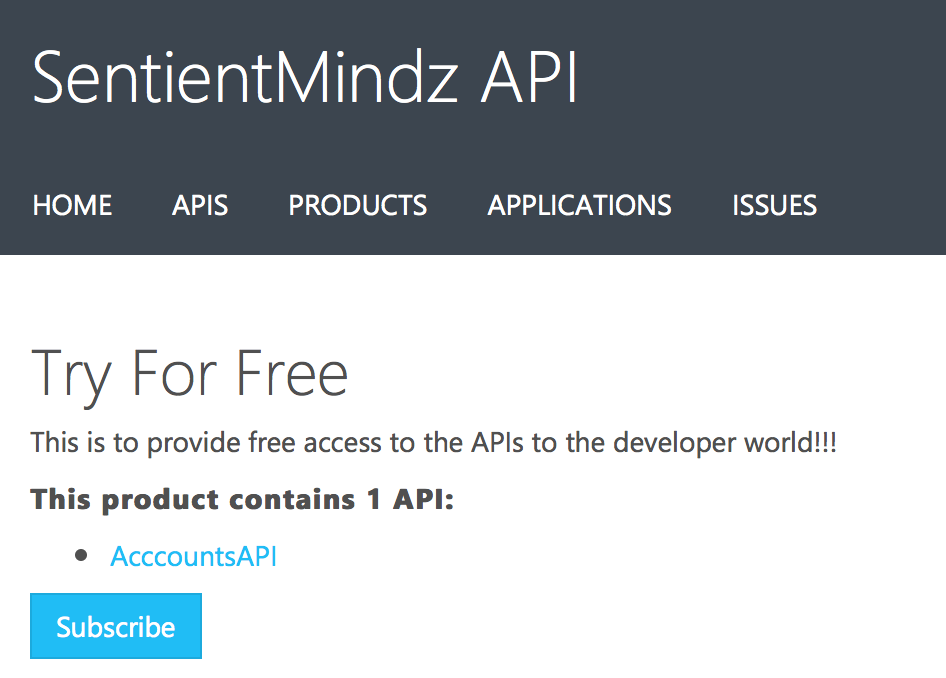
Figure 48 – Subscribe for the Product
Now a confirmation page appears and you are free to change the description of your subscription name and click “Confirm” button. In my case, I have changed the description to “My Free Subscription”.
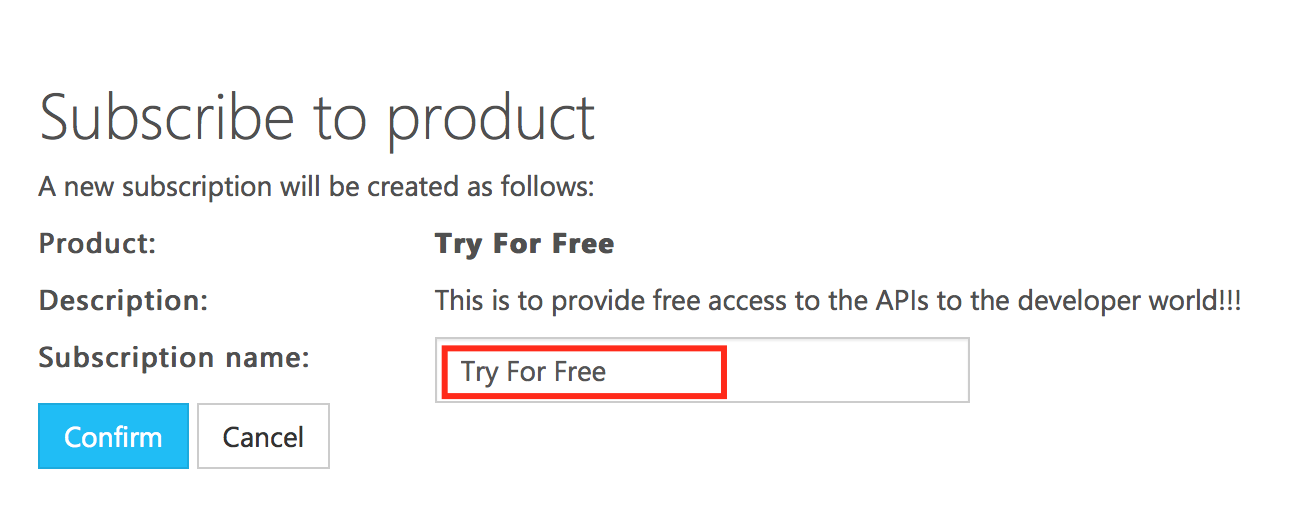
Figure 49 – Confirm Subscription
Now it will take you to your Profile page and you should see a message saying that you will be notified once the request is approved. Since, we have set the Product “Try For Free” needs approval not the request needs to be approved. You can test if you can “Try it” option on the API operations page and you should see the same error message that you are not subscribed yet to the Product.
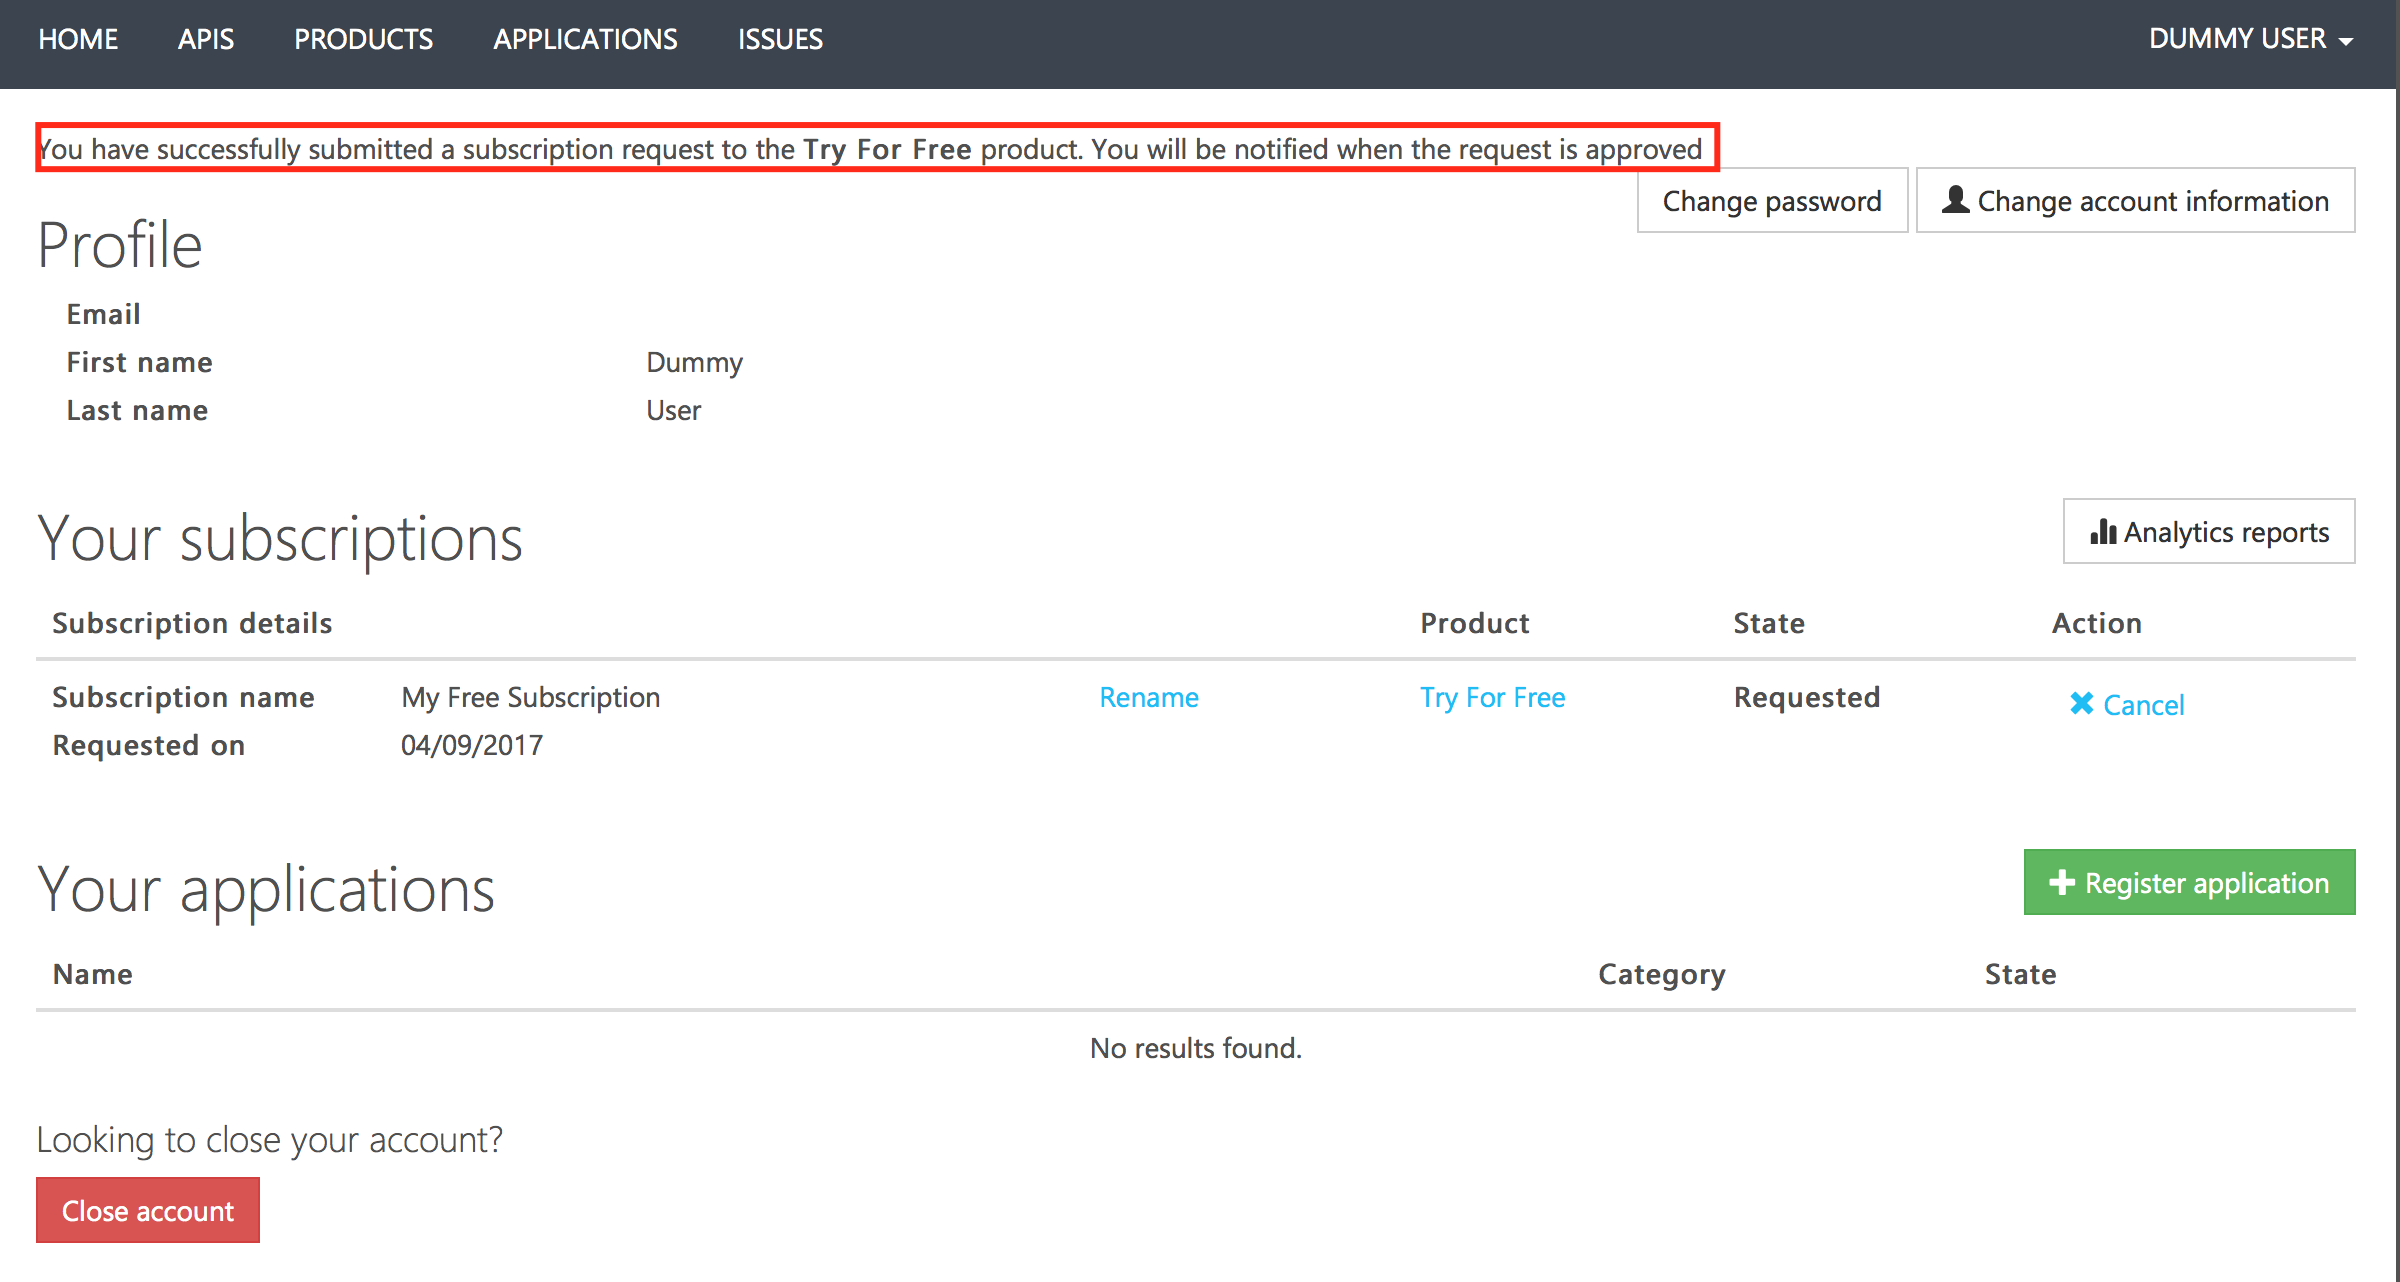
Figure 50 – Profile page
Now go back to the API Management in the Azure Portal and select Product “Try For Free” and go to tab “Subscription Requests” and you should see the request sent by the “DUMMY USER”.
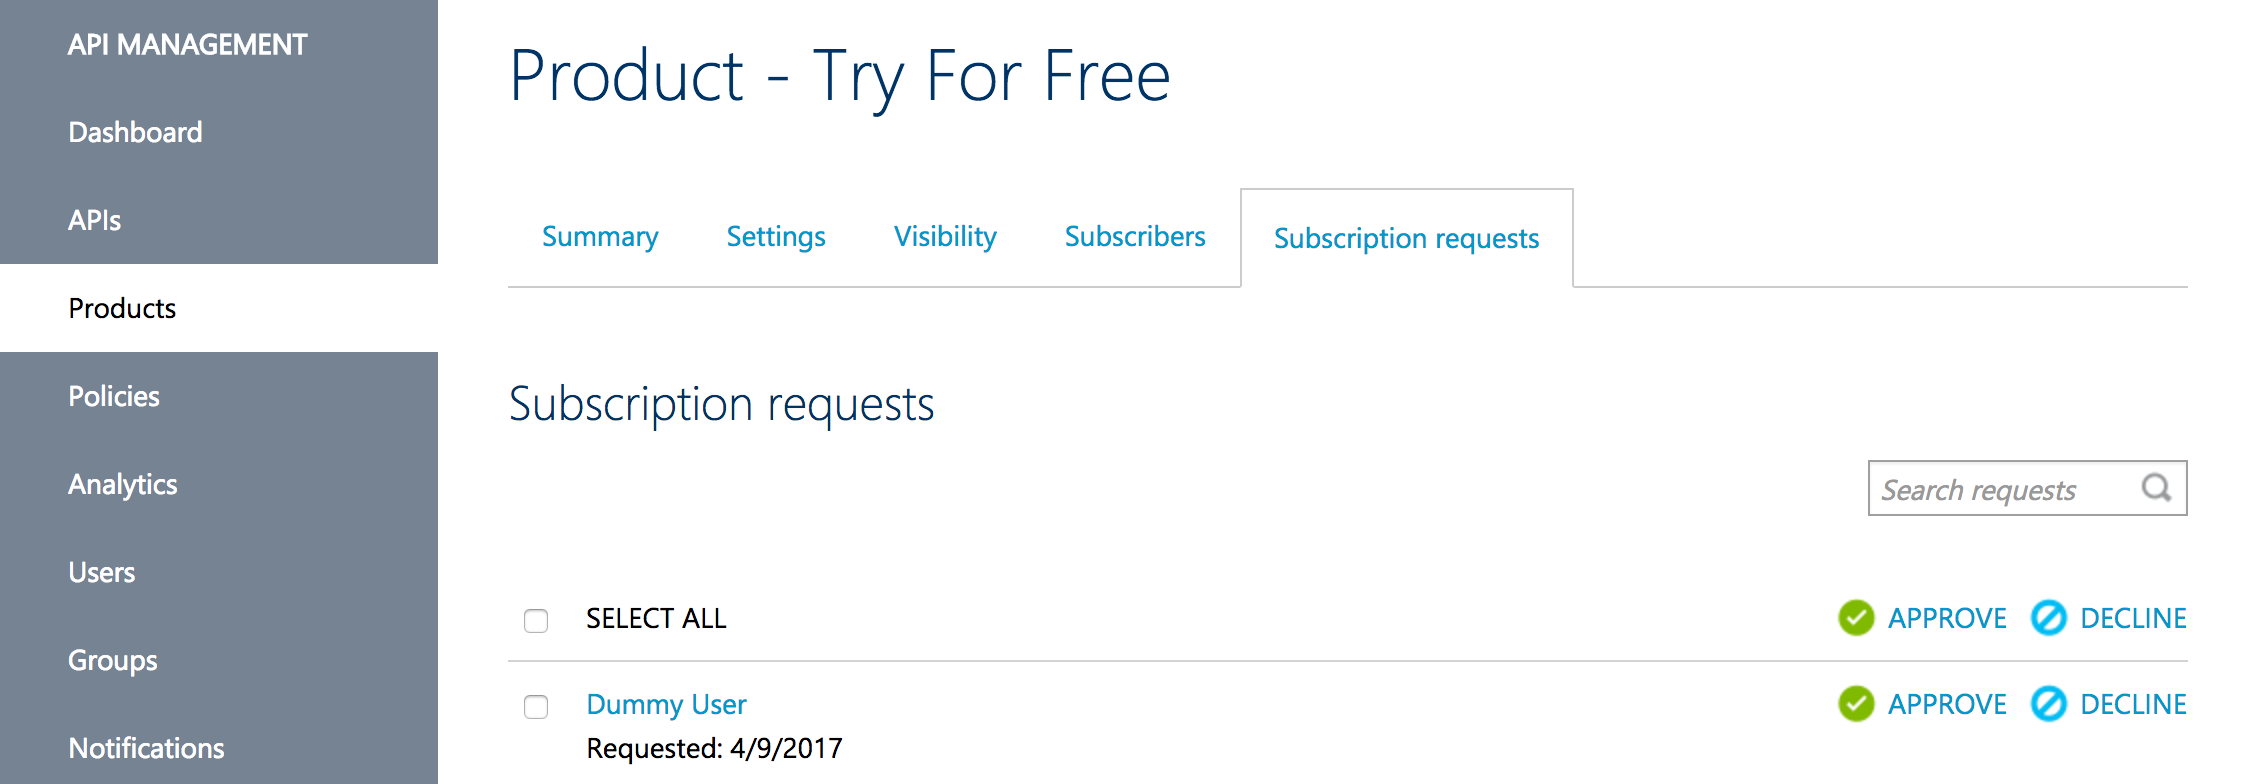
Figure 51 – Subscription requests page
You can approve the subscription by either clicking the “APPROVE” button across the listed user name or by selecting all the users on selecting checkbox “SELECT ALL”, clicking on “APPROVE” to approve all the selected users. Once you approve the request, the user name will disappear from the “Subscription requests” page.
Now browse the developer portal URL and login using the credentials created earlier and go to “PROFILE” by clicking on your user name in the portal and selecting “PROFILE” option. Now you should see your subscription details with state as active and you will be provided with primary key and secondary key.

Figure 52 – Selecting PROFILE
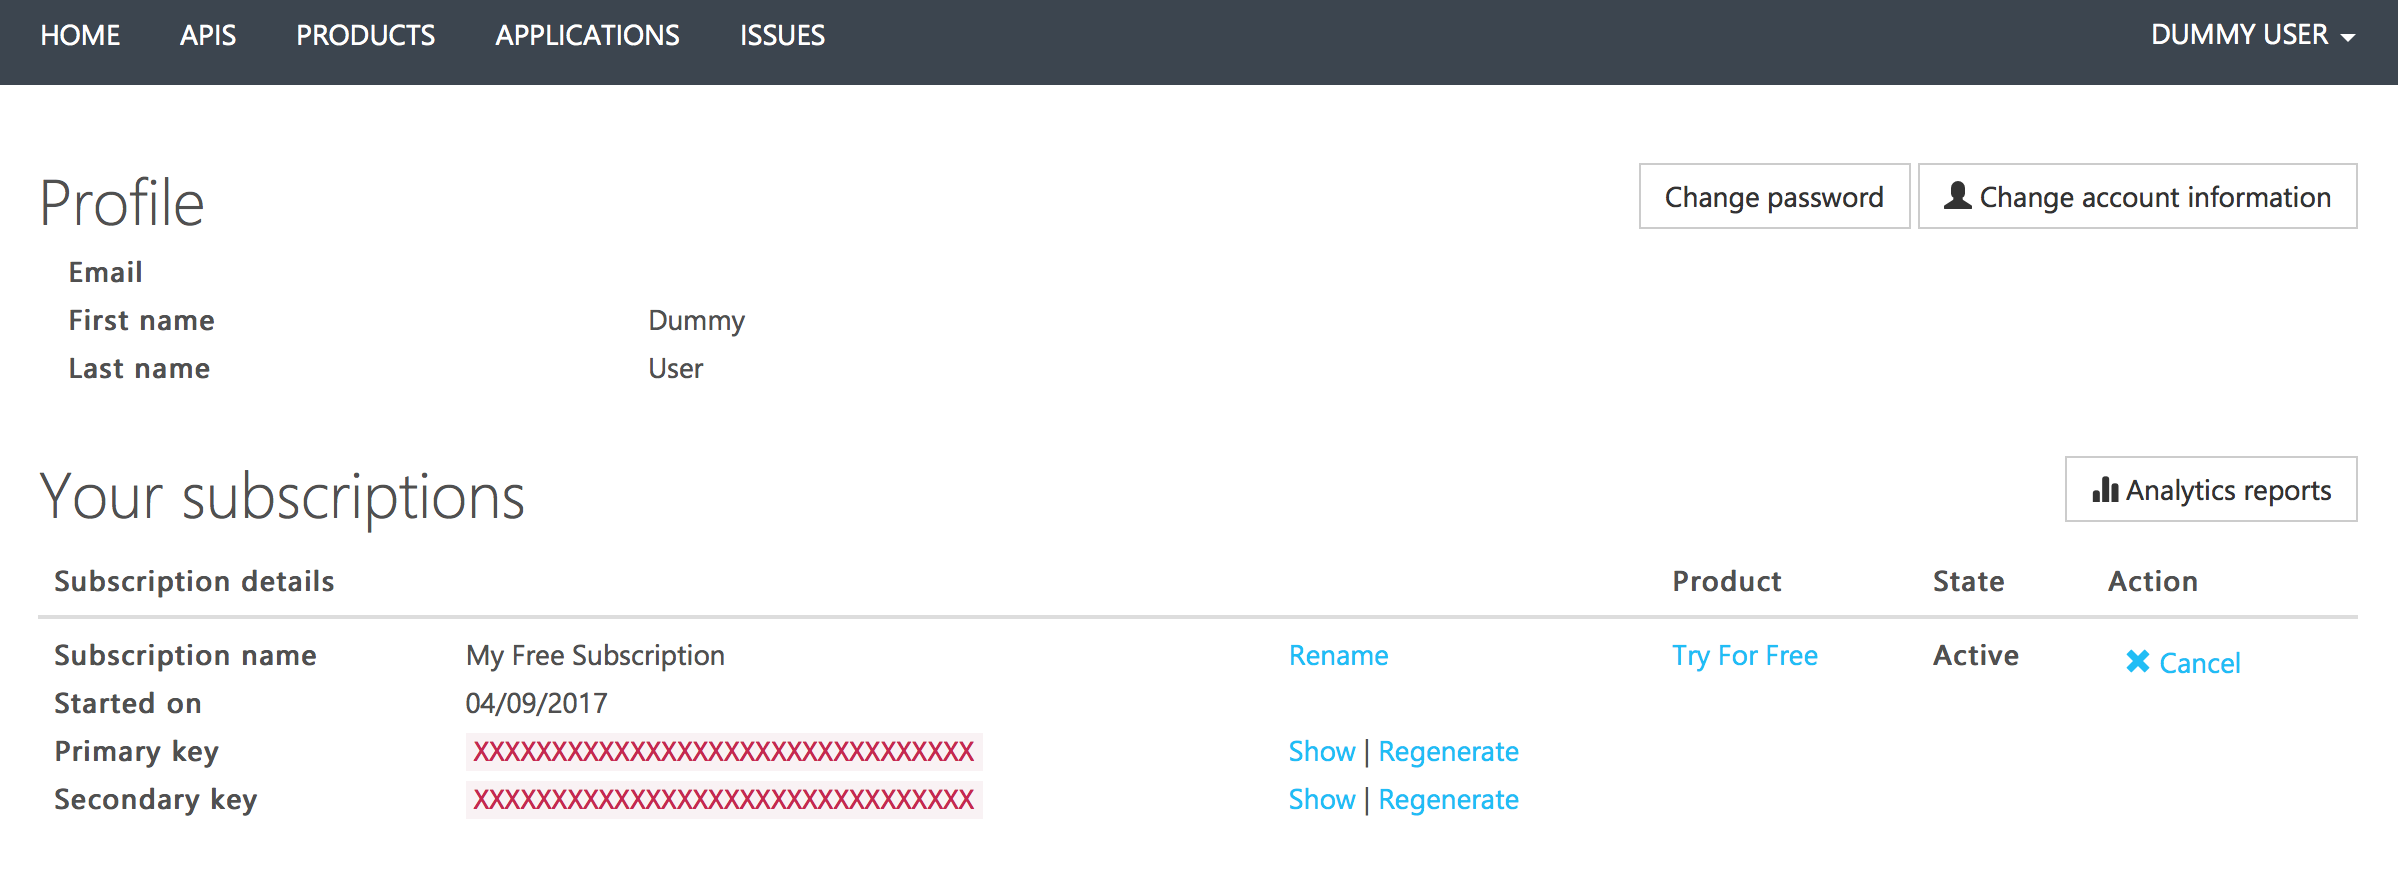
Figure 53 – Subscriptions
Why do we need two subscription keys? This allows for you to share your subscriptions with your colleagues or the client applications by providing the secondary key. You could revoke the access to them by regenerating the secondary key. But you still be able to continue with your subscription primary key while regenerating the secondary key.
Now since the subscription has been approved and now go to “APIS” page and click the “Accounts API” listed in the APIs page. By default, it will open one of the top operations listed for the API and displays the details of the API like:
- Request URL
- Request Headers
- Request body
- Code samples
For example, in my case it has opened operation “Create a New Account” as below:
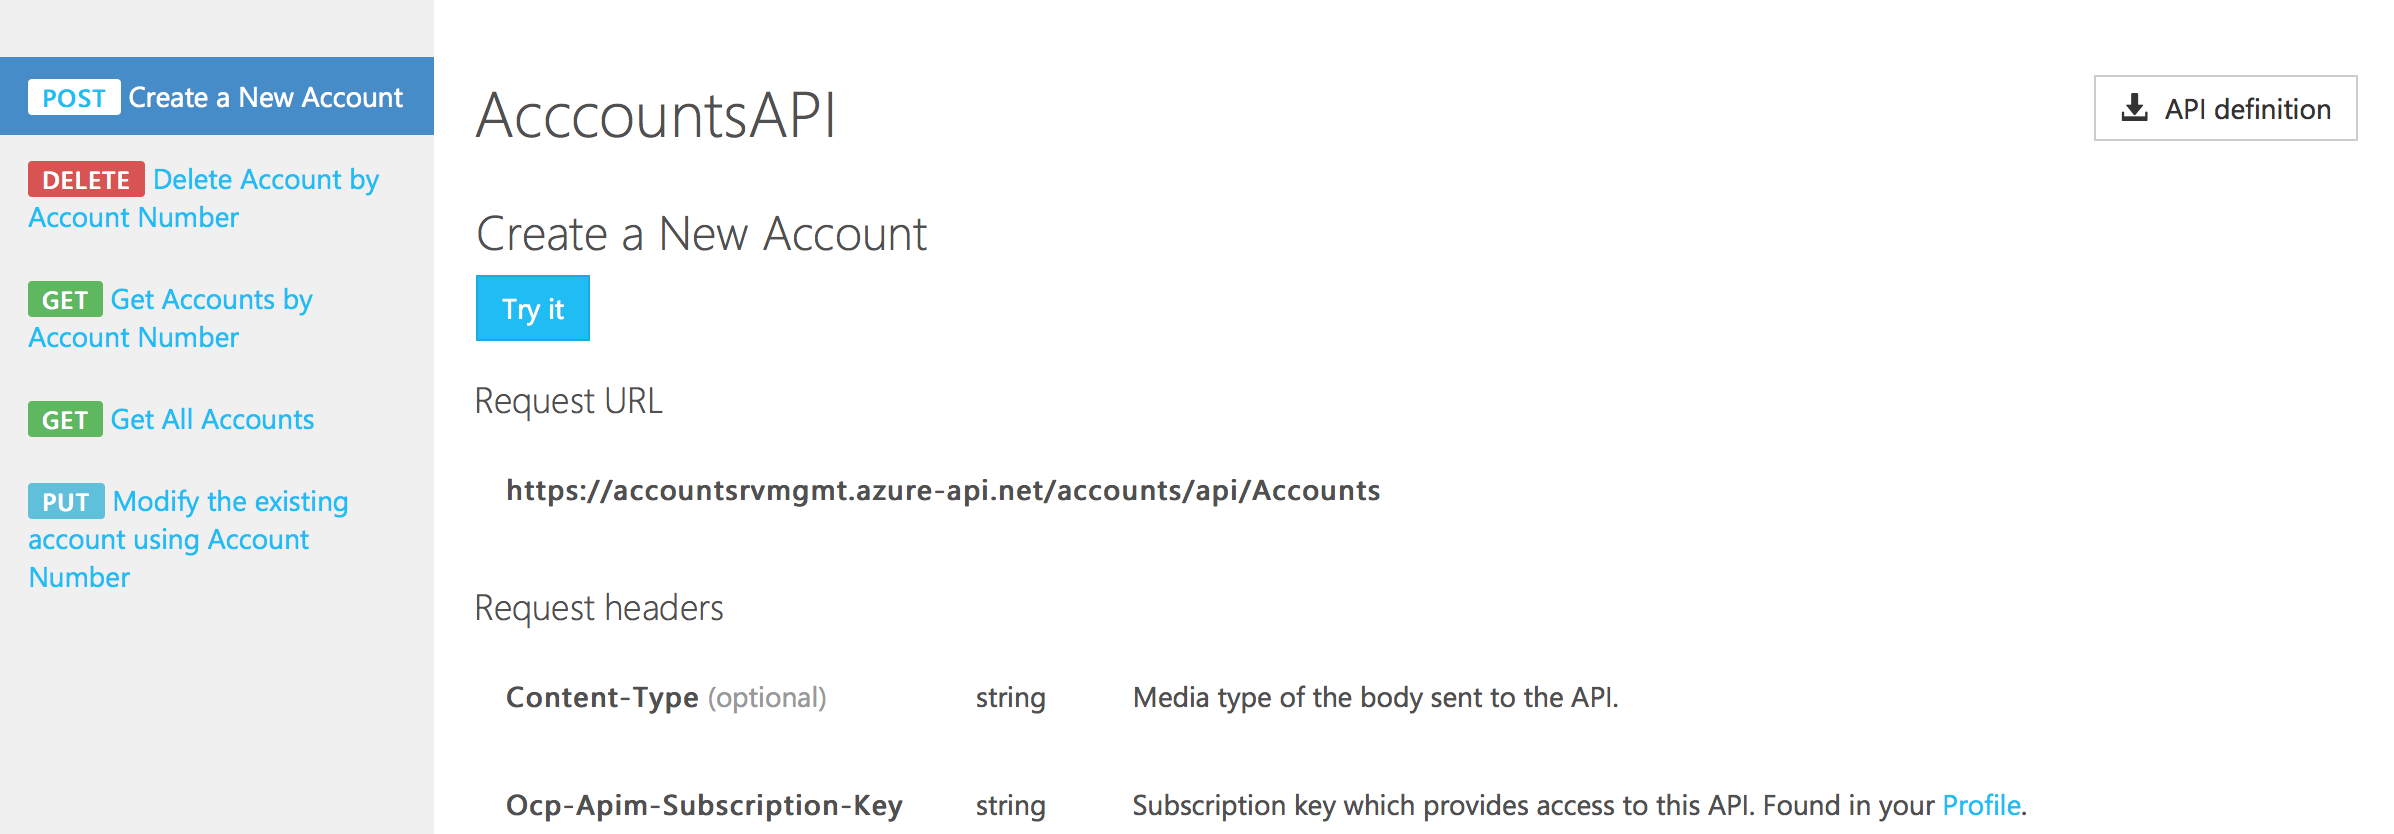
Figure 54 – Create a New Account operation (POST)
Request URL consists of the URL that should be used to perform the operation. Request Headers specifies two parameters: an optional parameter Content-Type to specify the content type and Ocp-Apim-Subscription-Key which is a subscription key provided in the Profile page.
If you have to submit a request you need to provide the subscription key.
Also, if scroll down you should see a request body with an example request and sample response that you have added in your Web API.
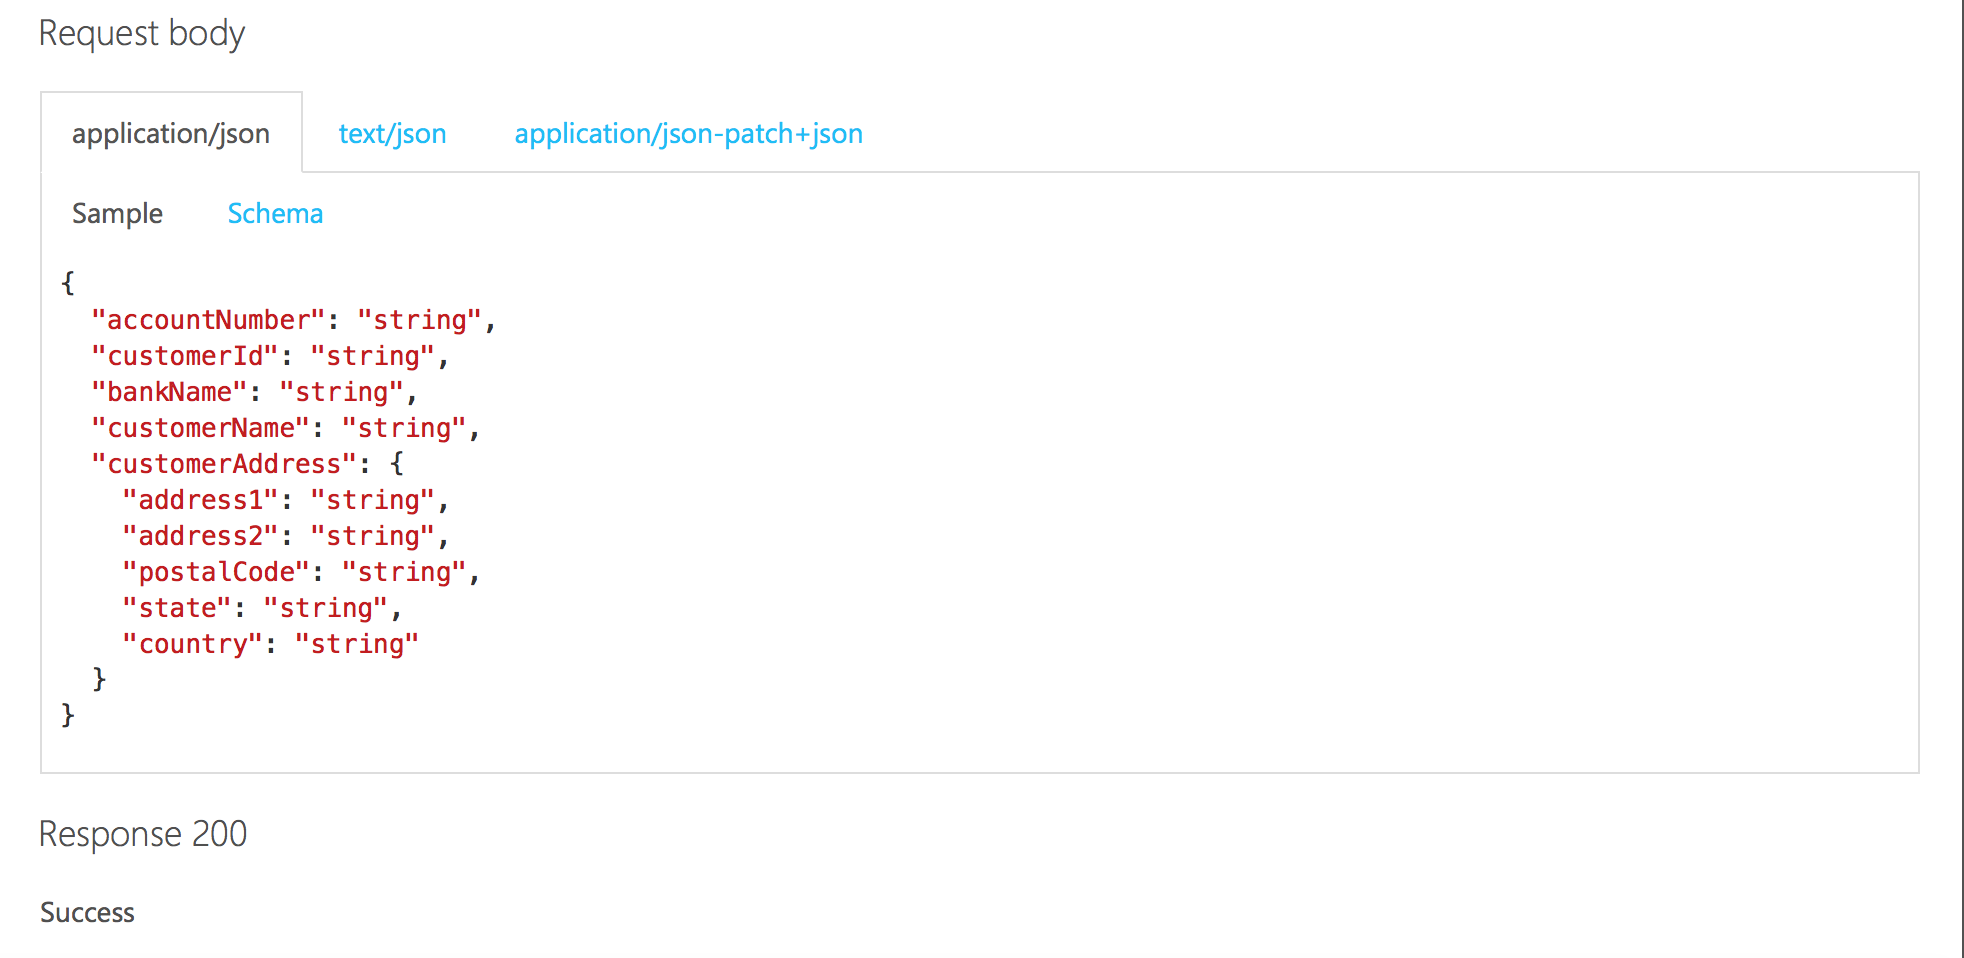
Figure 55 – Request body
And if you scroll little bit down, it will display code samples on how to consume the API. By default, Azure provides code samples in Curl, C#, Java, JavaScript, ObjC, PHP, Python, Ruby.
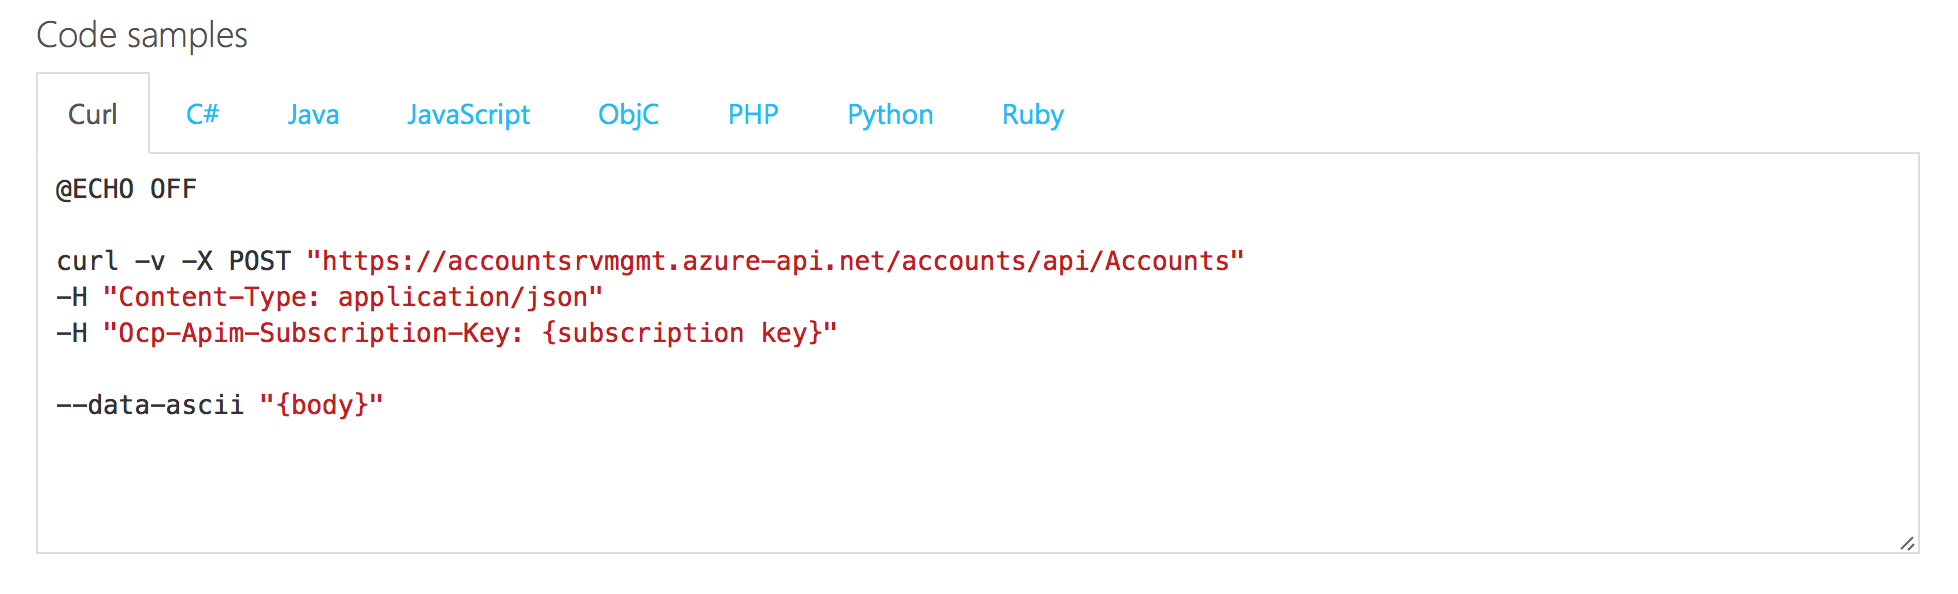
Figure 56 – Code samples
Now click the button “Try It” button on the top of the page and it should populate the headers parameters by default with subscription key as your primary key. You can add additional header parameters to the existing ones too. Also in the Authorization section, it by defaults add a primary subscription key. Now click on the “Send” button available in the bottom of the page. Now it will display the response with status 201.
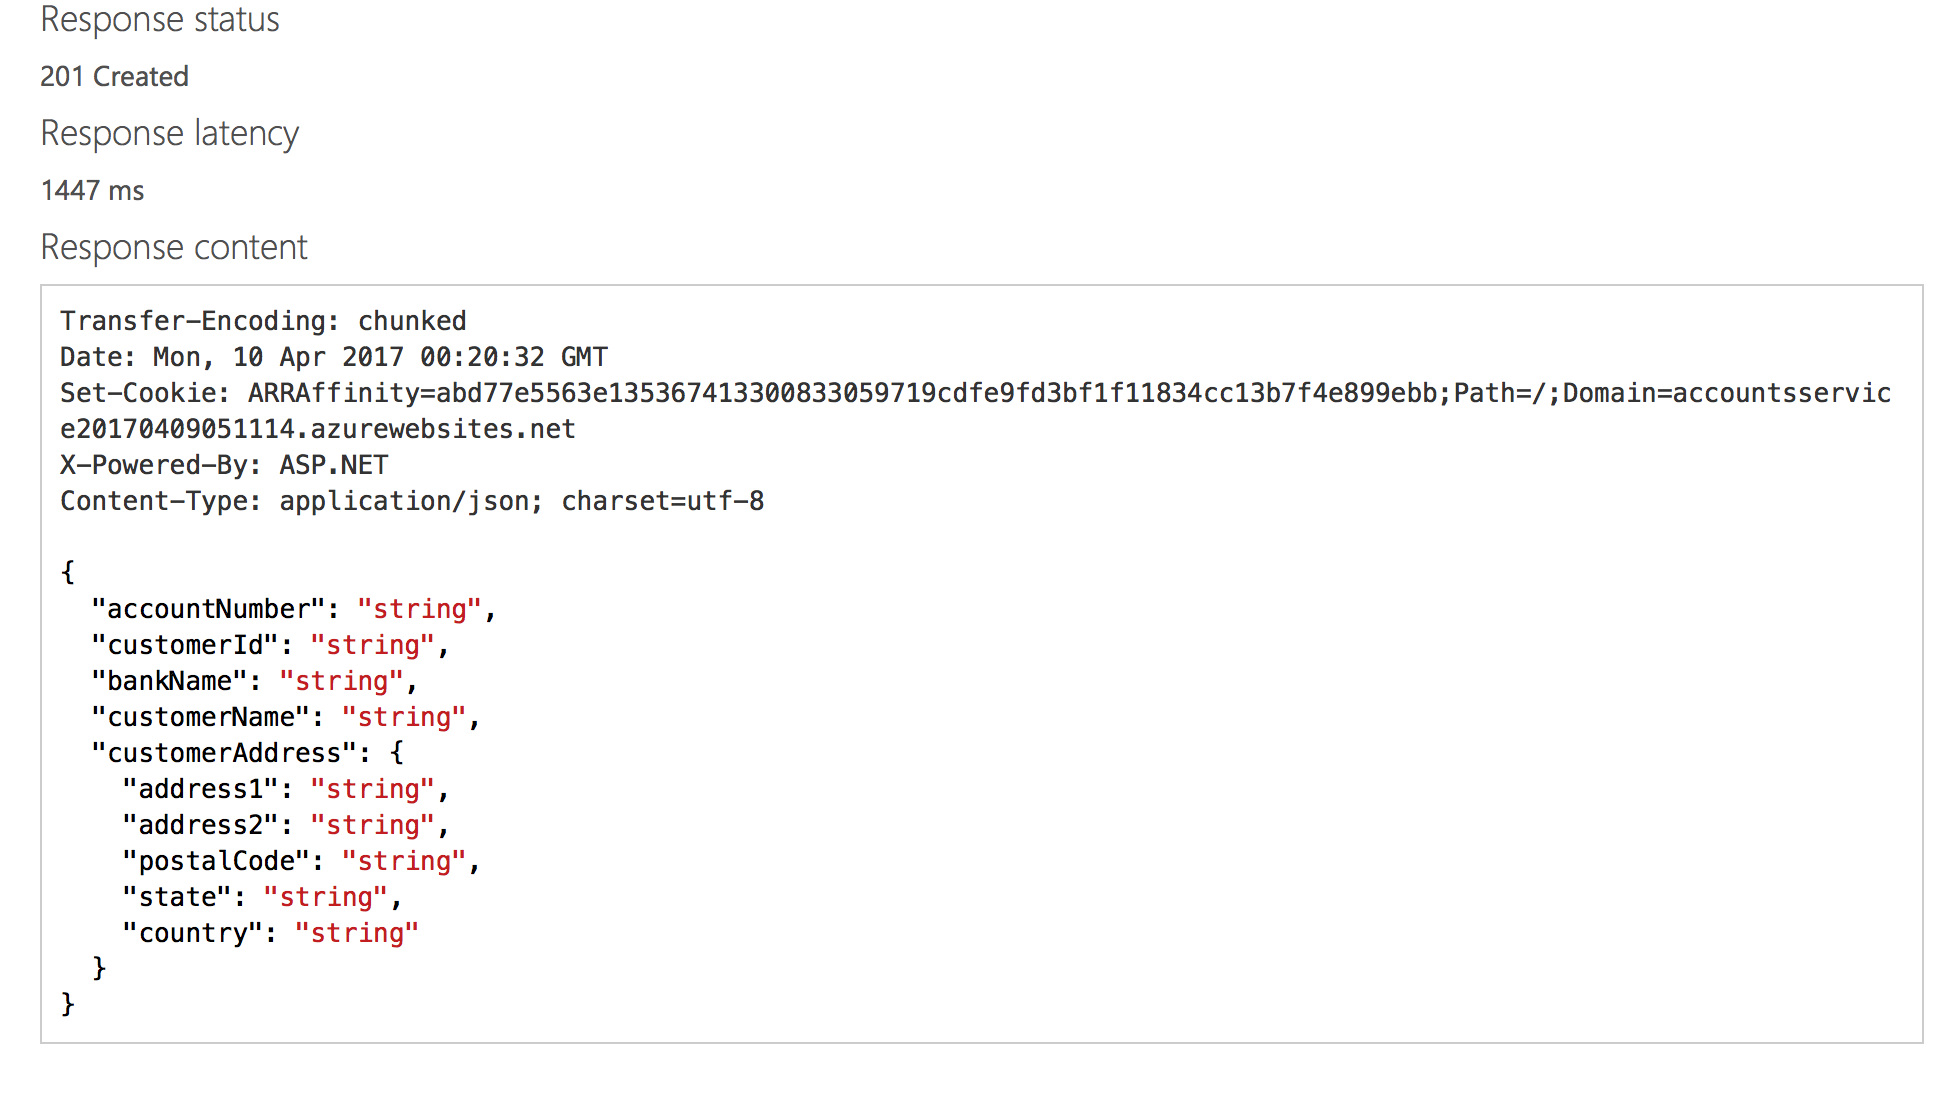
Figure 57 – Response status
Basically, developer portal is for developers to play with the APIs and gets hand on experience in consuming the APIs. Once, they understand the consumption, then they can integrate the API in their applications.
In real world, companies do not provide the APIs free. They impose certain restrictions like free trial users should be able to hit only some N number of requests in an hour or a day or a week. If the number of requests have exceeded, they would send back error message. Only paid or premium users will be provided with more options.
In order to differentiate the free trial users and premium users, the Products plays a vital role. Also, to protect APIs from other types of attacks like DDOS, we can restrict requests per second or per minute from a single IP address. All these features provide a better management of APIs.
You can apply restrictions using feature called “Policies” available in the Publisher Portal. You can define policies per Product or for all the products and for one product for all APIs in the product or one product and one API. You can play with many combinations as per your need. Also you can apply policy for a particular operation in an API in a product too.
Now click “Policies” in the Publisher Portal and select the Product, API in the dropdown and I want to apply policies for all the Operations so I would not select any Operation while defining the policies.
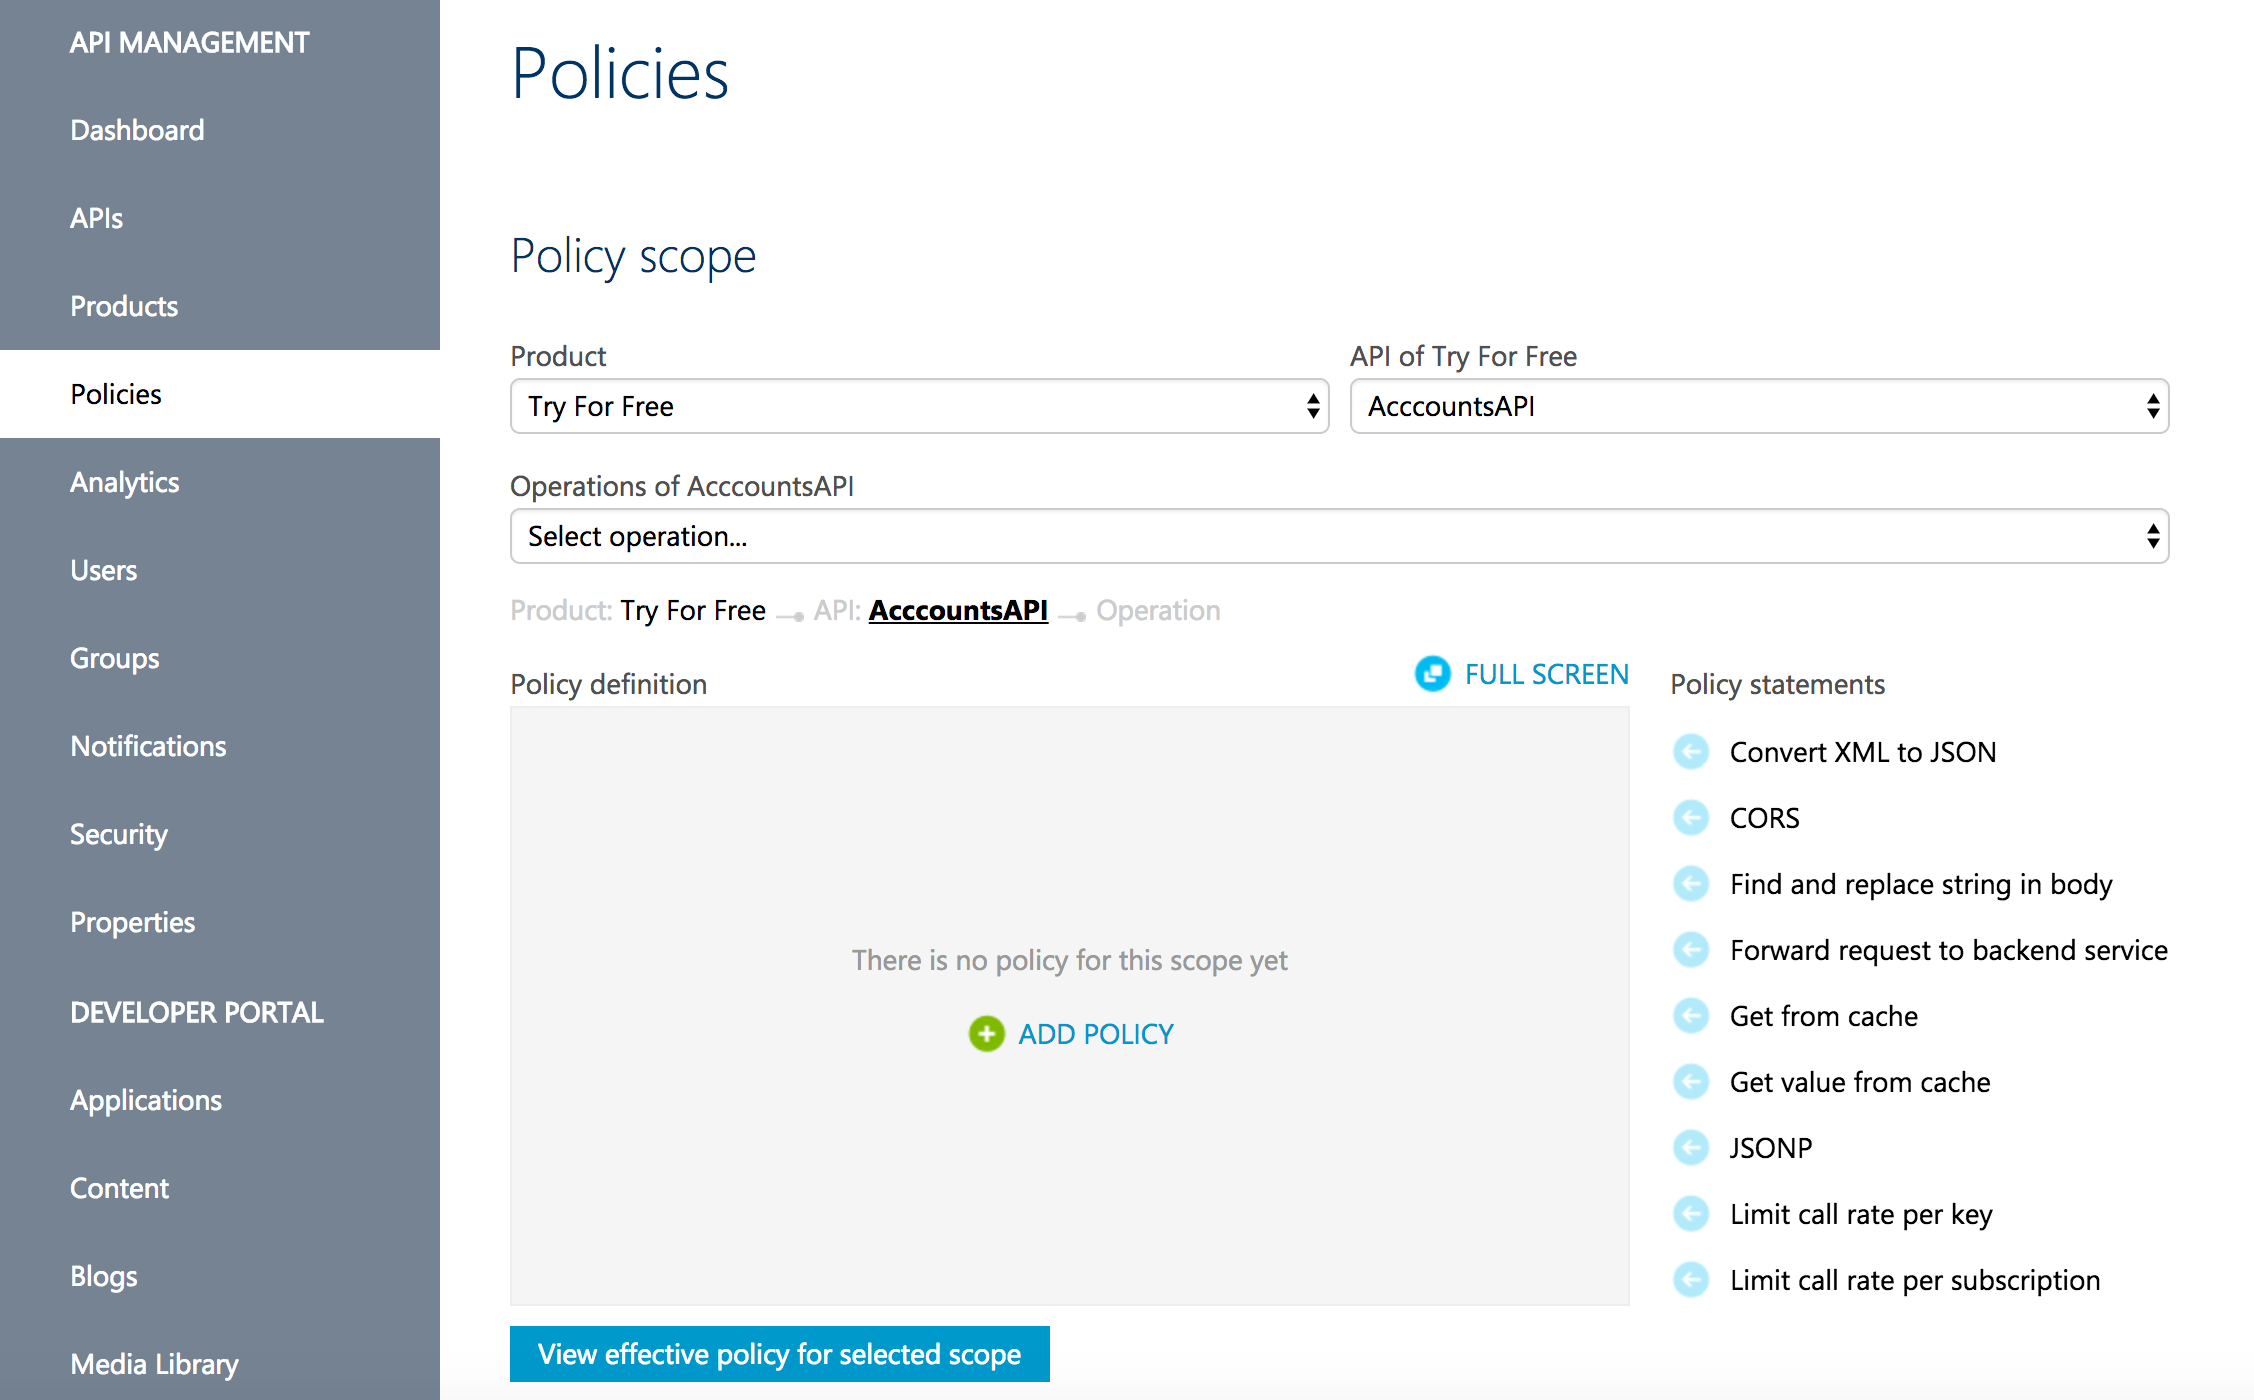
Figure 58 – Policies
Once you select the Product and API, in the below you should see a section called “Policy definition” and beside to that you will see “Policy Statements”. Click on the “ADD POLICY” and you will see policies configuration in XML format.
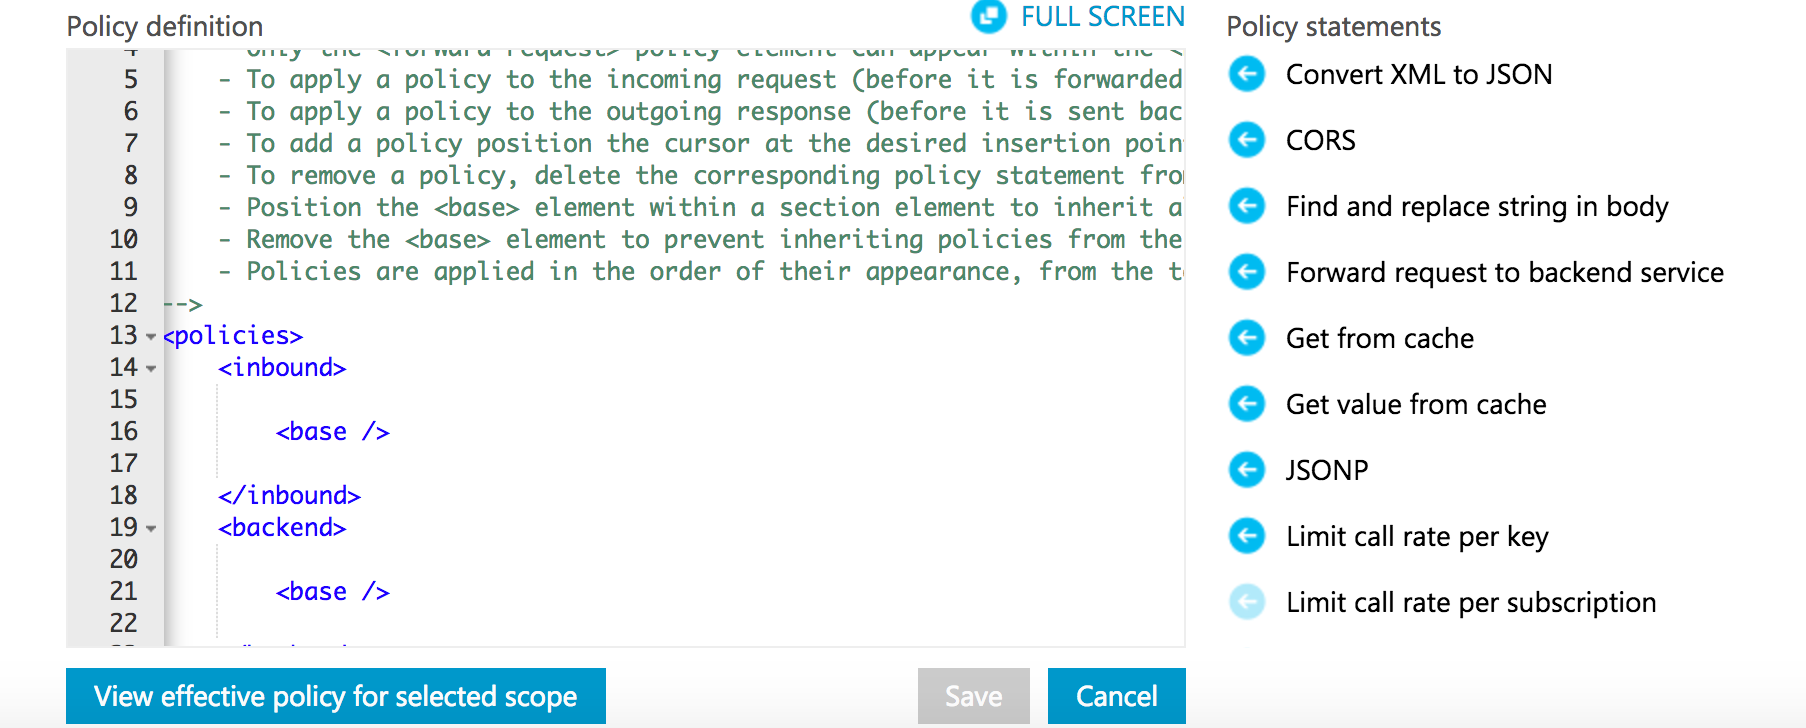
Figure 59 – Policy definition
You can select policies to be applied by selecting Policy statements. In my case, I want to apply restriction on the number of calls. Since, I have selected “AccountsAPI” the policy statement “Limit call rate per subscription” will be disabled. As this is applicable only to a Product and not for the API in the Product. If you want to apply limit rate per Product, then you need to deselect API name in the dropdown for APIs.
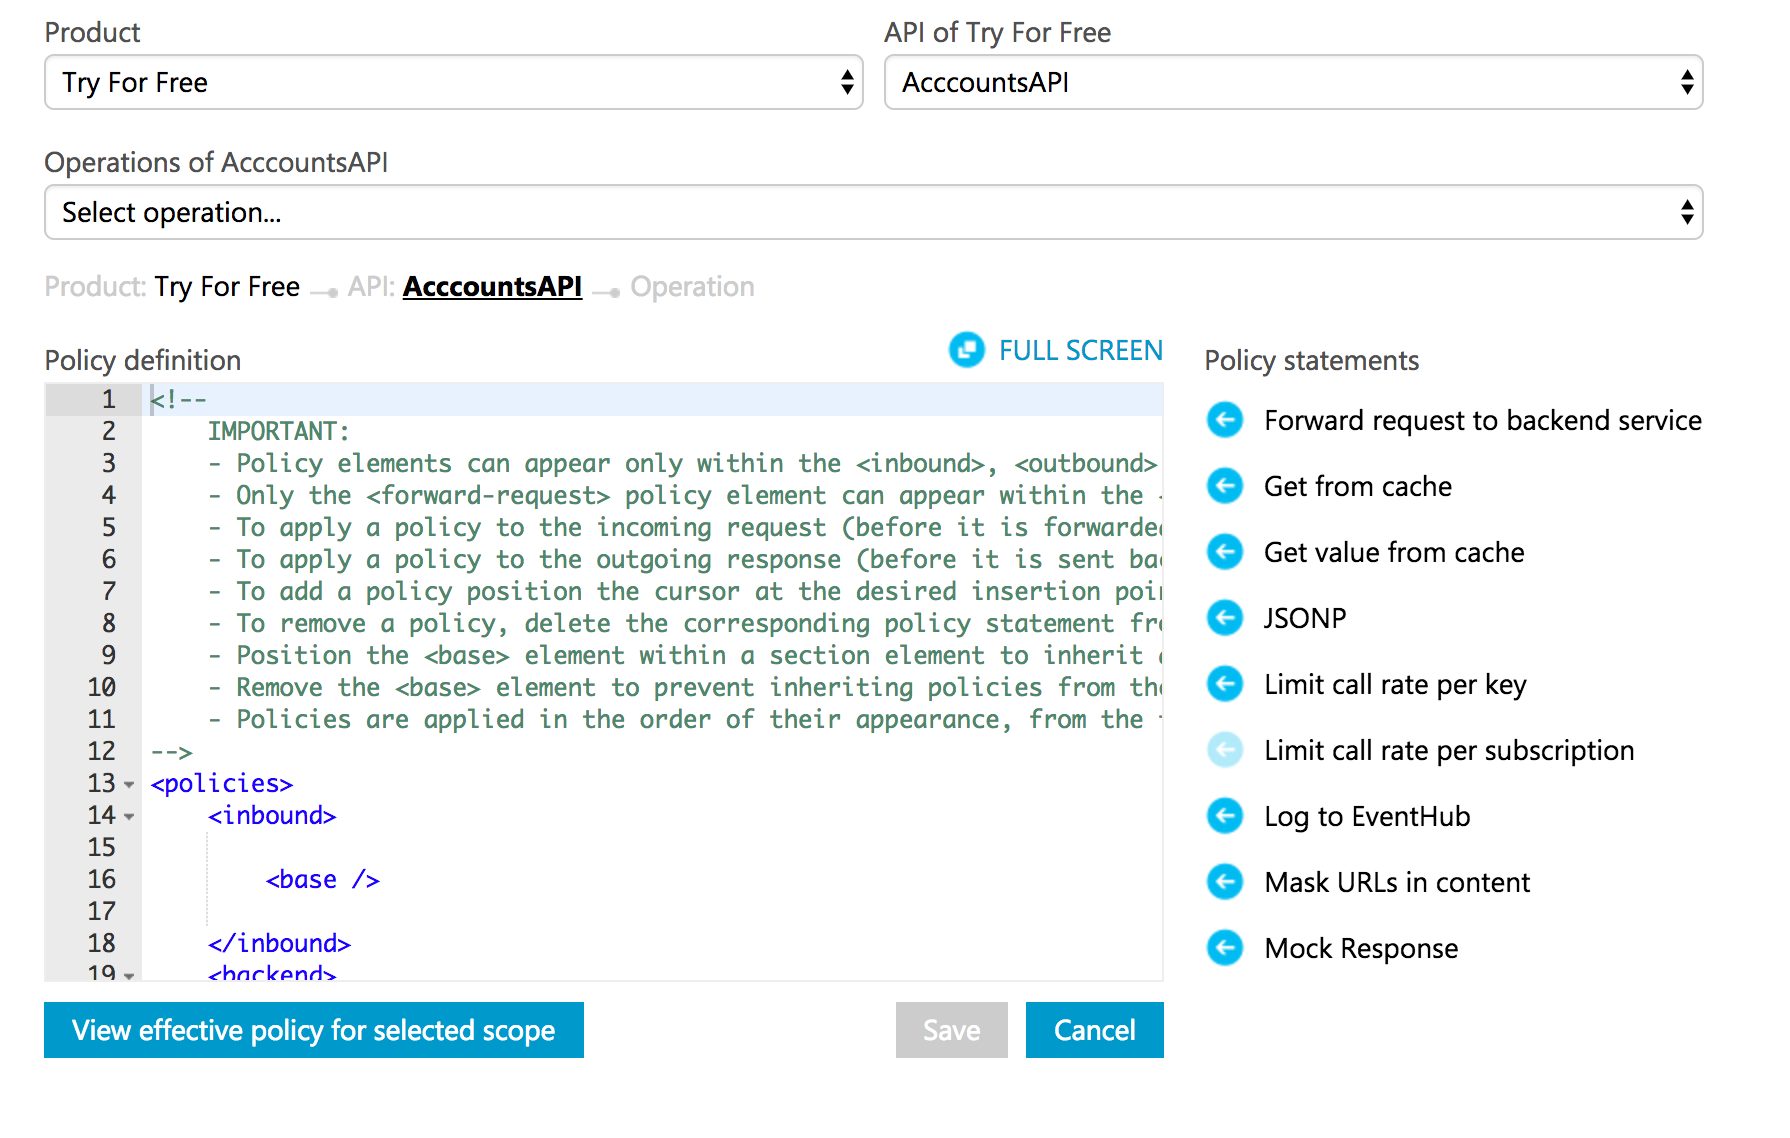
Figure 60 – Limit call rate per subscription policy is disabled
I want to apply limit on the Product and so let me go back and revert back the change I made for API.
Figure 61 – Applying policies for the product
Now you observe that Limit call rate per subscription is enabled in the policy statements. Put your cursor inside the element <inbound> and then click the policy statement limit call rate per subscription and it should insert basic syntax for rate limit as below:
<inbound>
         <rate-limit calls="number" renewal-period="seconds">
            <api name="name" calls="number">
                <operation name="name" calls="number" />
            </api>
        </rate-limit>
        <base />
 </inbound>
We are interested only restricting the number of request and so only we will be concerned with the element rate-limit and remove other settings. I want to allow only 3 calls per minute to test the rating limit.
So, my policy definition looks like below:
<policies>
 <inbound>
    <rate-limit calls="3" renewal-period="60"></rate-limit>
  </inbound>
 <backend>
  <forward-request />
 </backend>
<outbound />
</policies>
Now save your policy definition and let’s test the rate limit by logging into the developer portal and hitting any of the operation with “Try It” button multiple times so that we exceed number of calls per minute.
To test the rate call limit, I have selected the operation “Get All Accounts” and clicked on “Try it” button and hit the “Send” button more than 3 times consequently and during the 4th attempt, I get error message in the response with status 429 as below:

Figure 62 – Too many requests
You can add many policies to the API to manage your API in a better fashion. Microsoft has provided many useful policy statements and you can review them in more detail through Microsoft Azure documentation.
There are many more features available for API management and it would be difficult to explain them all. But this article provides basic overview of API Management and encourages readers to go through Microsoft Azure Documentation for more details.
Analytics Reporting feature in Azure API Management
Azure API Management by default provides a Dashboard and Analytics to provide details about the traffic. Analytics page has multiple tabs:
- At a glance
- Usage
- Health
- Activity
At a glance, Screen:
This screen provides the overall usage/health of the APIs, number of requests and all the needed dashboard reports.
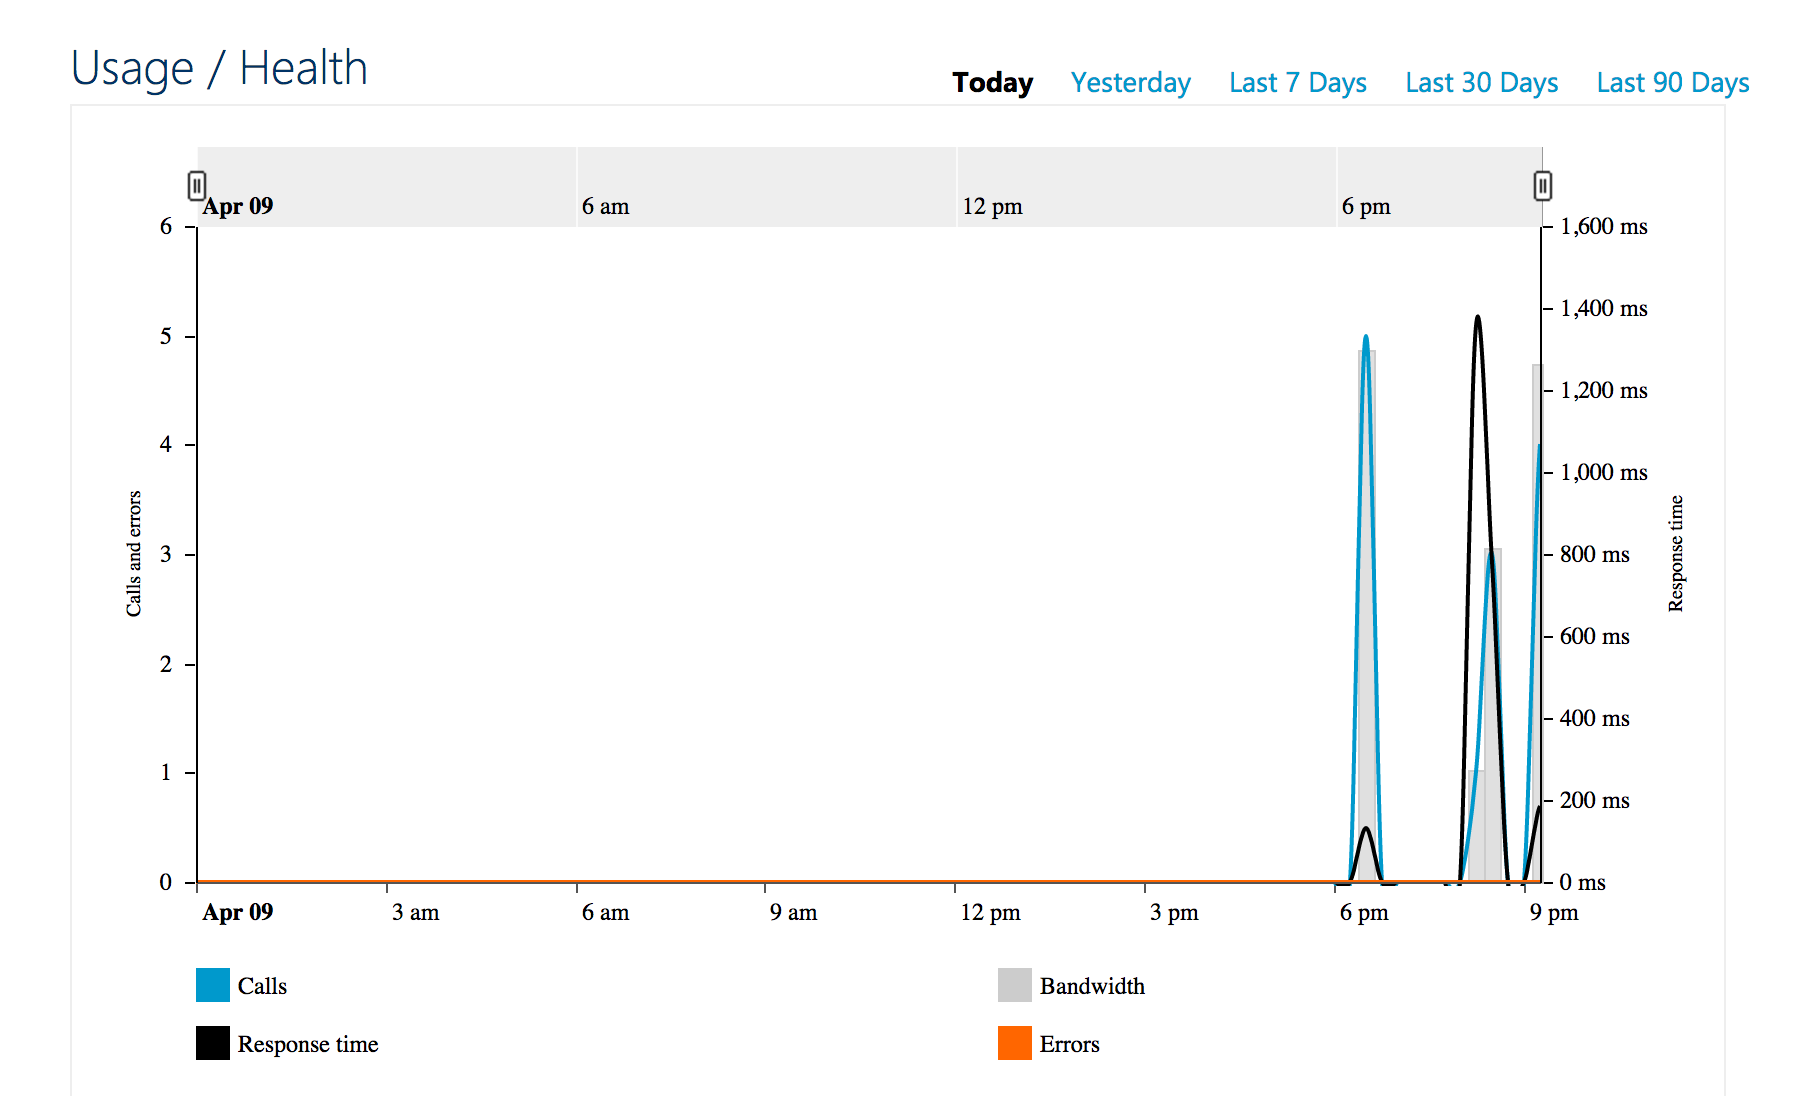
Figure 63 – Usage/Health
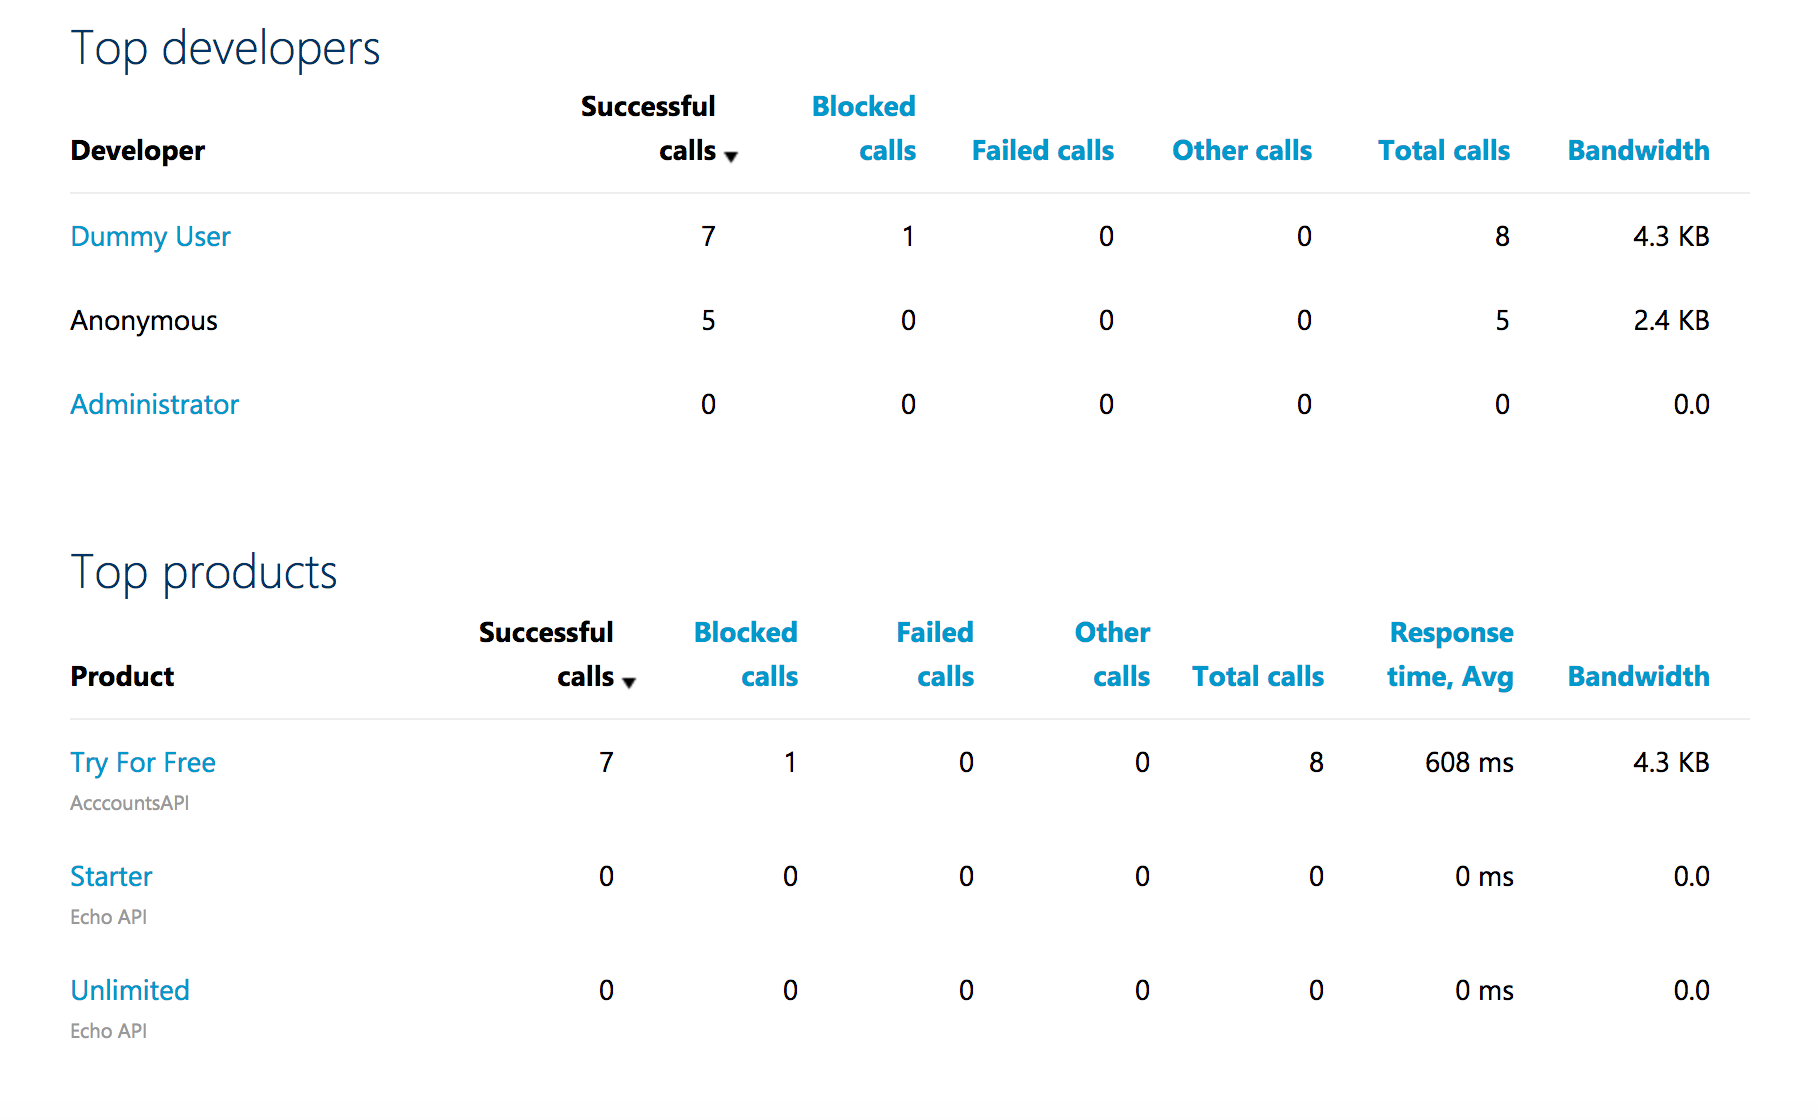
Figure 64 – Requests from Top developers, Top products

Figure 65 – Top subscriptions, APIs
Usage:
Usage shows the graphical report of the Calls, Bandwidth.
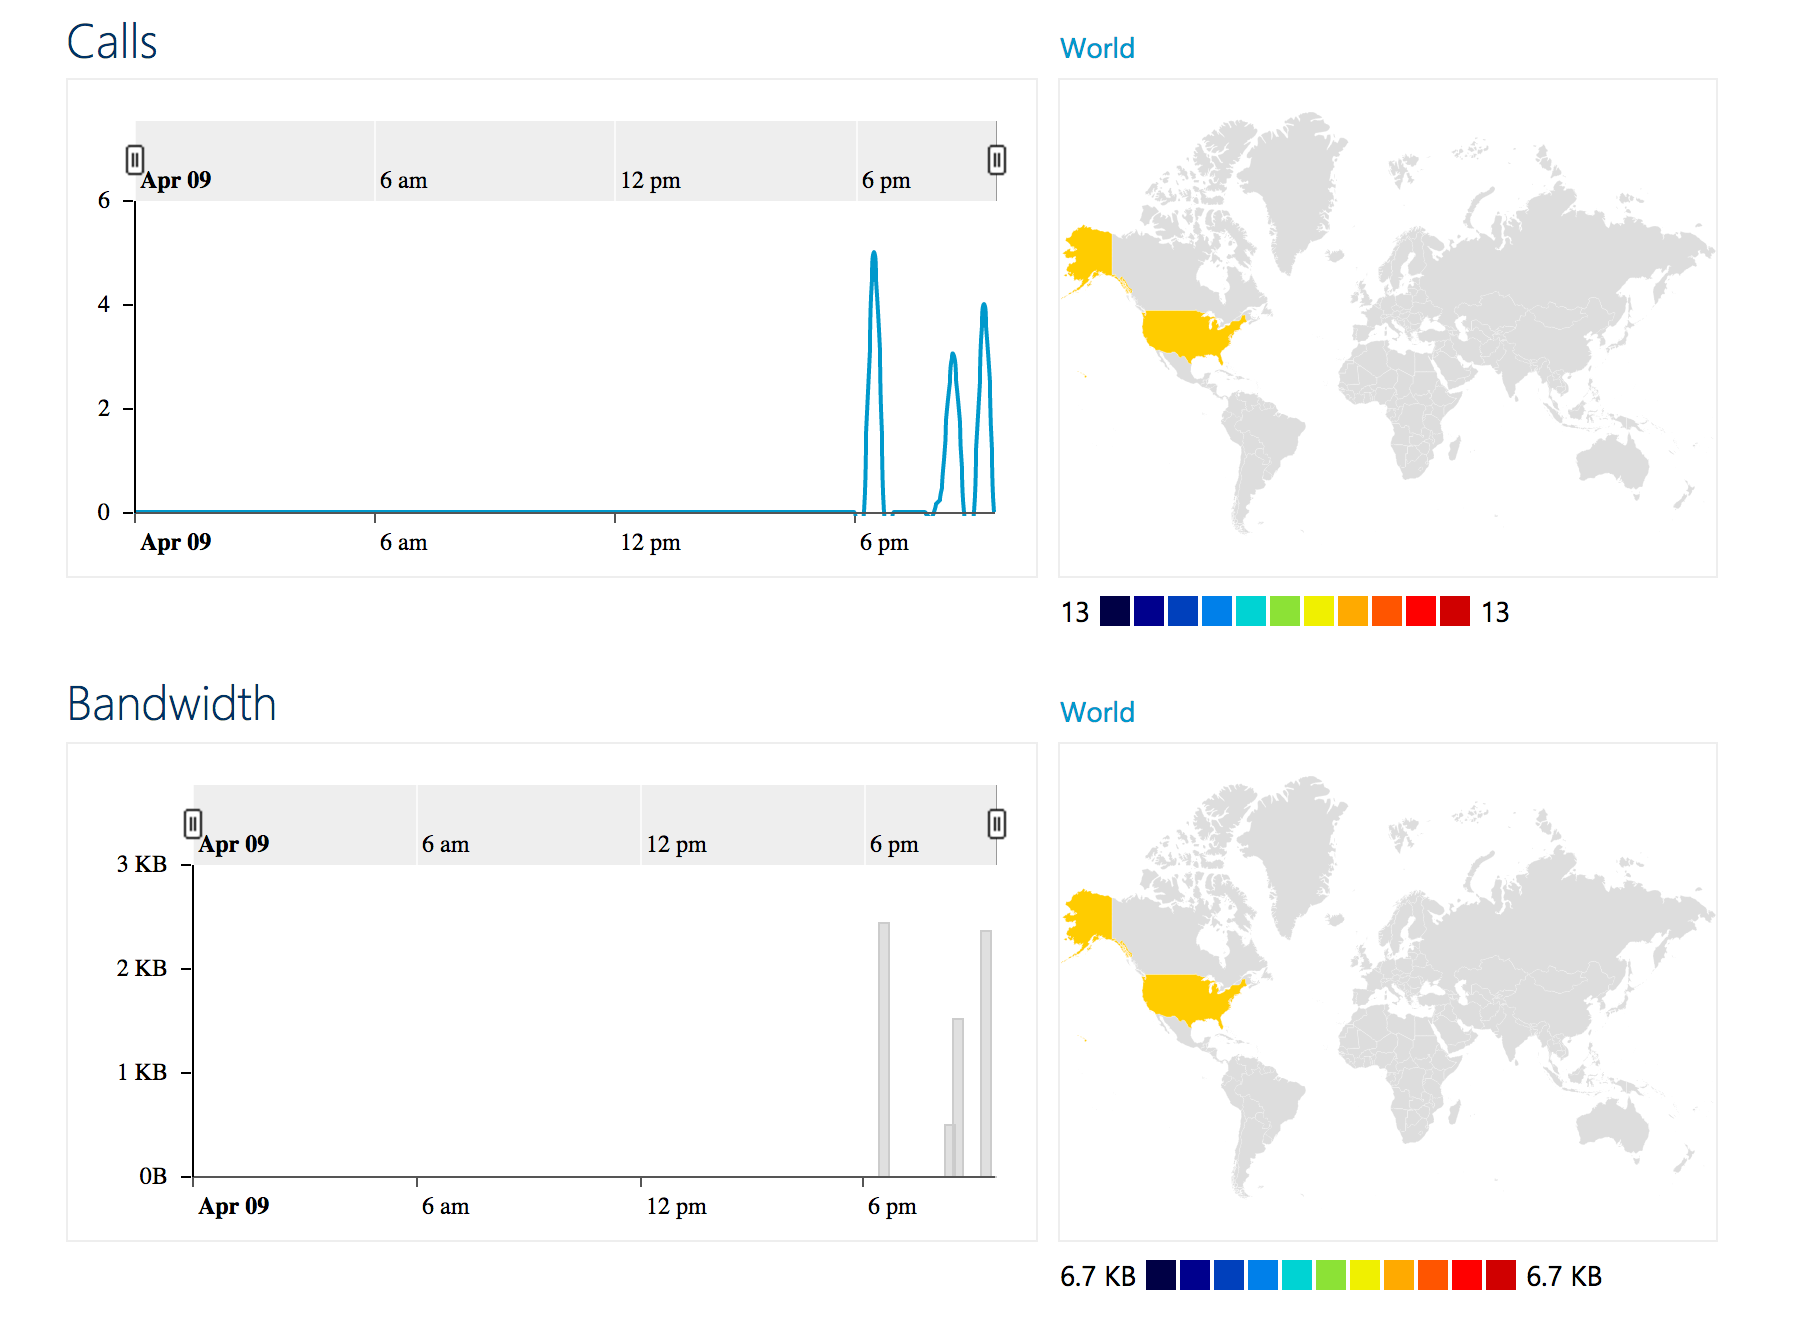
Figure 66 – Calls, Bandwidth
Health:
Health shows status codes of the APIs and their response time.

Figure 67 – Status codes, Cache
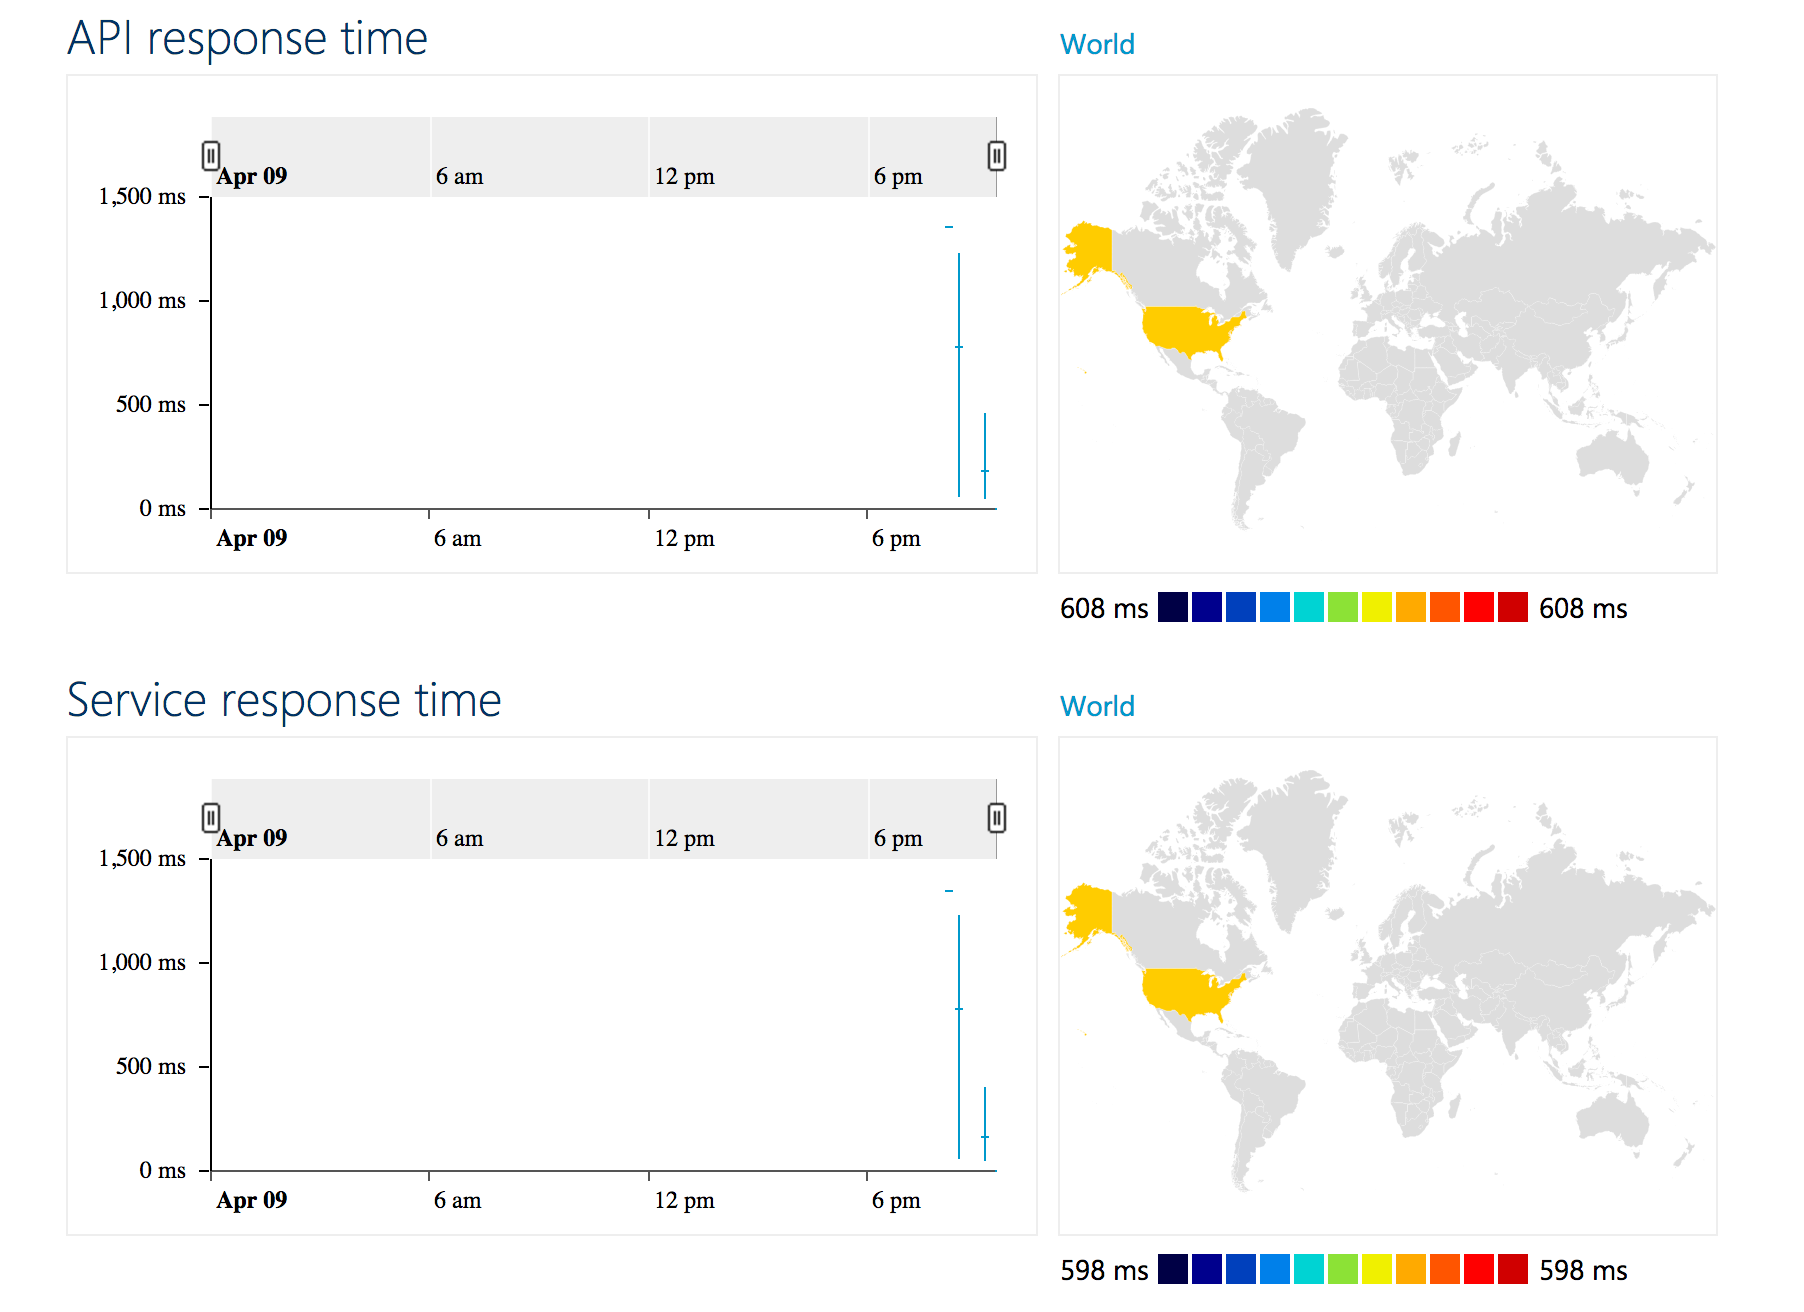
Figure 68 – API, Service response time
Activity:
Activity shows activities per groups, products, subscriptions, APIs and operations
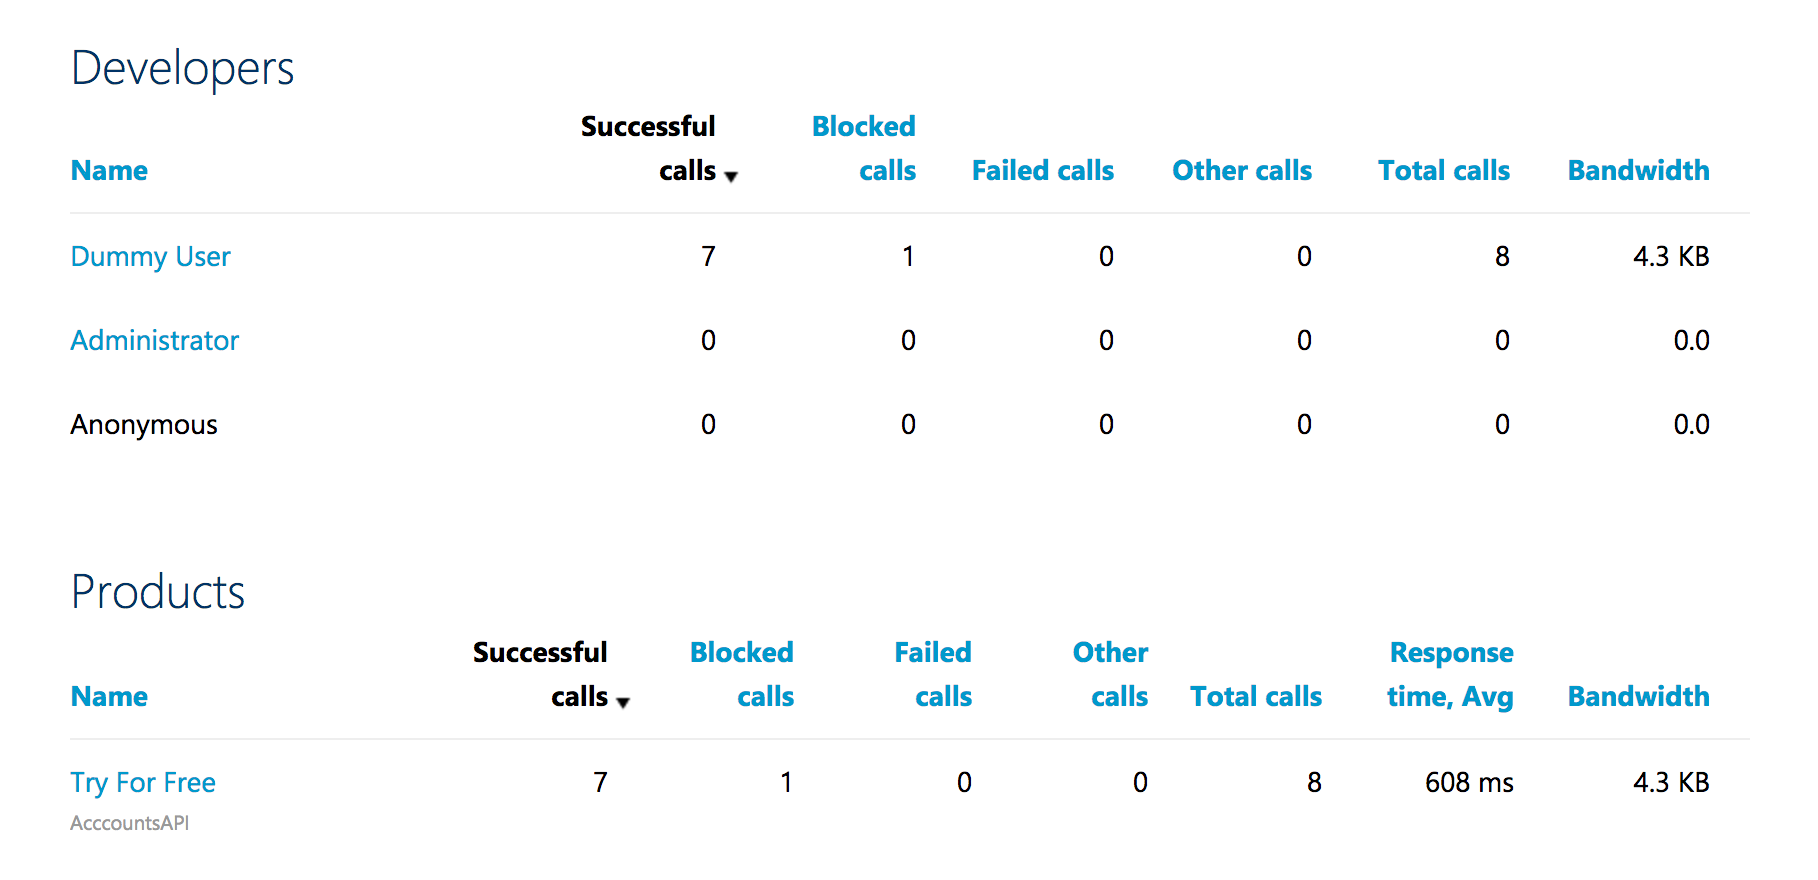
Figure 69 – Activity by developers, Products
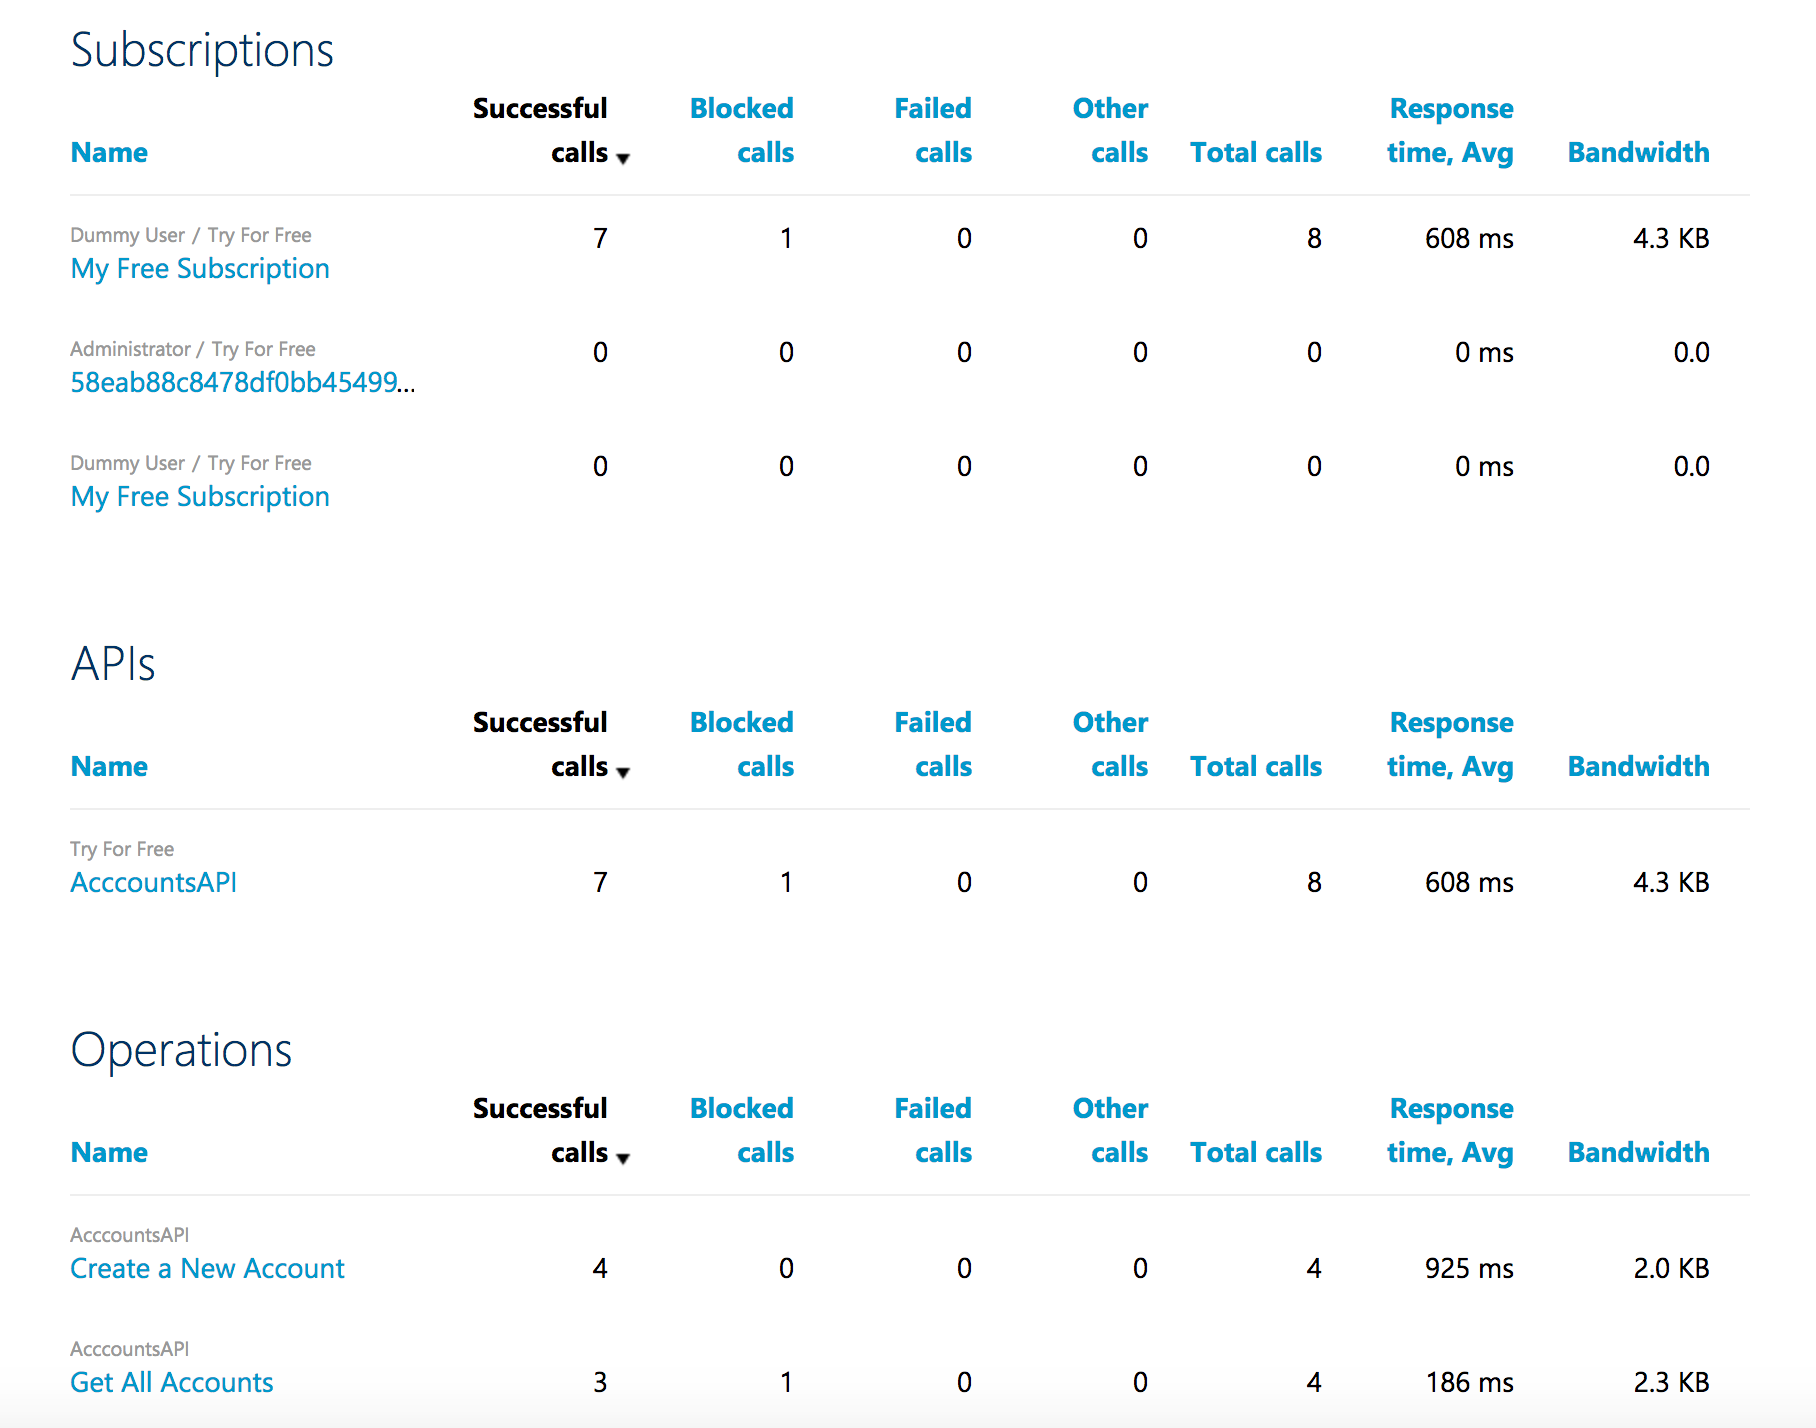
Figure 70 – Activities by Subscriptions, APIs, Operations