
In the previous article, I have explained how we can manage the Web API using Azure API Management. In this article, I would be discussing about adding custom logging for the API using event hub.
You can add custom logging in the Policies for the API and send the logging events to the Event Hub.
What is Event Hub?
Azure Event Hub is a new feature in Azure Service Bus which is intended to be used to work with event based messaging.
According to Microsoft Documents,
“Event Hubs is a highly scalable data streaming platform capable of ingesting millions of events per second. Data sent to an Event Hub can be transformed and stored using any real-time analytics provider or batching/storage adapters. With the ability to provide publish-subscribe capabilities with low latency and at massive scale, Event Hubs serves as the “on ramp” for Big Data.”
As specified above, Event Hubs are introduced to handle ingestion of millions of events per second. Event Hubs are useful when we want to perform Application Instrumentation, User Experience and IOT.
A simple example that I heard of in one of the sessions on Event Hub is Food Transporting Trucks. Most of the Food companies need to transport the food containers to different parts of the country to the retailer shops through trucks. Each container will be having a IOT device that captures the temperature inside the container, location of the truck and other details every second to Azure Event Hub. An Azure Stream Analytics Job will read the events from Event Hub and send it to the destination sinks like Azure Data Lake Store, SQL Server Database or any other storage. If any of the container food got contaminated by the time it has been shipped, then this metrics can help in identifying the root cause like may be the coolant in the container has a problem and so it could not maintain a temperature or the truck has travelled locations where climate is too hot. A visual report can be provided to the management using PowerBI or Excel or any other tool. As an action, the management may ask the IT to set up an alert when a certain event occurs that needs to be notified so that the issue is rectified immediately. For example, if the container must keep temperature of 65 F but it has gone above 70 F. Since, the data will be published by multiple containers and each container publishes many events per second, the receiving end should be able to ingest such a huge number of events per second. So, Event Hub is the solution provided by Microsoft in Azure that helps in collecting data for Data Analytics, Reporting and Machine Learning.
You can read more about Event Hub from Microsoft Website https://docs.microsoft.com/en-us/azure/event-hubs/event-hubs-what-is-event-hubs
My intention in this article is to provide an insight of Event Hub and how can we leverage the ingestion functionality of Event Hub in the API Management to log the requests and produce the data for reporting.
First, we need to enable logger using the API Management REST API to send events to an event hub. To do that go to Azure API Management created in the previous article and select “Security” to go to Security Section. Check the checkbox option for “Enable API Management REST API”.
By the way why should I log the data to Event Hub when API Management is already providing out of the box functionalities to get an insight into the APIs? Logging to Event Hub comes to rescue when you would like to log more information while inbound and outbound request to APIs takes place for debugging or troubleshooting. Also it is useful when the management is interested in learning more about the inbound/outbound to API requests by generating reports with the data collected.
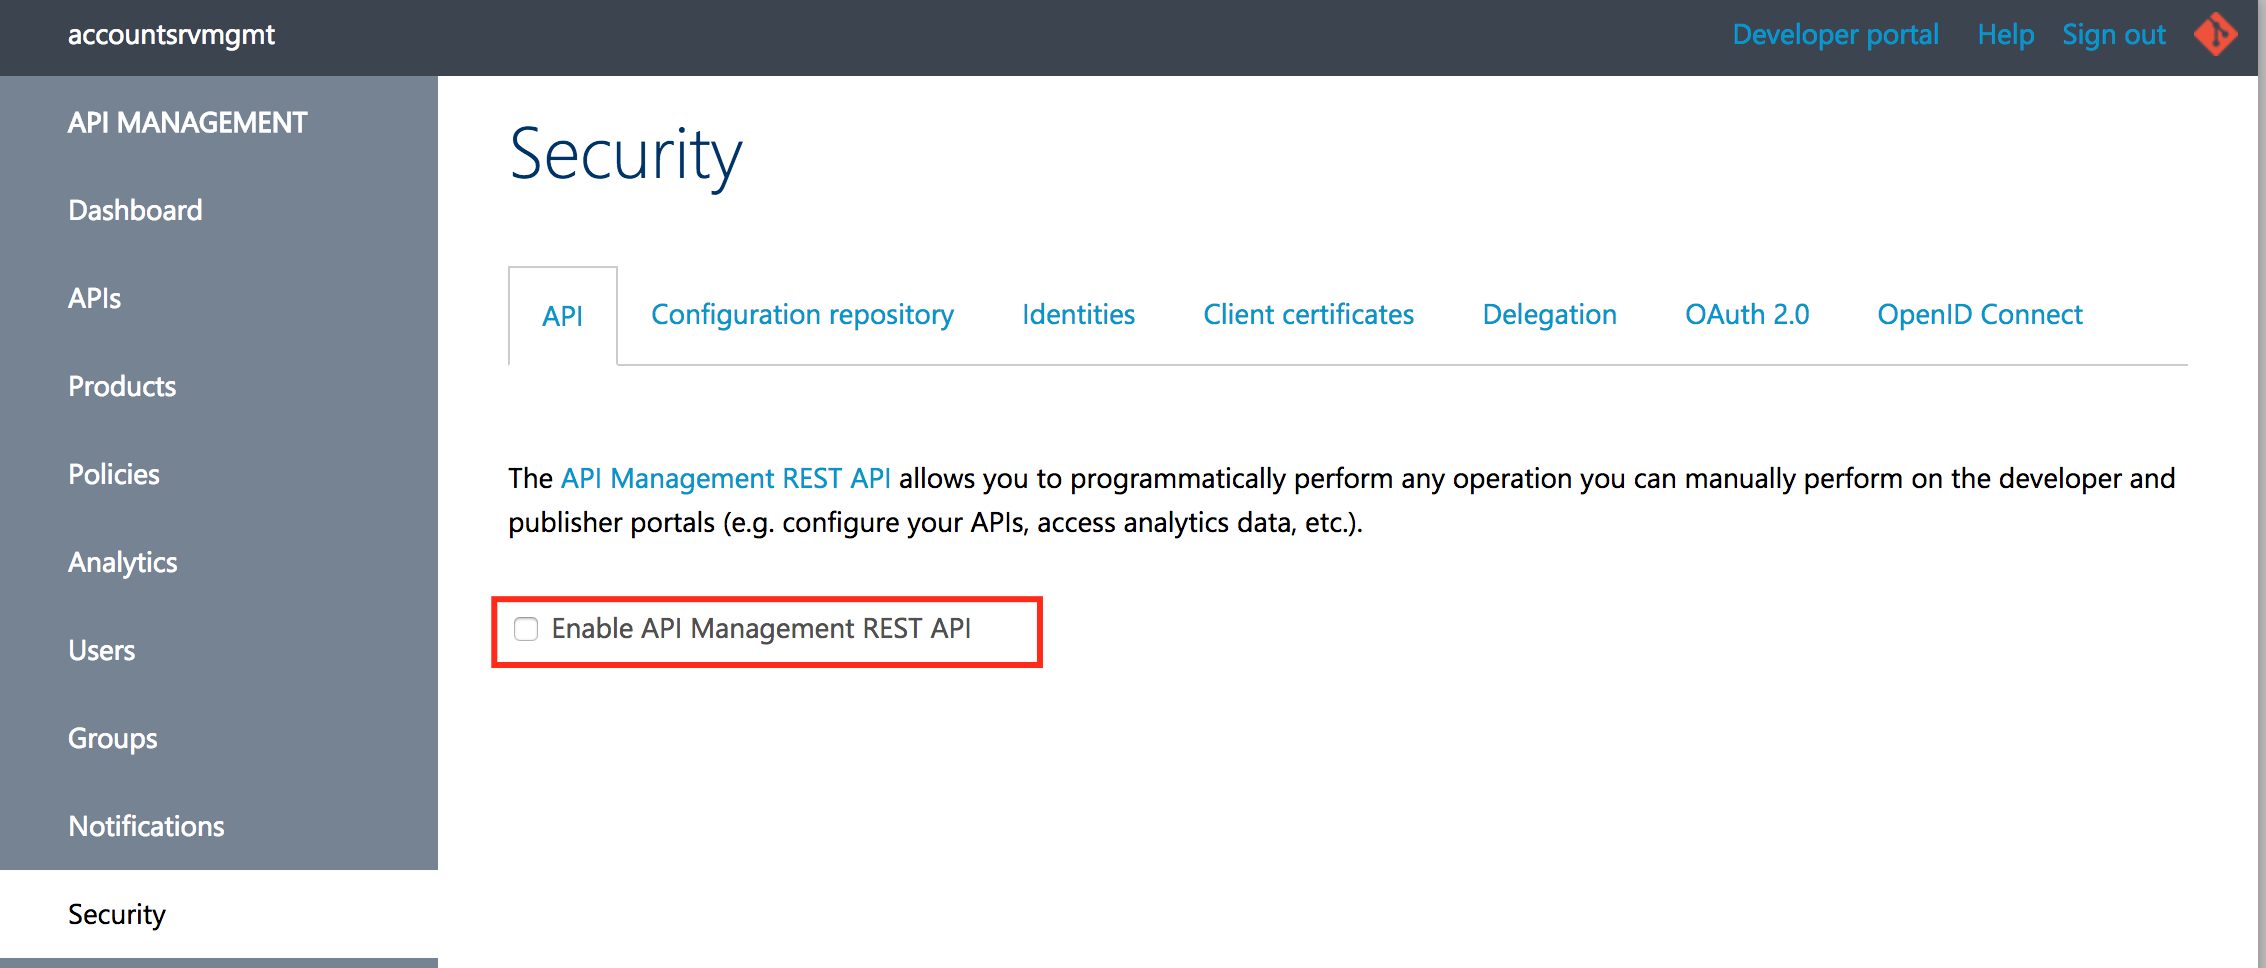
Figure 71 – Enable API Management REST API
As soon as you select the checkbox, it will display Credentials like Primary Key and Secondary Key and Access Token. You can generate token from the section “Access Token”. We need the keys and access token to add a logger.
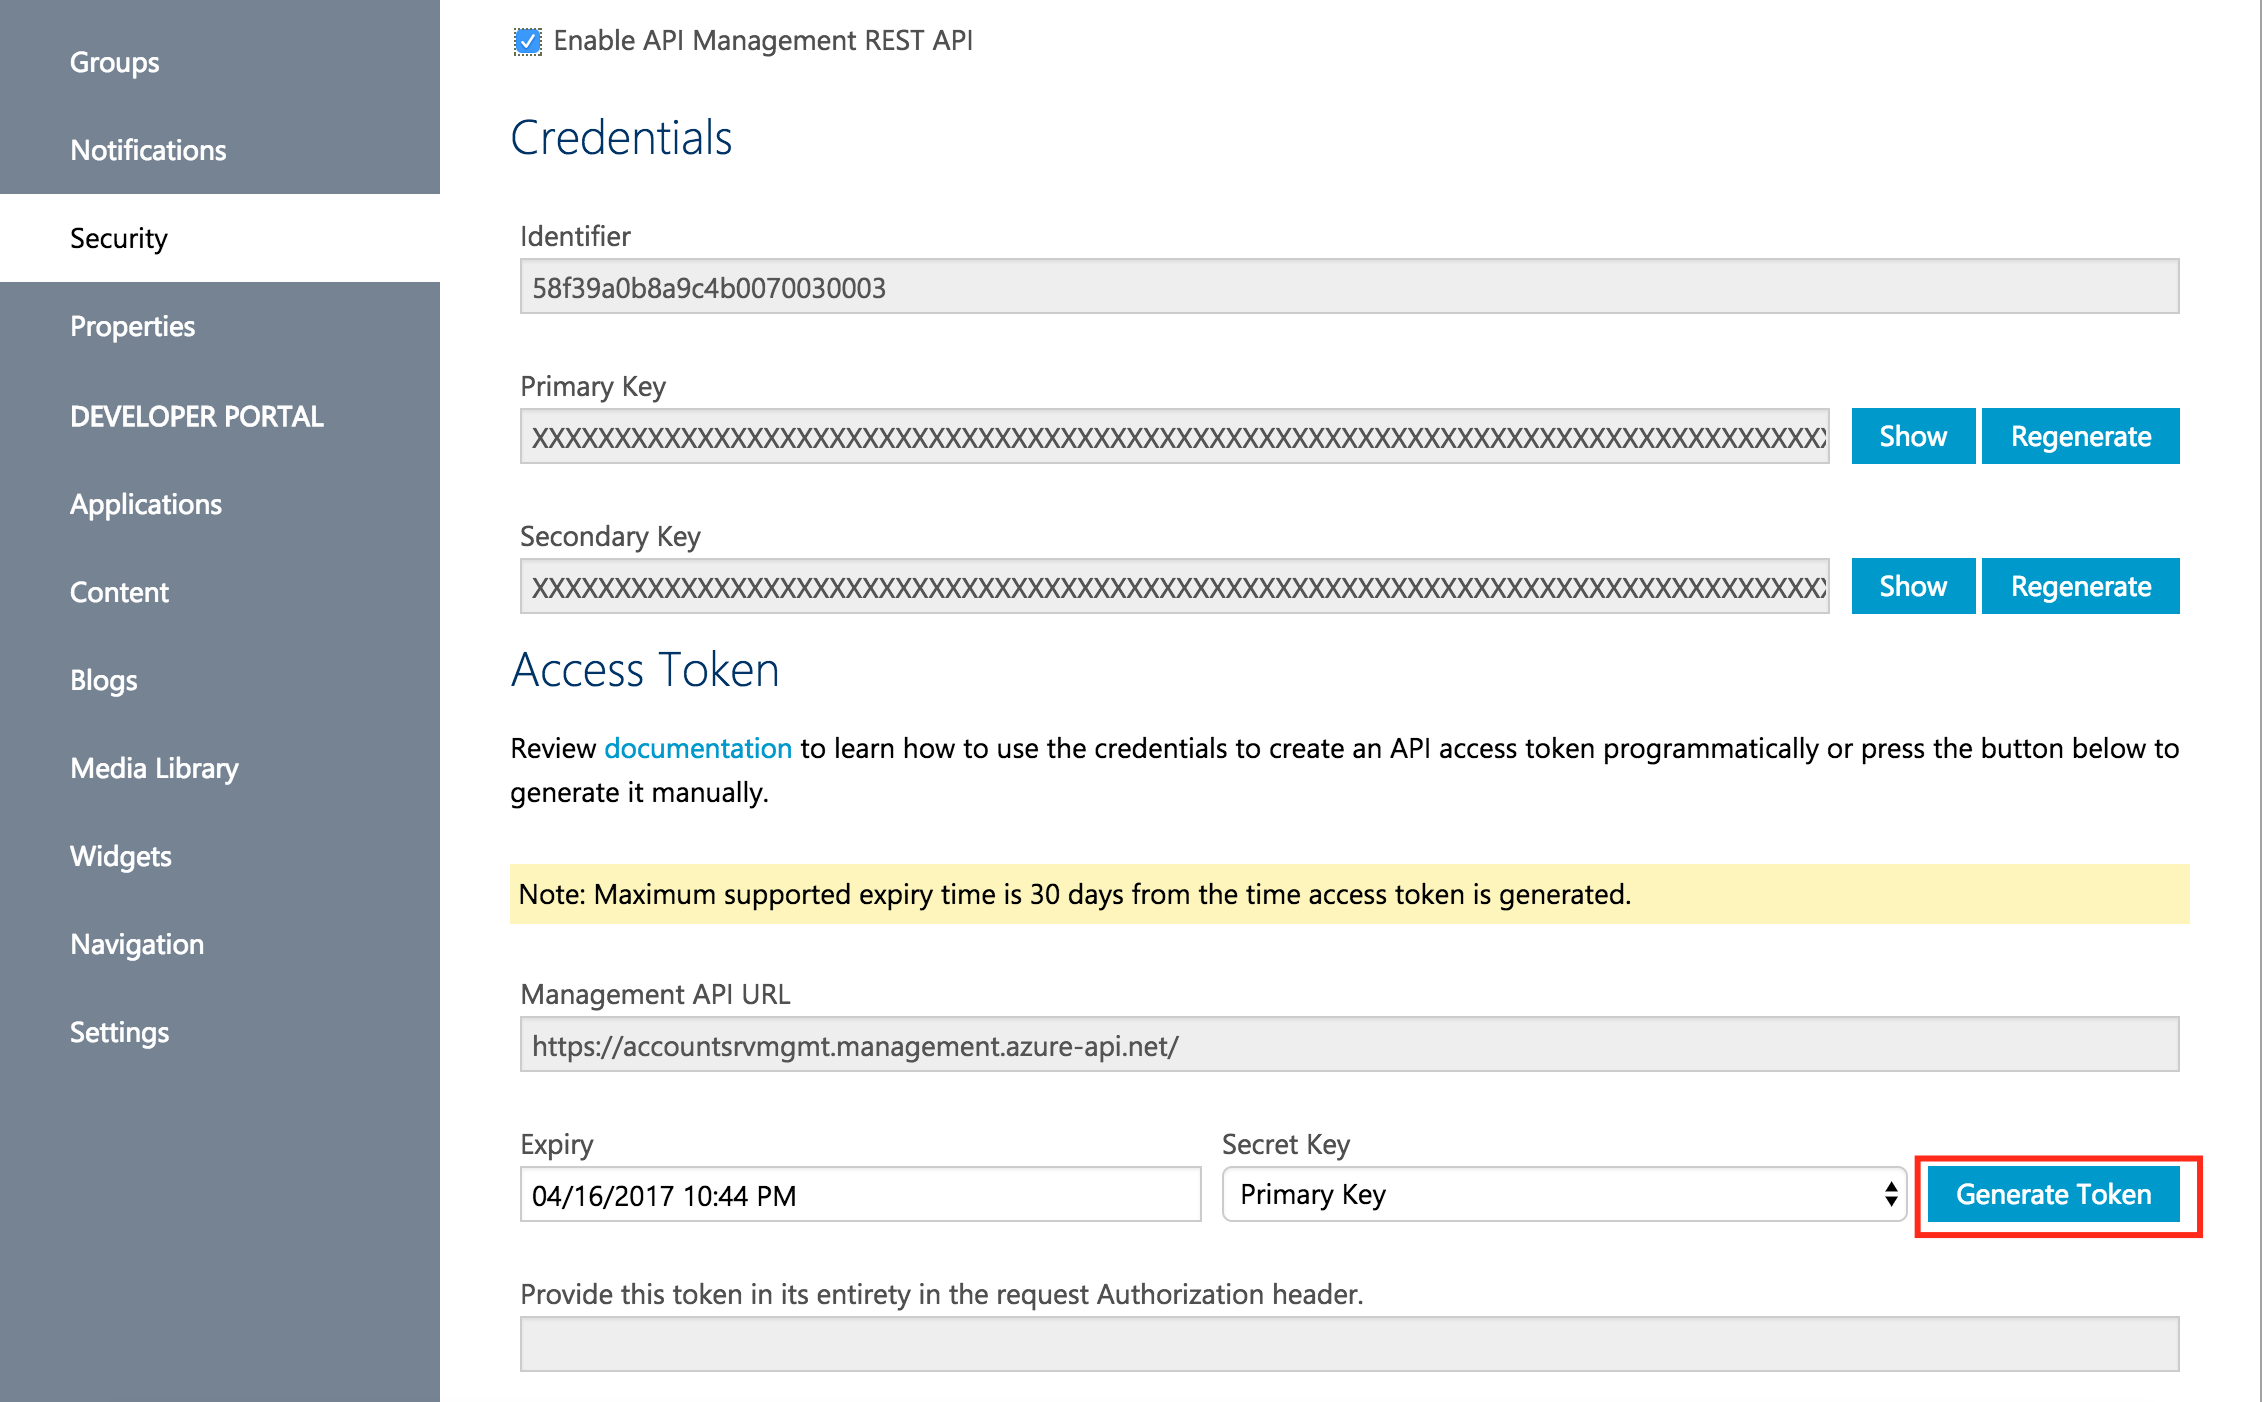
Figure 72 – Credentials and Access Token
Before adding the logger, we need to create an Event Hub. Search for Event Hubs and hit the “Event Hubs” in the result and click on the “Create” button in the next blade displayed.

Figure 73 – Event Hubs
Next, we need to create a namespace. Provide the name input field and select the existing resource group and click the “Create” button at the bottom of the blade.
NOTE: Make sure that SQL Database, Event Hub and Stream Analytics Job are in the same location. Otherwise, you may have to incur extra cost.
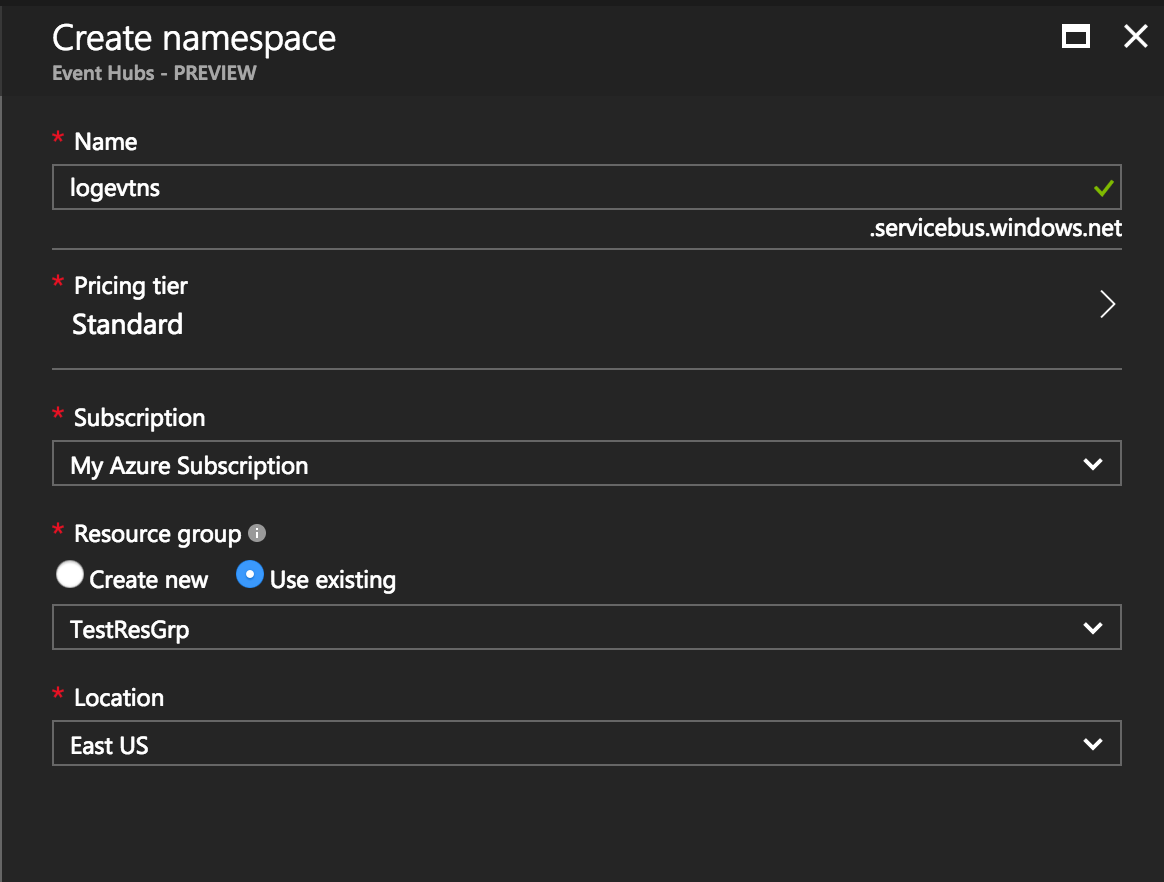
Figure 74 – Create namespace
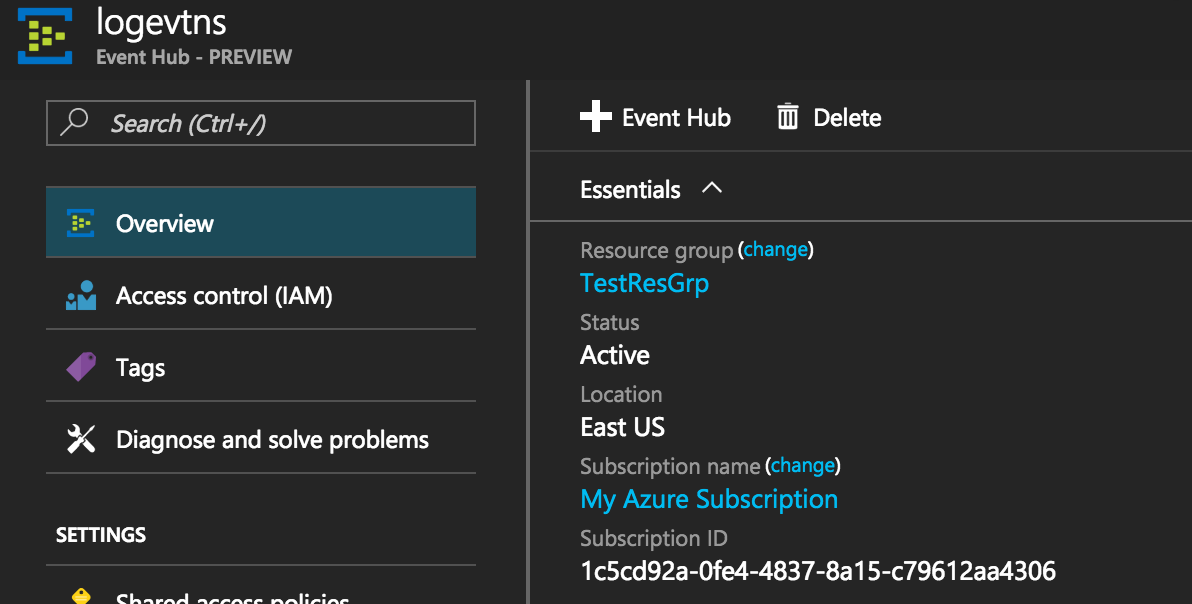
Figure 75 – Namespace created
Click the “+ Event Hub” on the top of the blade to create the Event Hub.
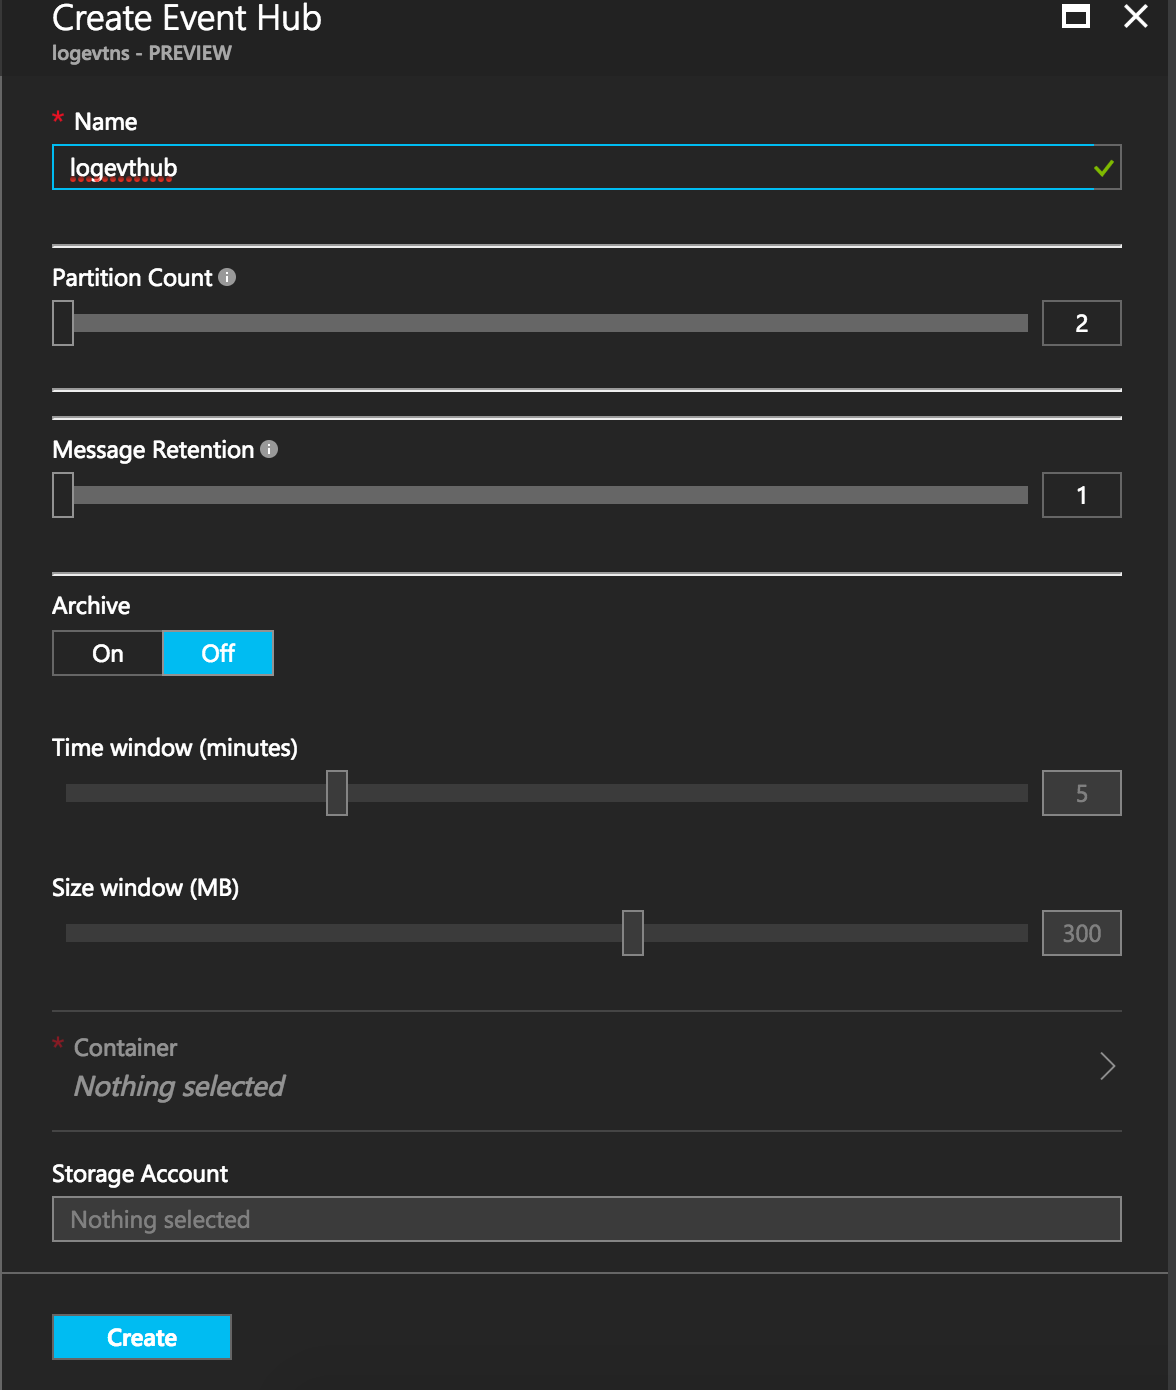
Figure 76 – Create Event Hub
Once it is created, you should see the event hub created.
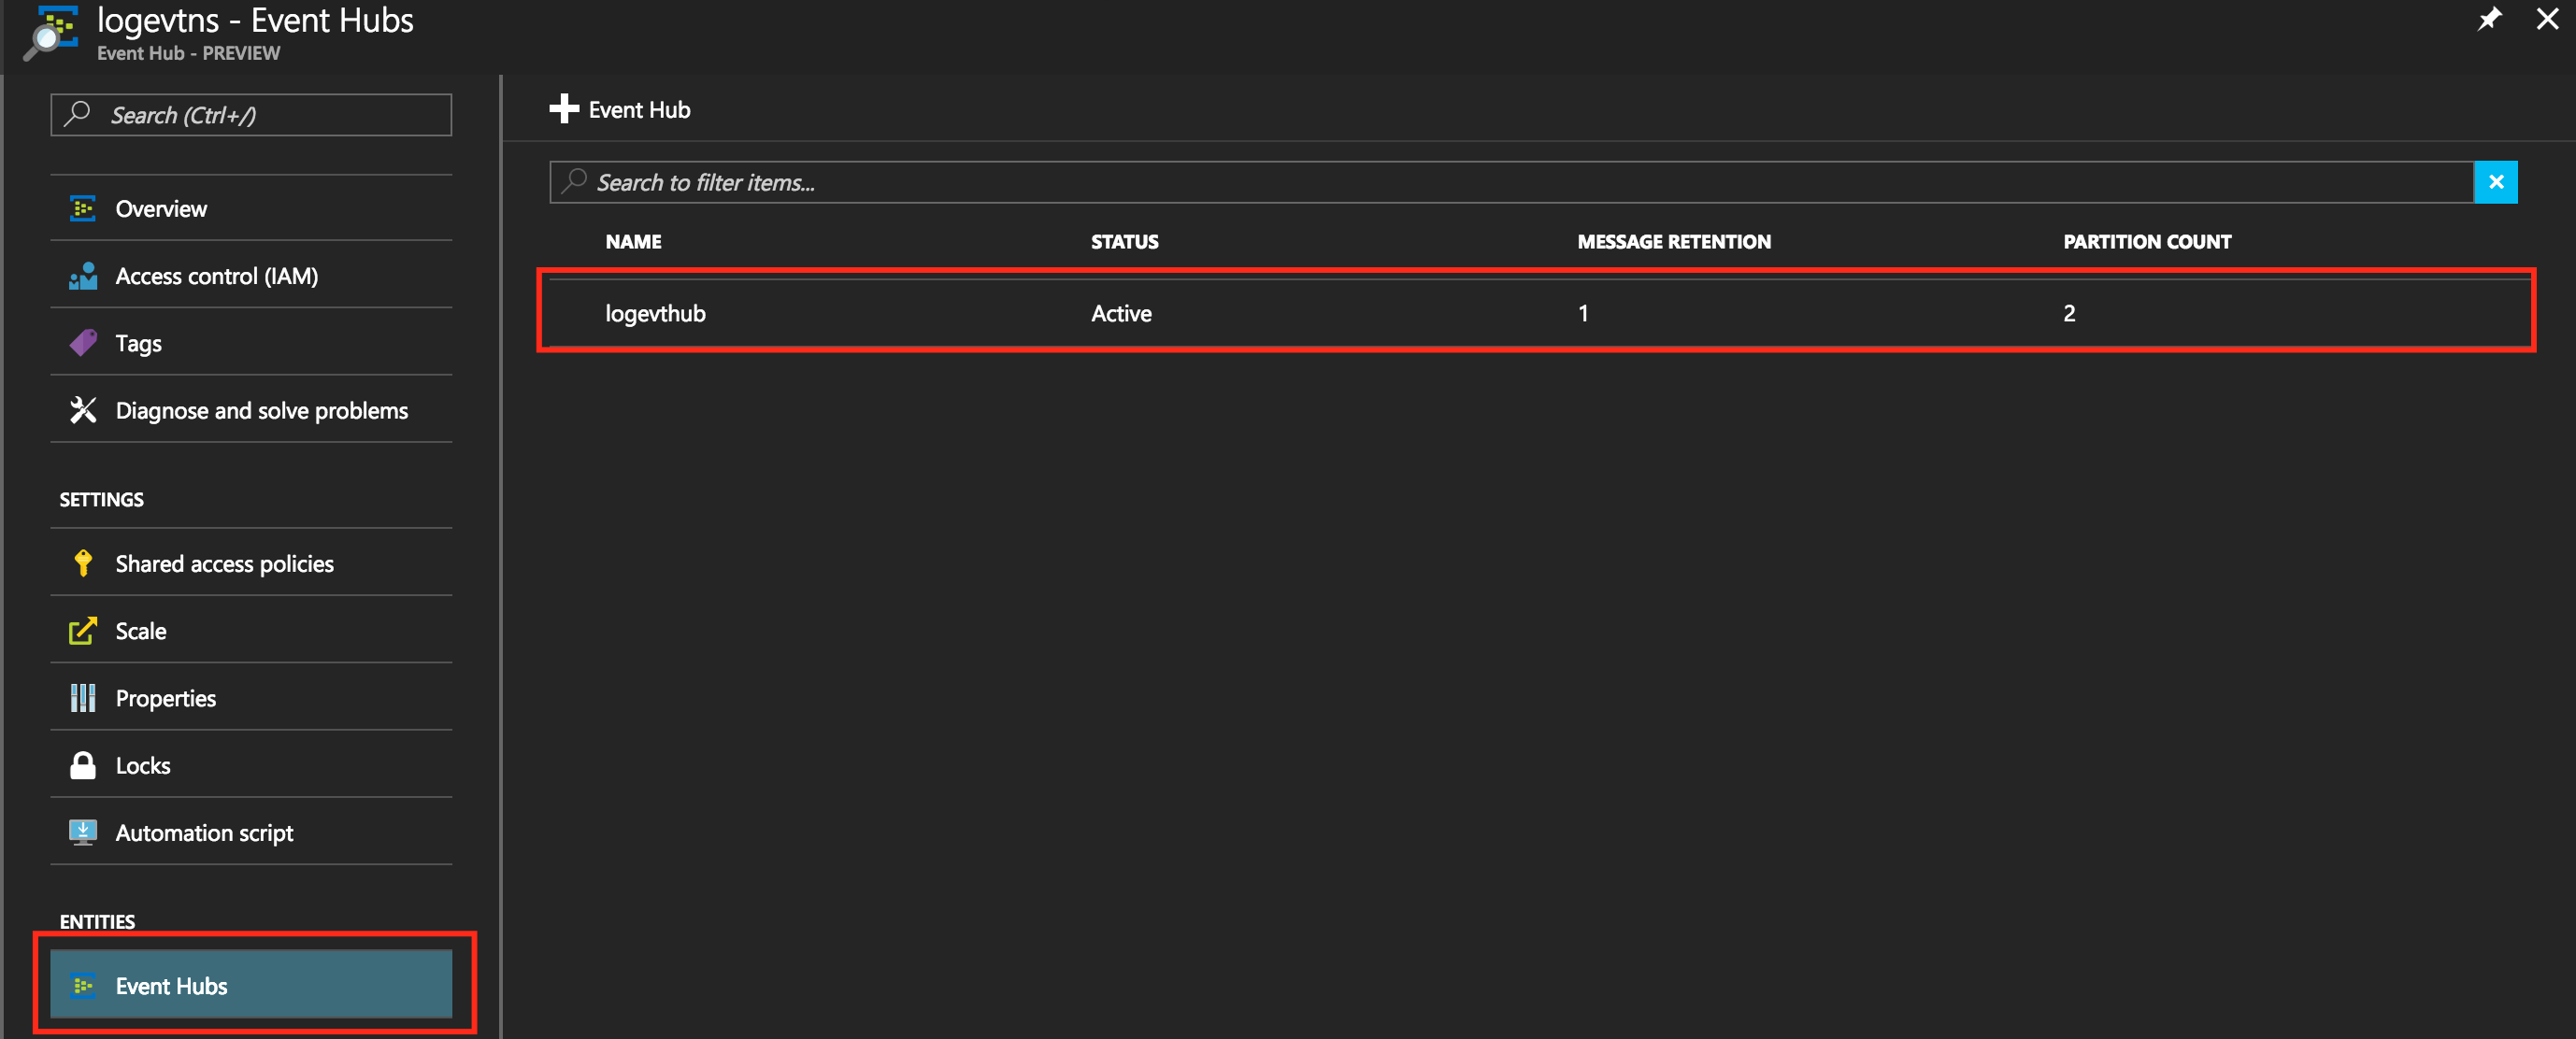
Figure 77 – Event Hubs
Click the Event Hub “logevthub” and click the “Shared access policies” in the “SETTINGS” section.
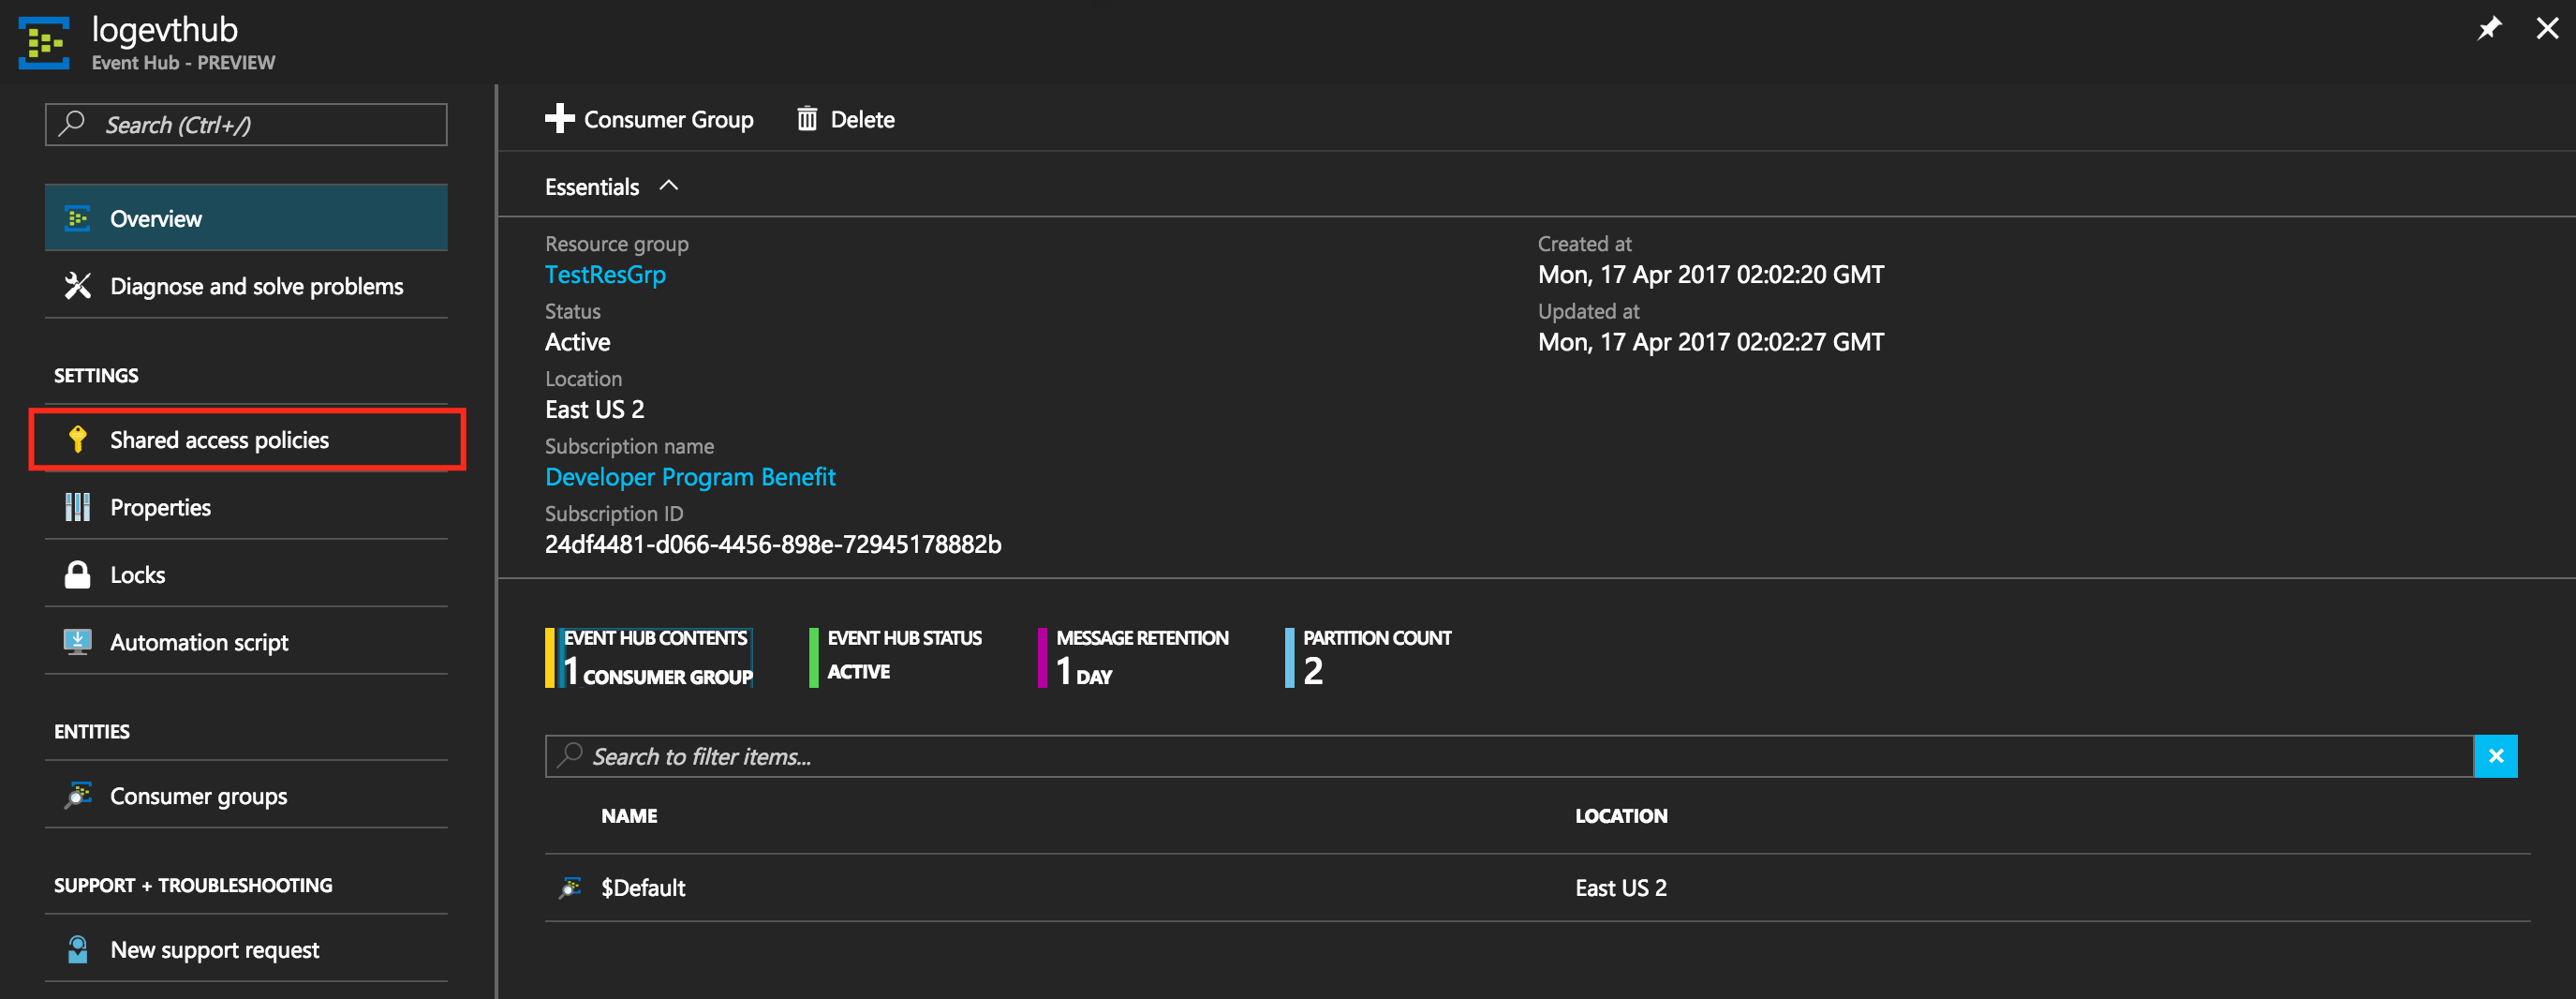
Figure 78 – Shared access policies
Click “Add” on the top of the Shared access policies blade displayed on the right.

Figure 79 – Add policies
We need to create two policies. One for listening to the requests and other for sending the requests.
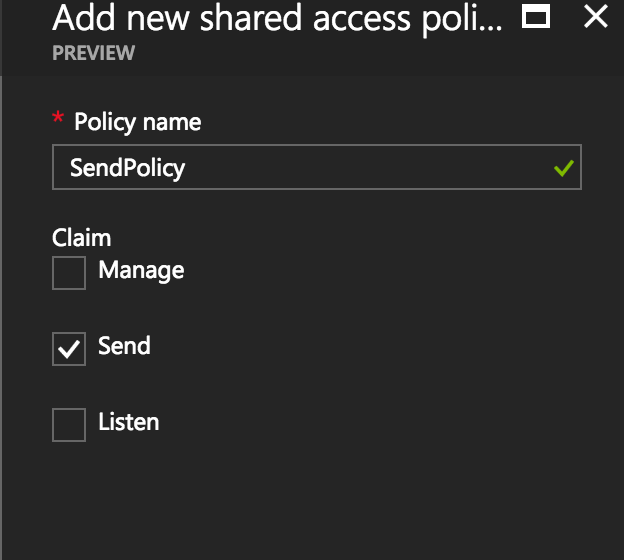
Figure 80 – Send Policy
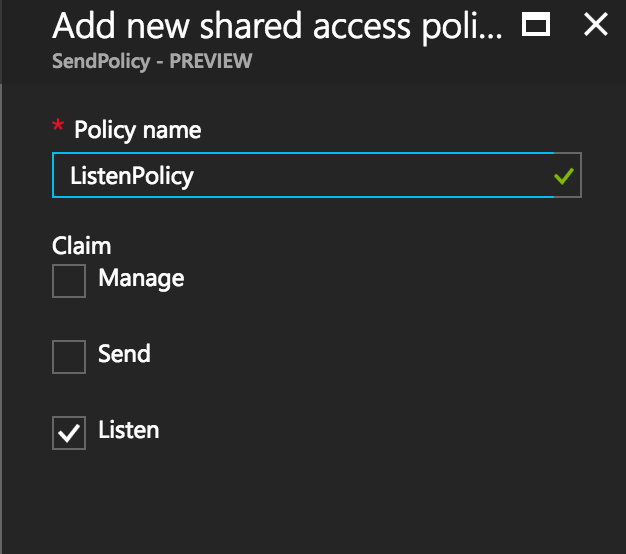
Figure 81 – Listen Policy
Now that we have created the Event Hub, next step is to create a Logger. You can know more about Azure API Management REST Operations using the URL https://docs.microsoft.com/en-us/rest/api/apimanagement/.
Loggers – Provides operations for managing Loggers used to collect events ( https://docs.microsoft.com/en-us/rest/api/apimanagement/loggers)
To create a logger, make an HTTP PUT request using the URL template as specified in the logger events as specified in the Loggers URL.
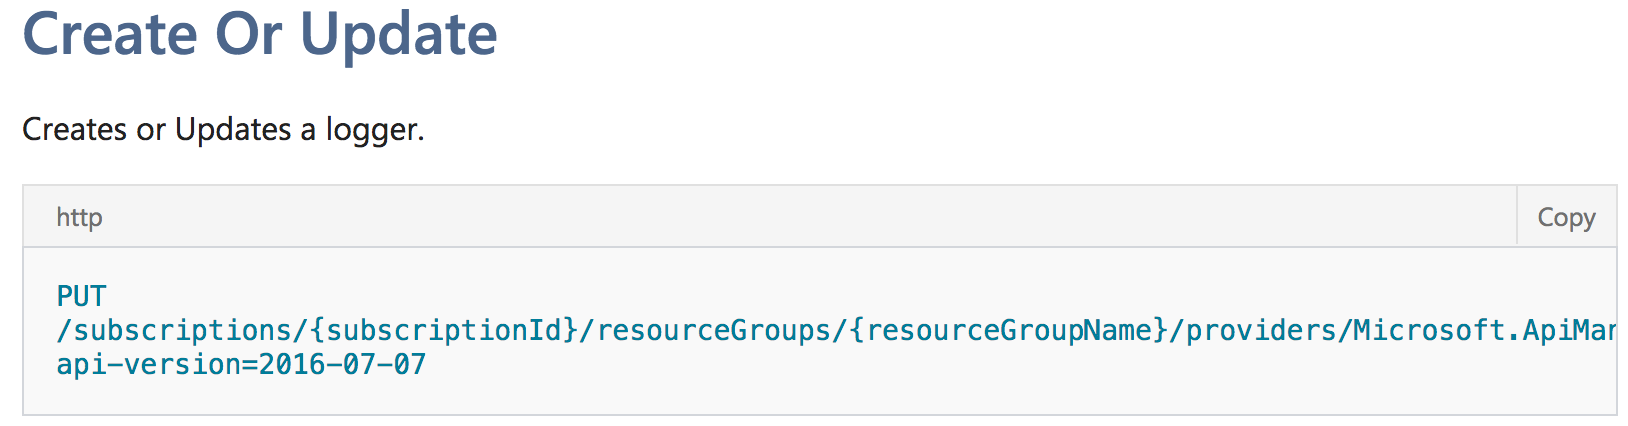
Figure 82 – PUT Request
Now open Fiddler or PostMan to submit the PUT Request and your URL should be something similar as below:
https://{your service}.management.azure-api.net/loggers/{new logger name}?api-version={api-version}
If you want to supported API Versions, you can do as below:
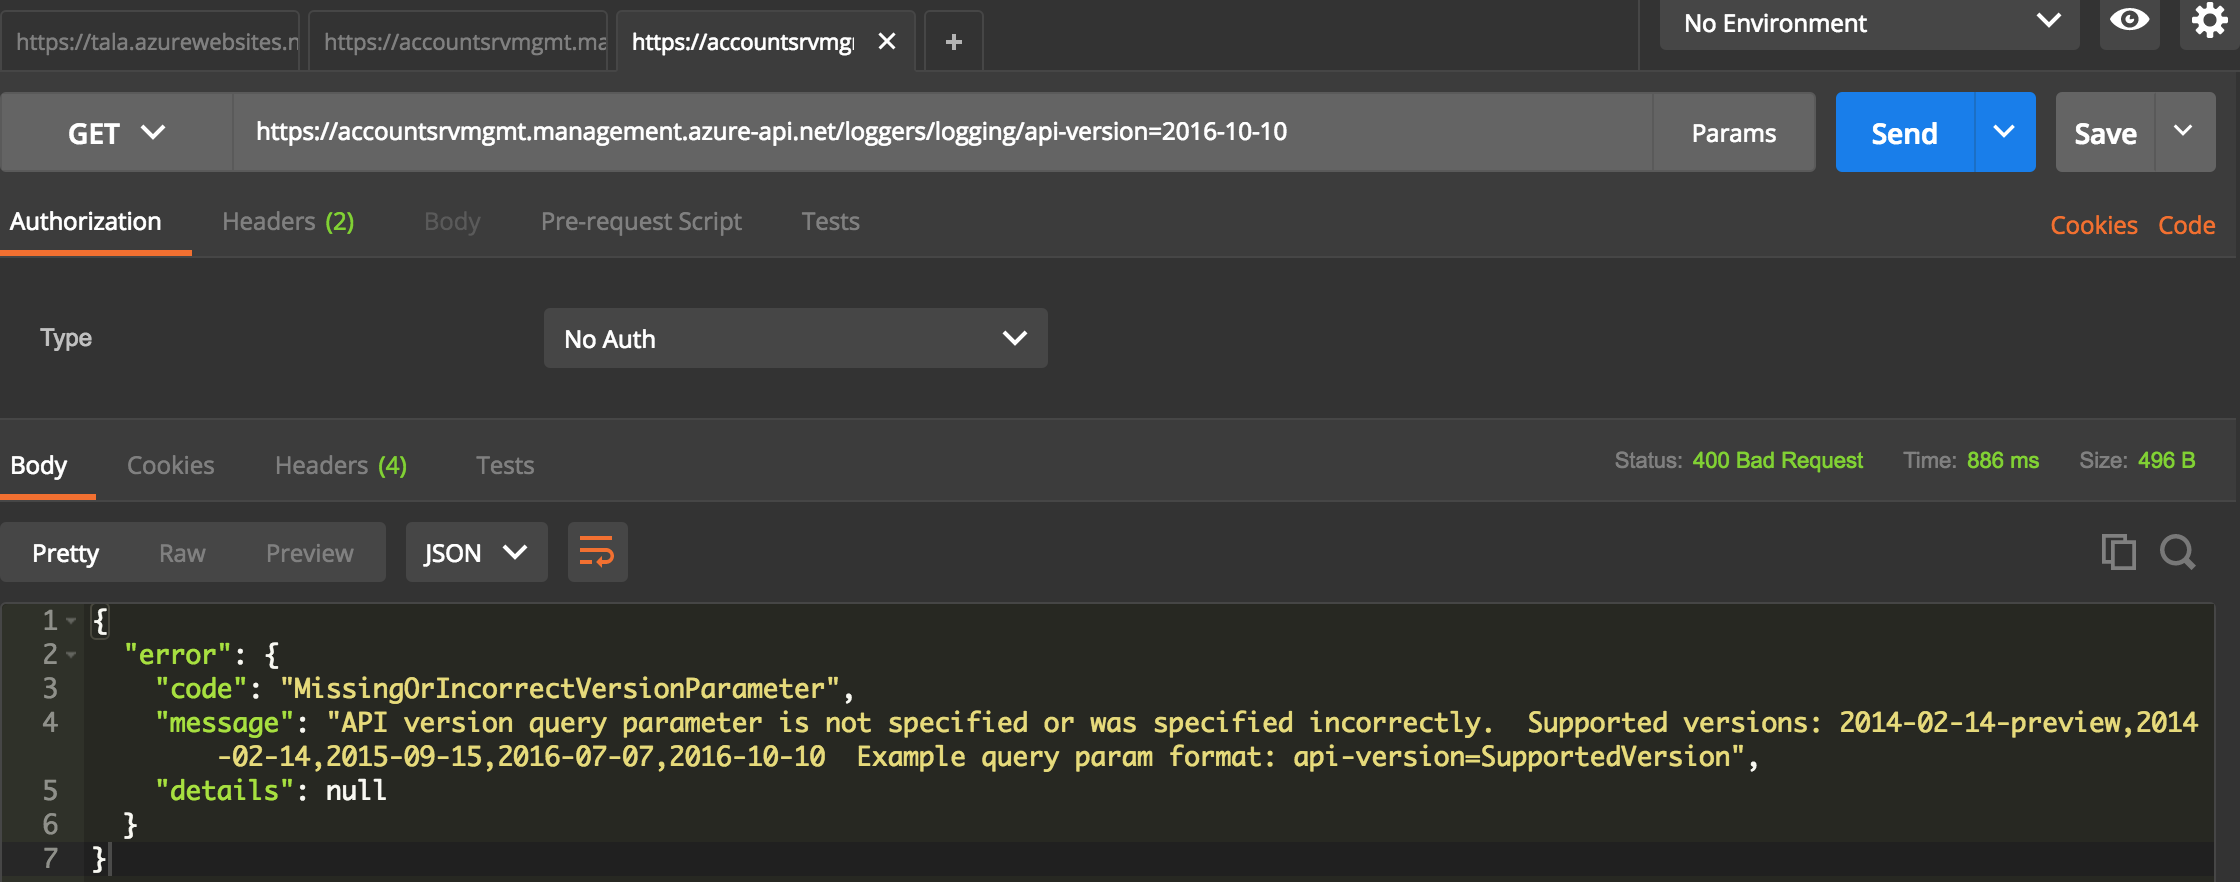
Figure 83 – Get request
Though GET request comes up with error but it displays the supported versions.
Now we need to execute HTTP PUT request from POSTMAN using the URL:
https://accountsrvmgmt.management.azure-api.net/loggers/accountlog?api-version=2016-10-10
Go back to “Security” in the API Management and click the “Generate Token” and copy the SharedAccessSignature generated.

Figure 84 – SharedAccessSignature
Now to back to POSTMAN and add the following headers:
Content-Type: application/json
Authorization: Copy the SharedAccessSignature

Figure 85 – PUT Request
Add the following in the body of the request:
{
    "type" : "AzureEventHub",
    "description" : "AccountsAPIEventHub",
    "credentials" : {
            "name" :{event hub},
            "connectionString" : {sender connection string
       }
}
The type property should be “AzureEventHub” and description is as suitable for your application and in the credentials provide the name of the event hub created earlier (in my case it is “logevthub”) and connection string value should be the sender connection string that you can find it from “logevthub” details page.

Figure 86 – Shared access policies
Hit on the “SendPolicy” listed in the figure 86 and should see a connection string. Copy the connection string and paste it in the connection property value in the request body and execute the request. It should see the HTTP response 201 Created.
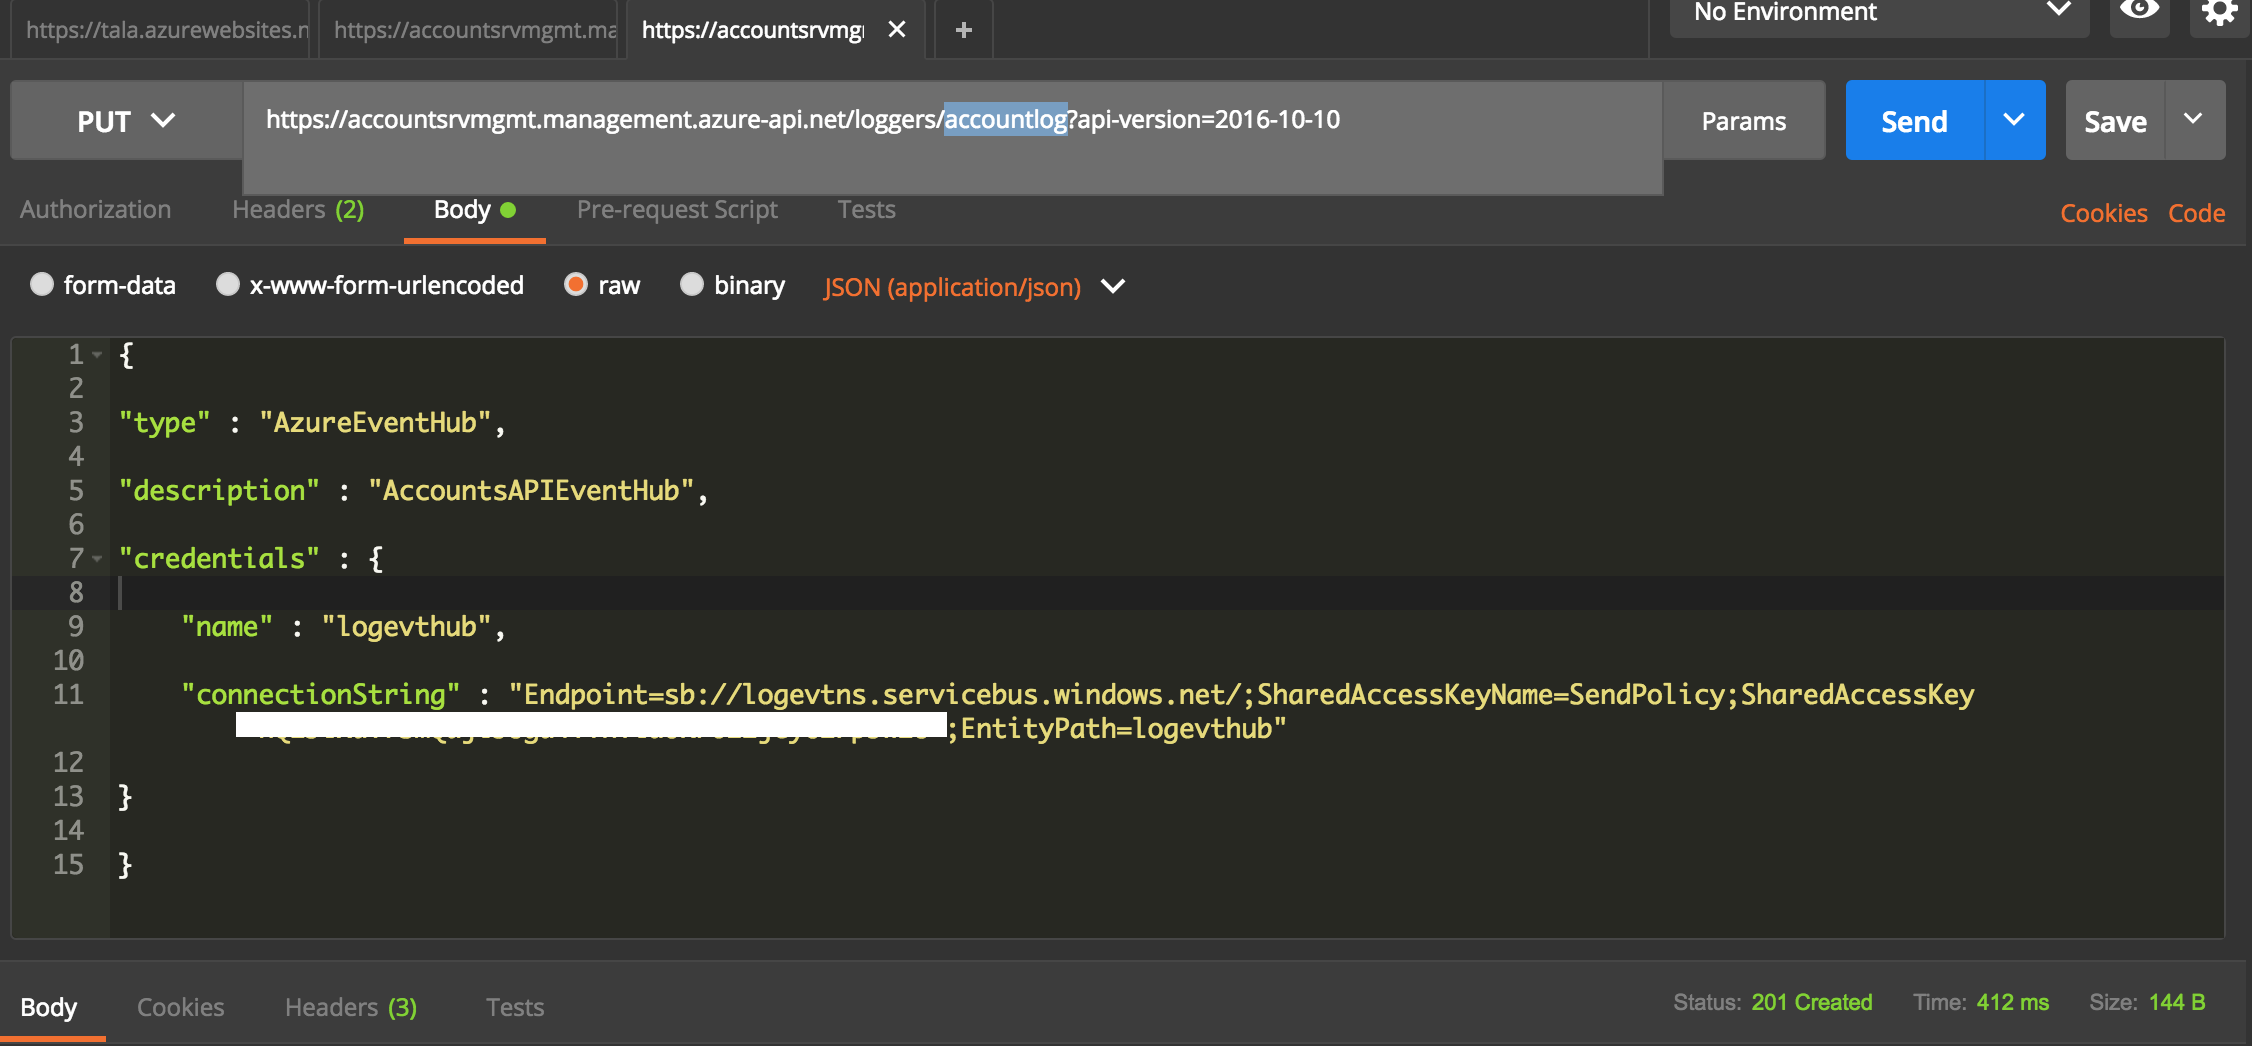
Figure 87 – 201 created
Now we can use the logger “accountlog” gets created. Go back to API Management and select “Policies” in the Publisher Portal. Select the API “AccountsAPI” and click on “CONFIGURE POLICY”.
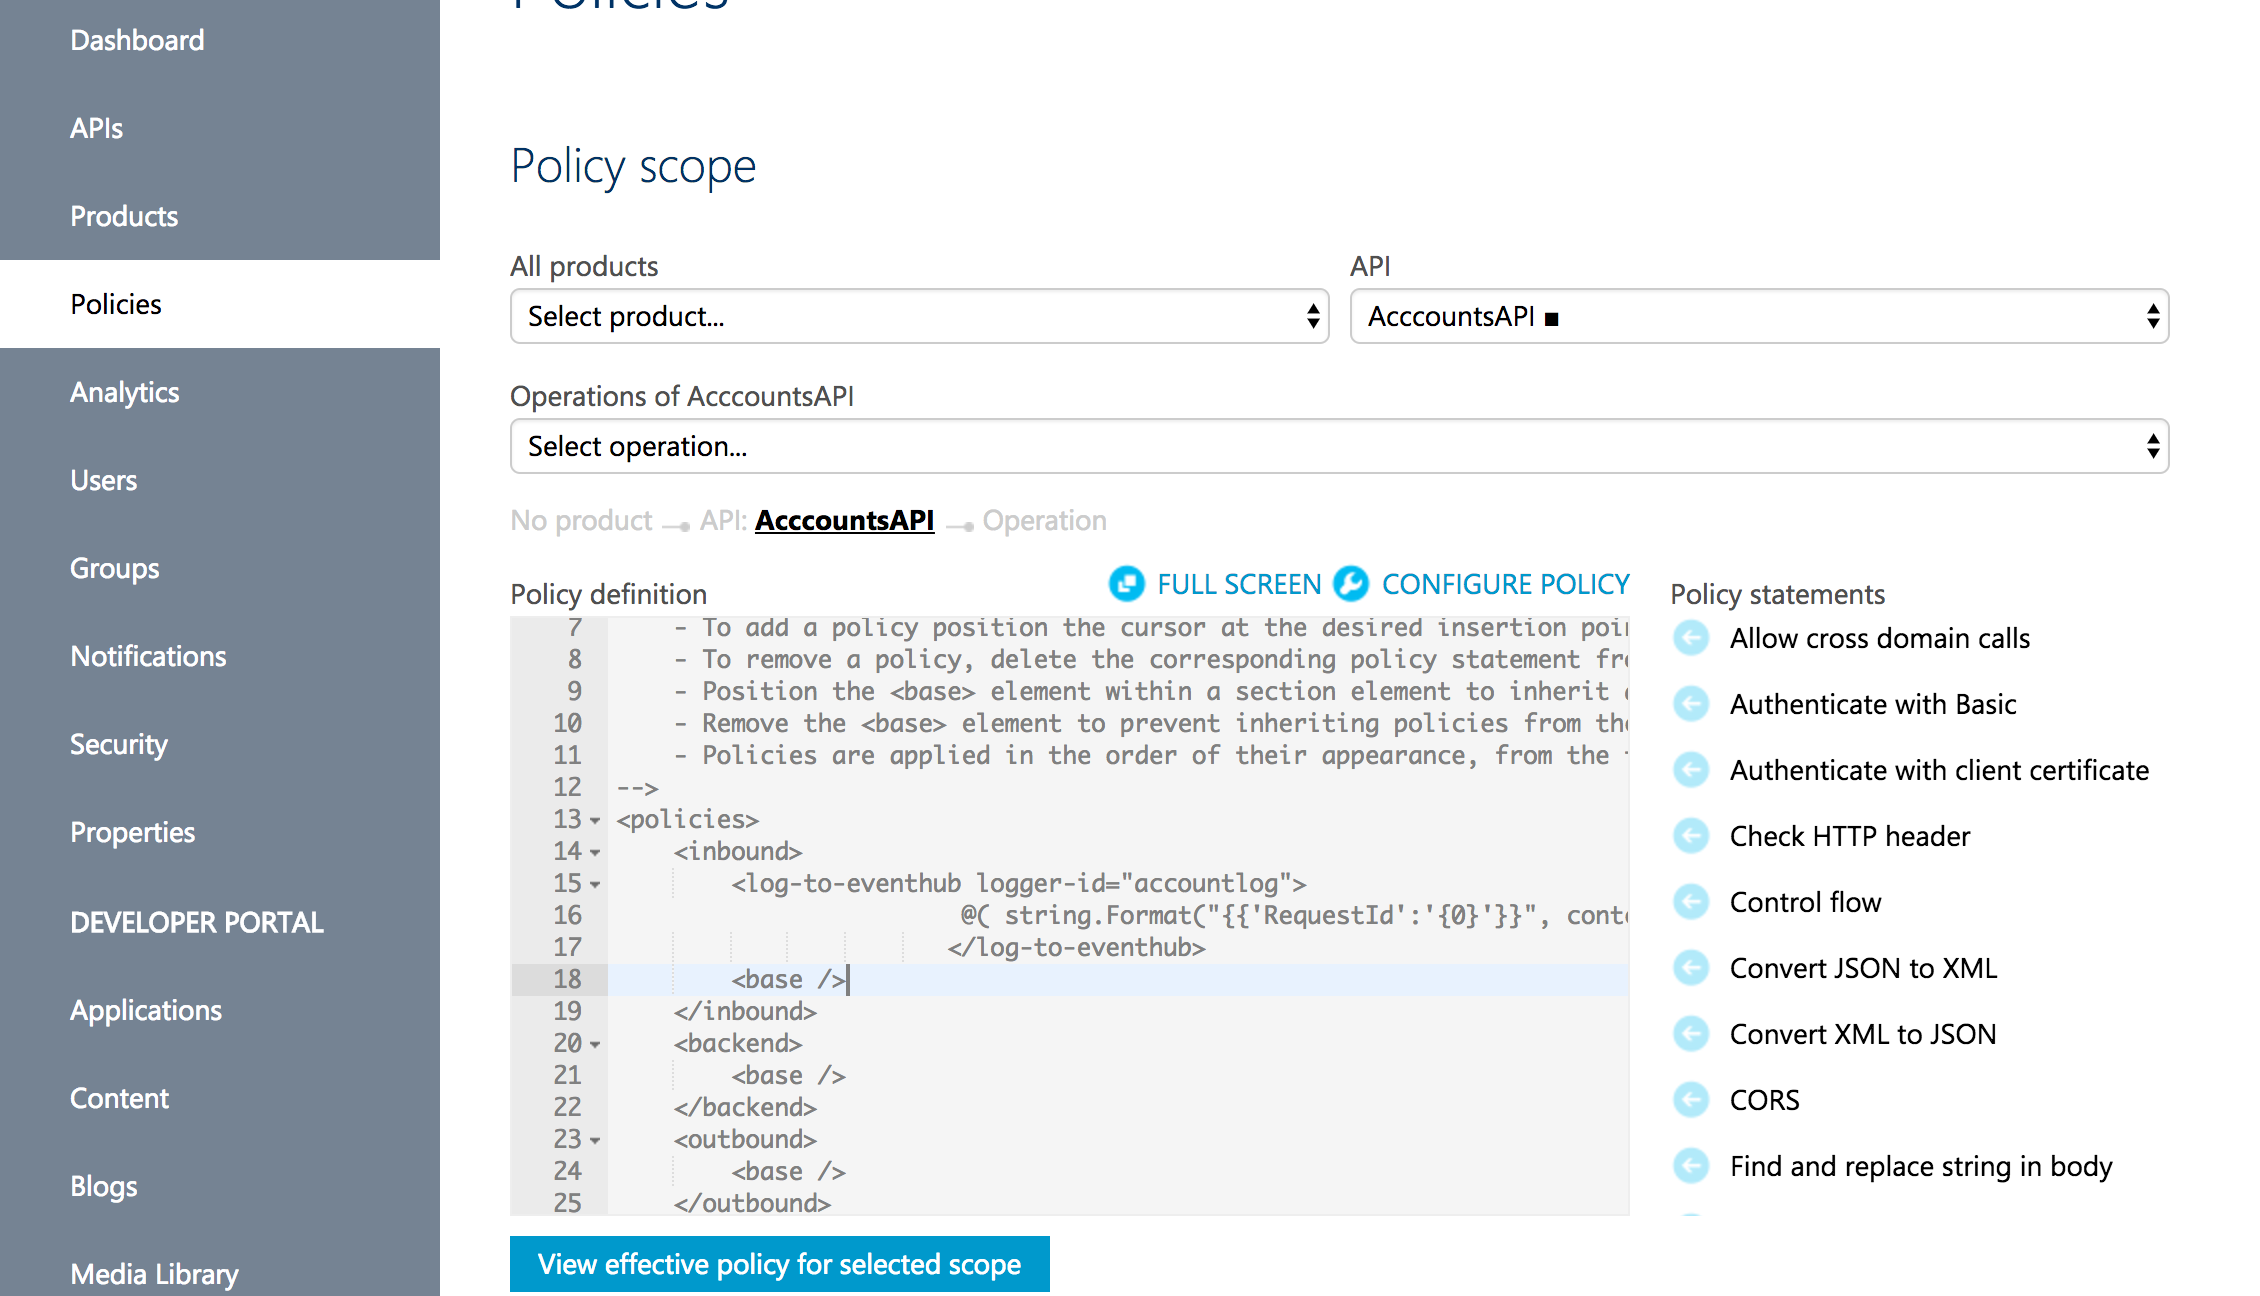
Figure 88 – Policy scope
Click on the policy statement “Log to EventHub” and add the policy statement as below:
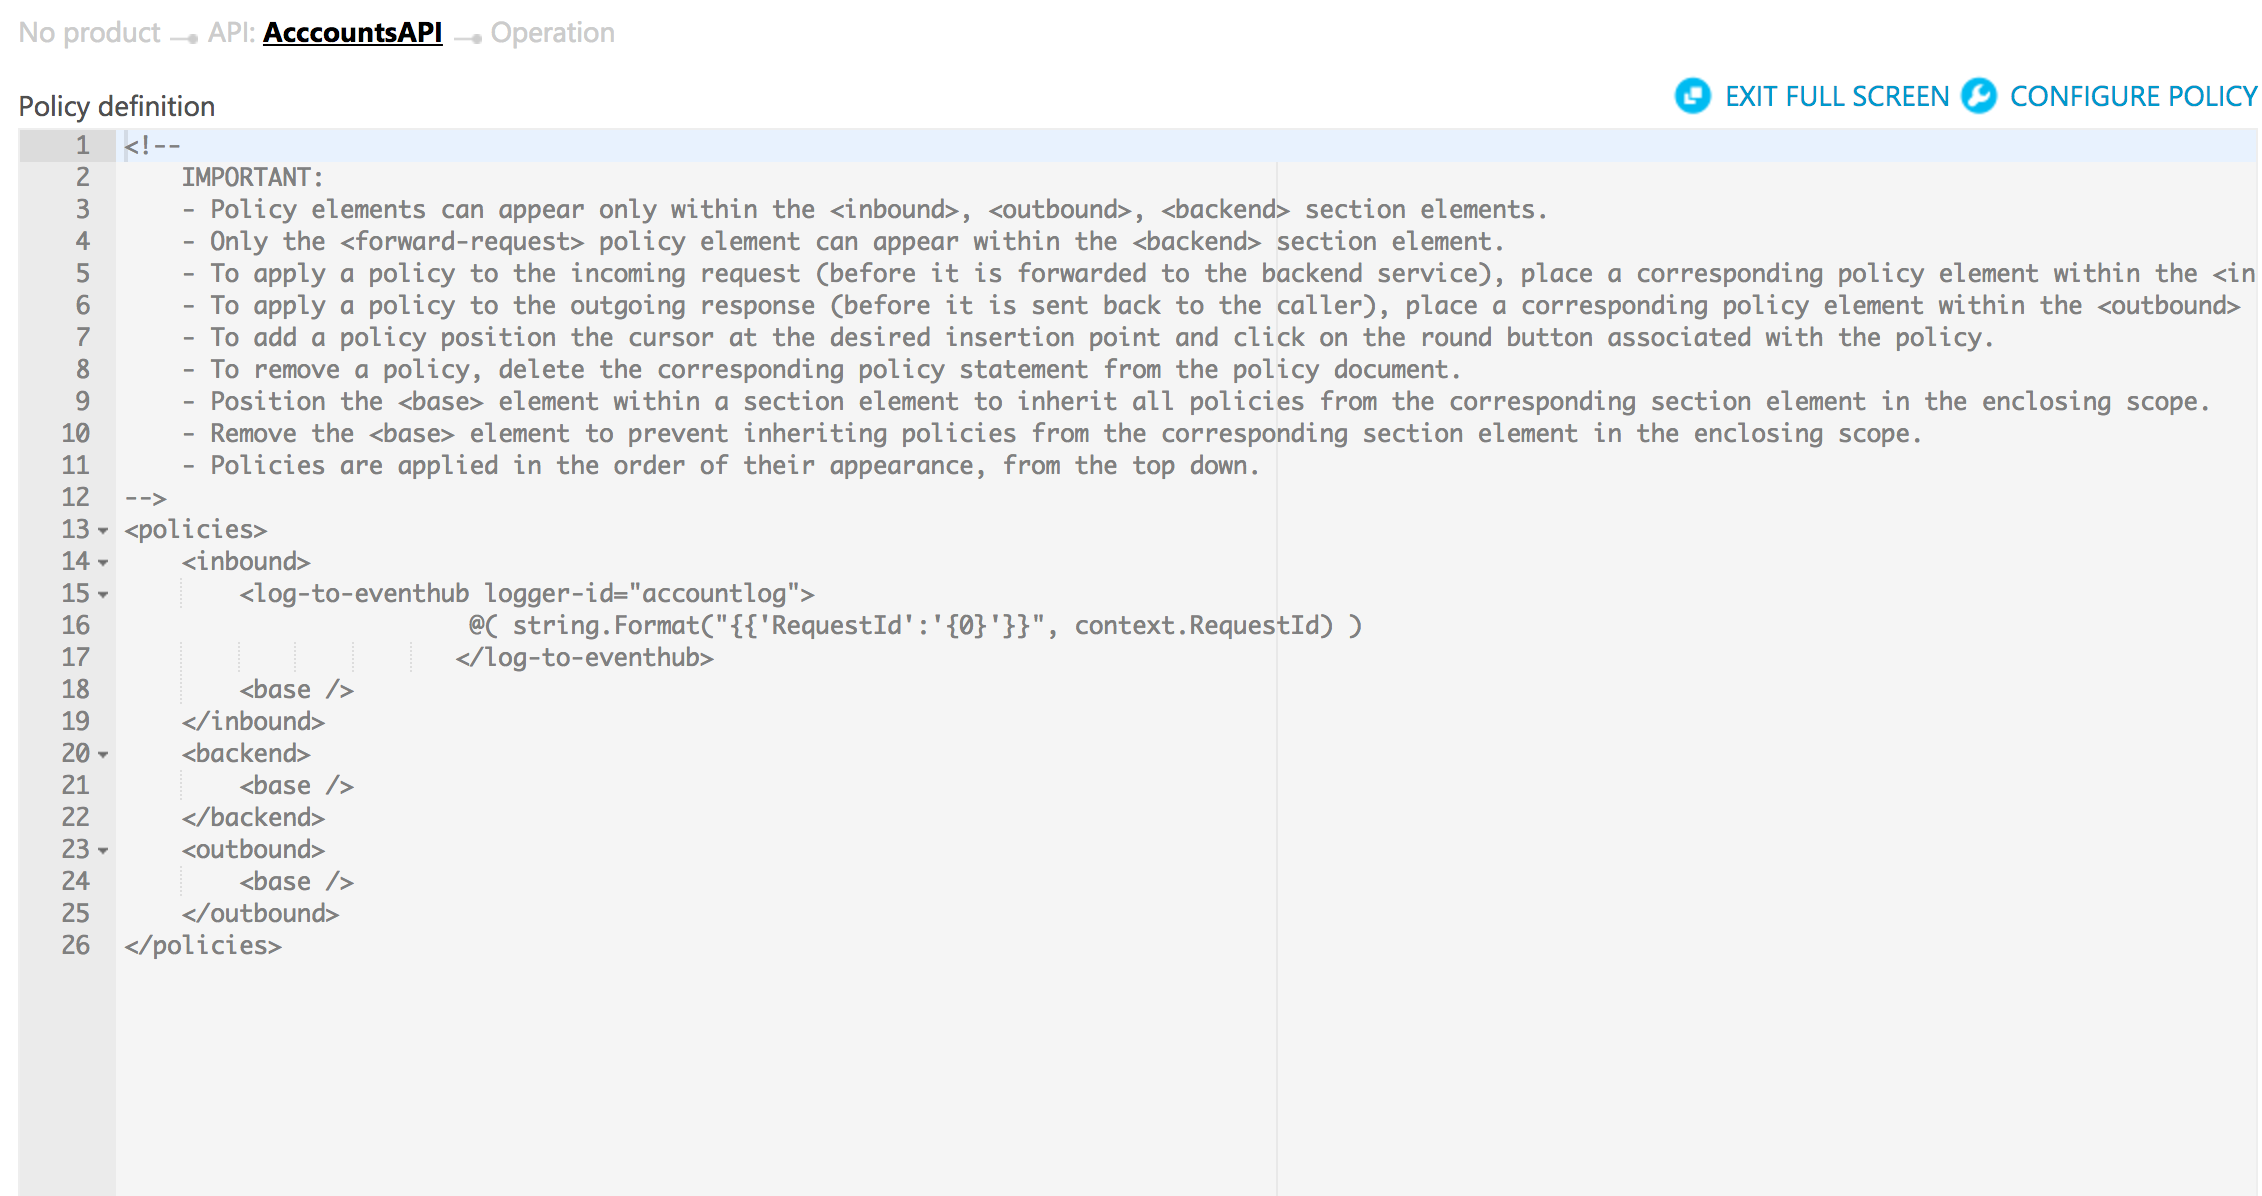
Figure 89 – Adding logger
Now let us test the logger by hitting the API “AccountsAPI” by navigating to the “Developer Portal” and hit the “Get All Accounts” and click “Try it” and send the request. In the “Trace” section, now we should see the trace for log-to-eventhub as below and here we are trying to generate response in JSON format ({‘RequestId’:’70aa3c76-98ec-4779-a5ec-263db4d267da’}):
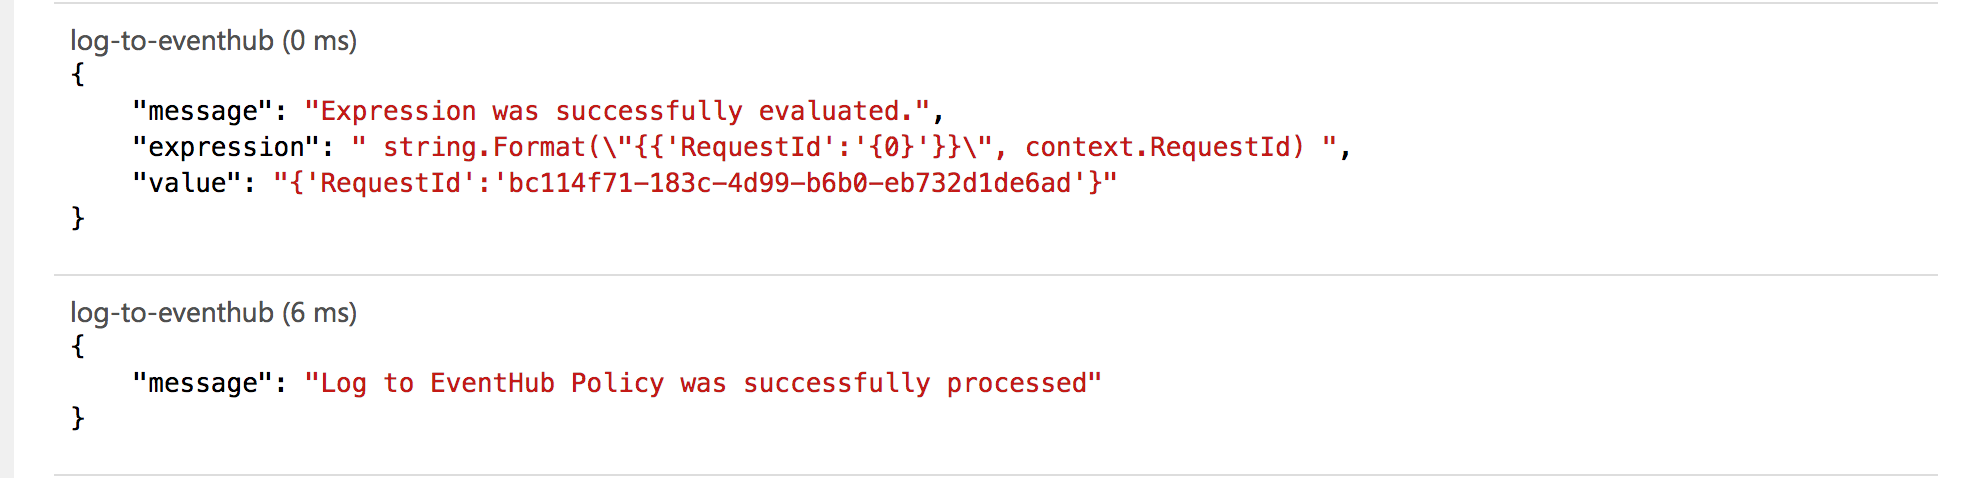
Figure 90 – log-to-eventhub trace
Also navigate to the “logevtns” details and you should see a spike in the Metrics as below:
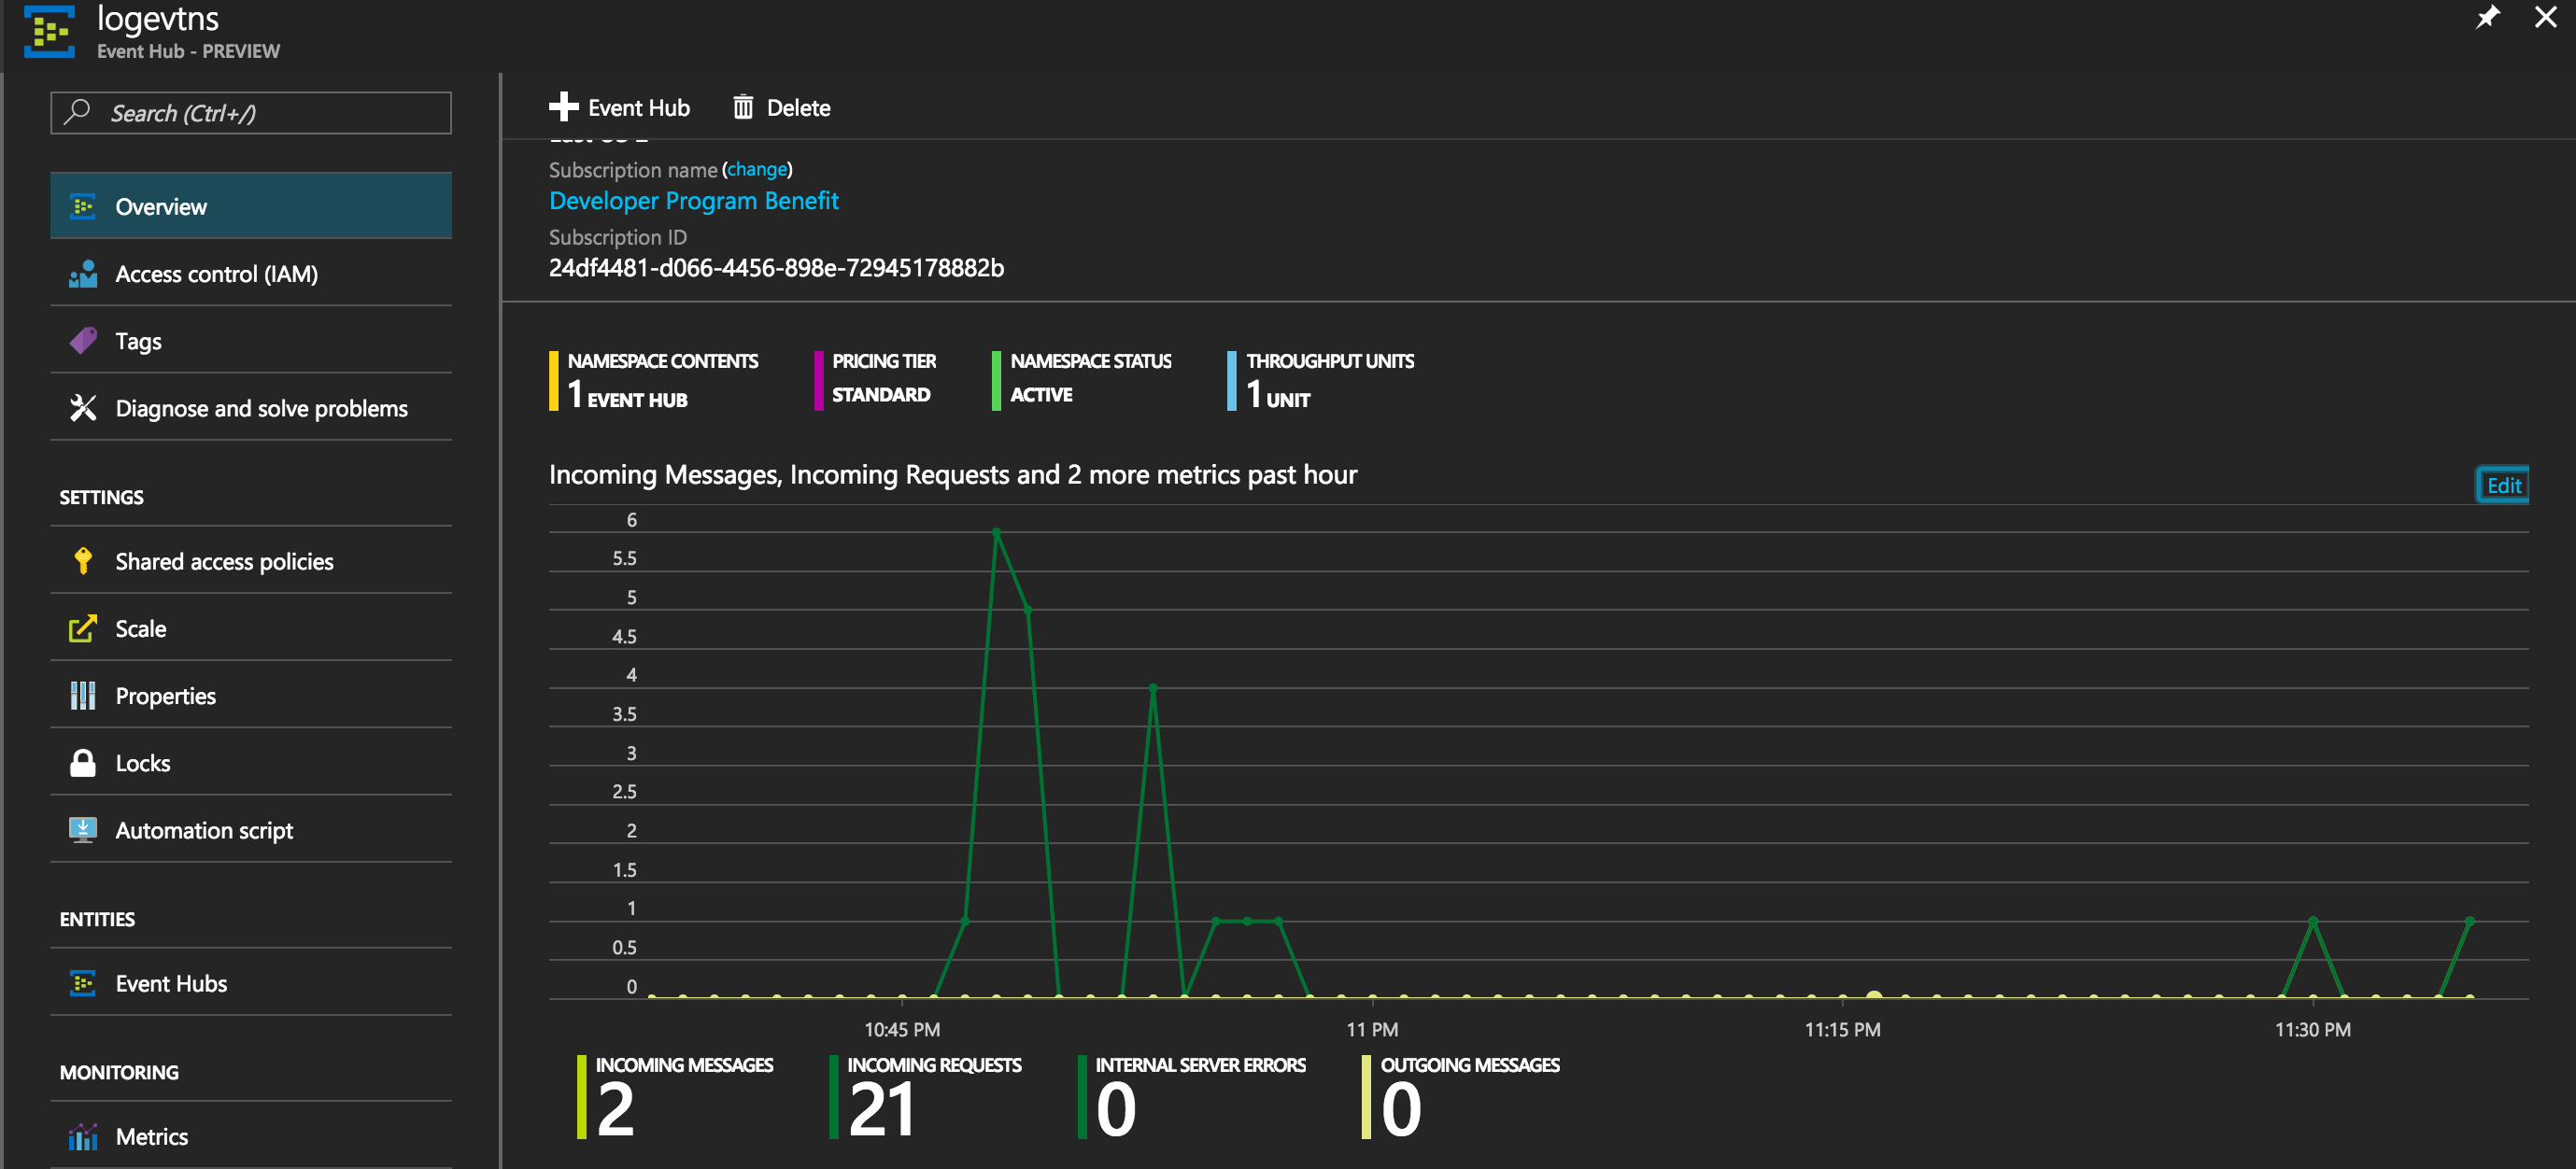
Figure 91 – Metrics
Next step is creating a SQL Server and a database to inject the data from Event Hub to the database using Stream analytics. Search for “SQL Database” and select the “SQL Database” from the results and click “Create” in the blade displayed.
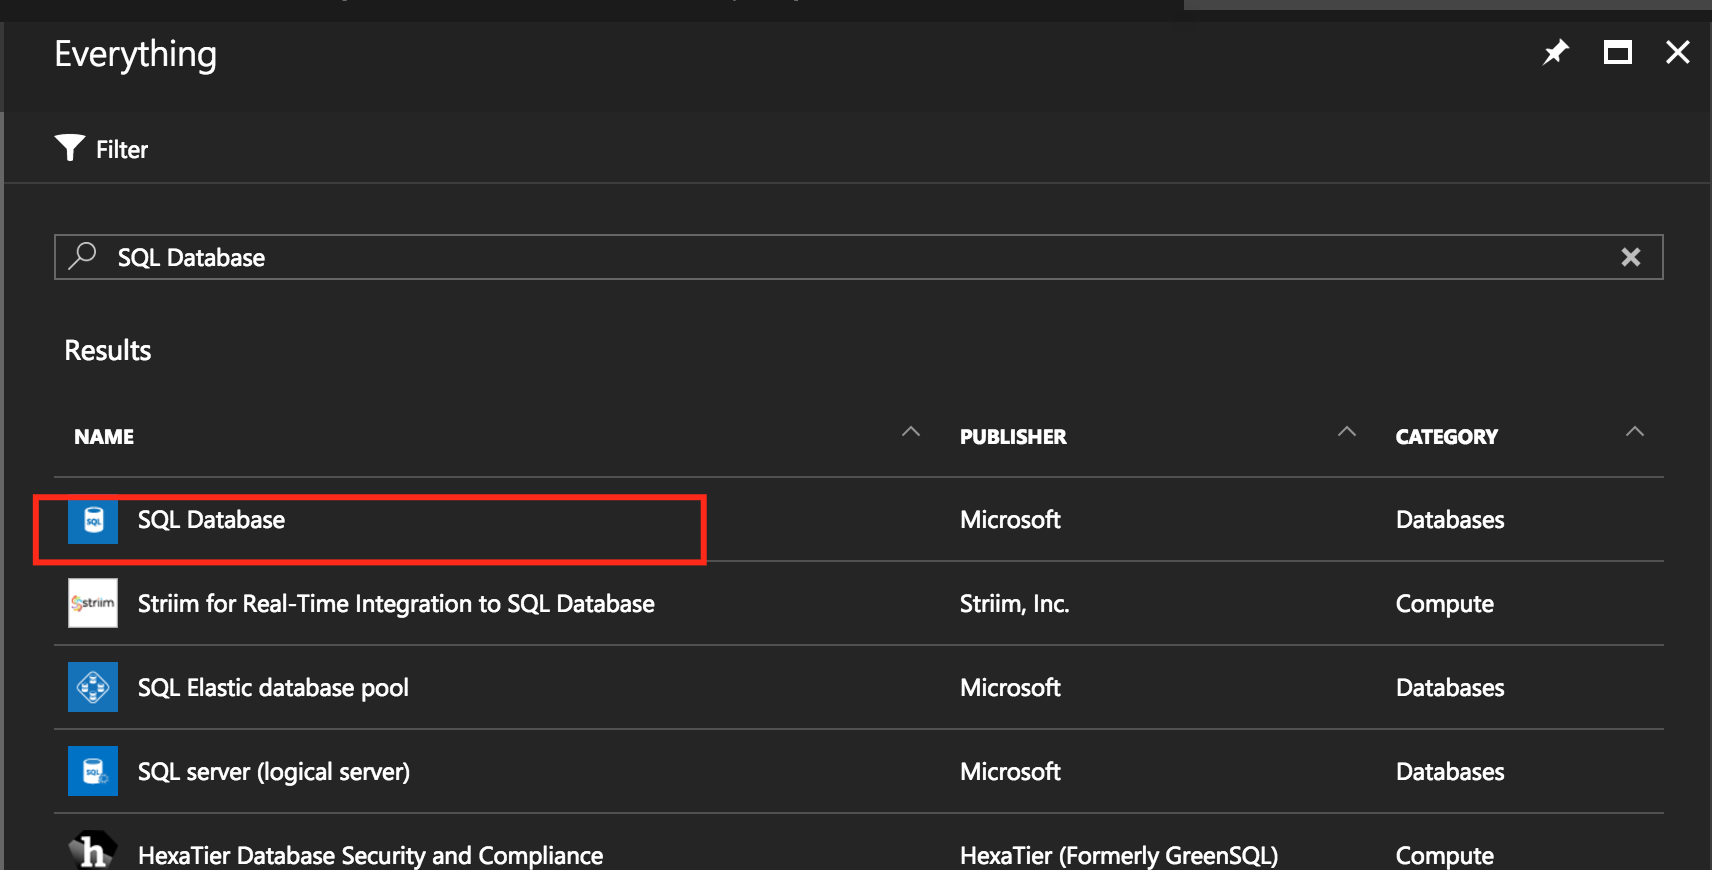
Figure 92 – SQL Database
Configure SQL server as shown in figure 93 and remember admin login value and password so that we can use the same in future.
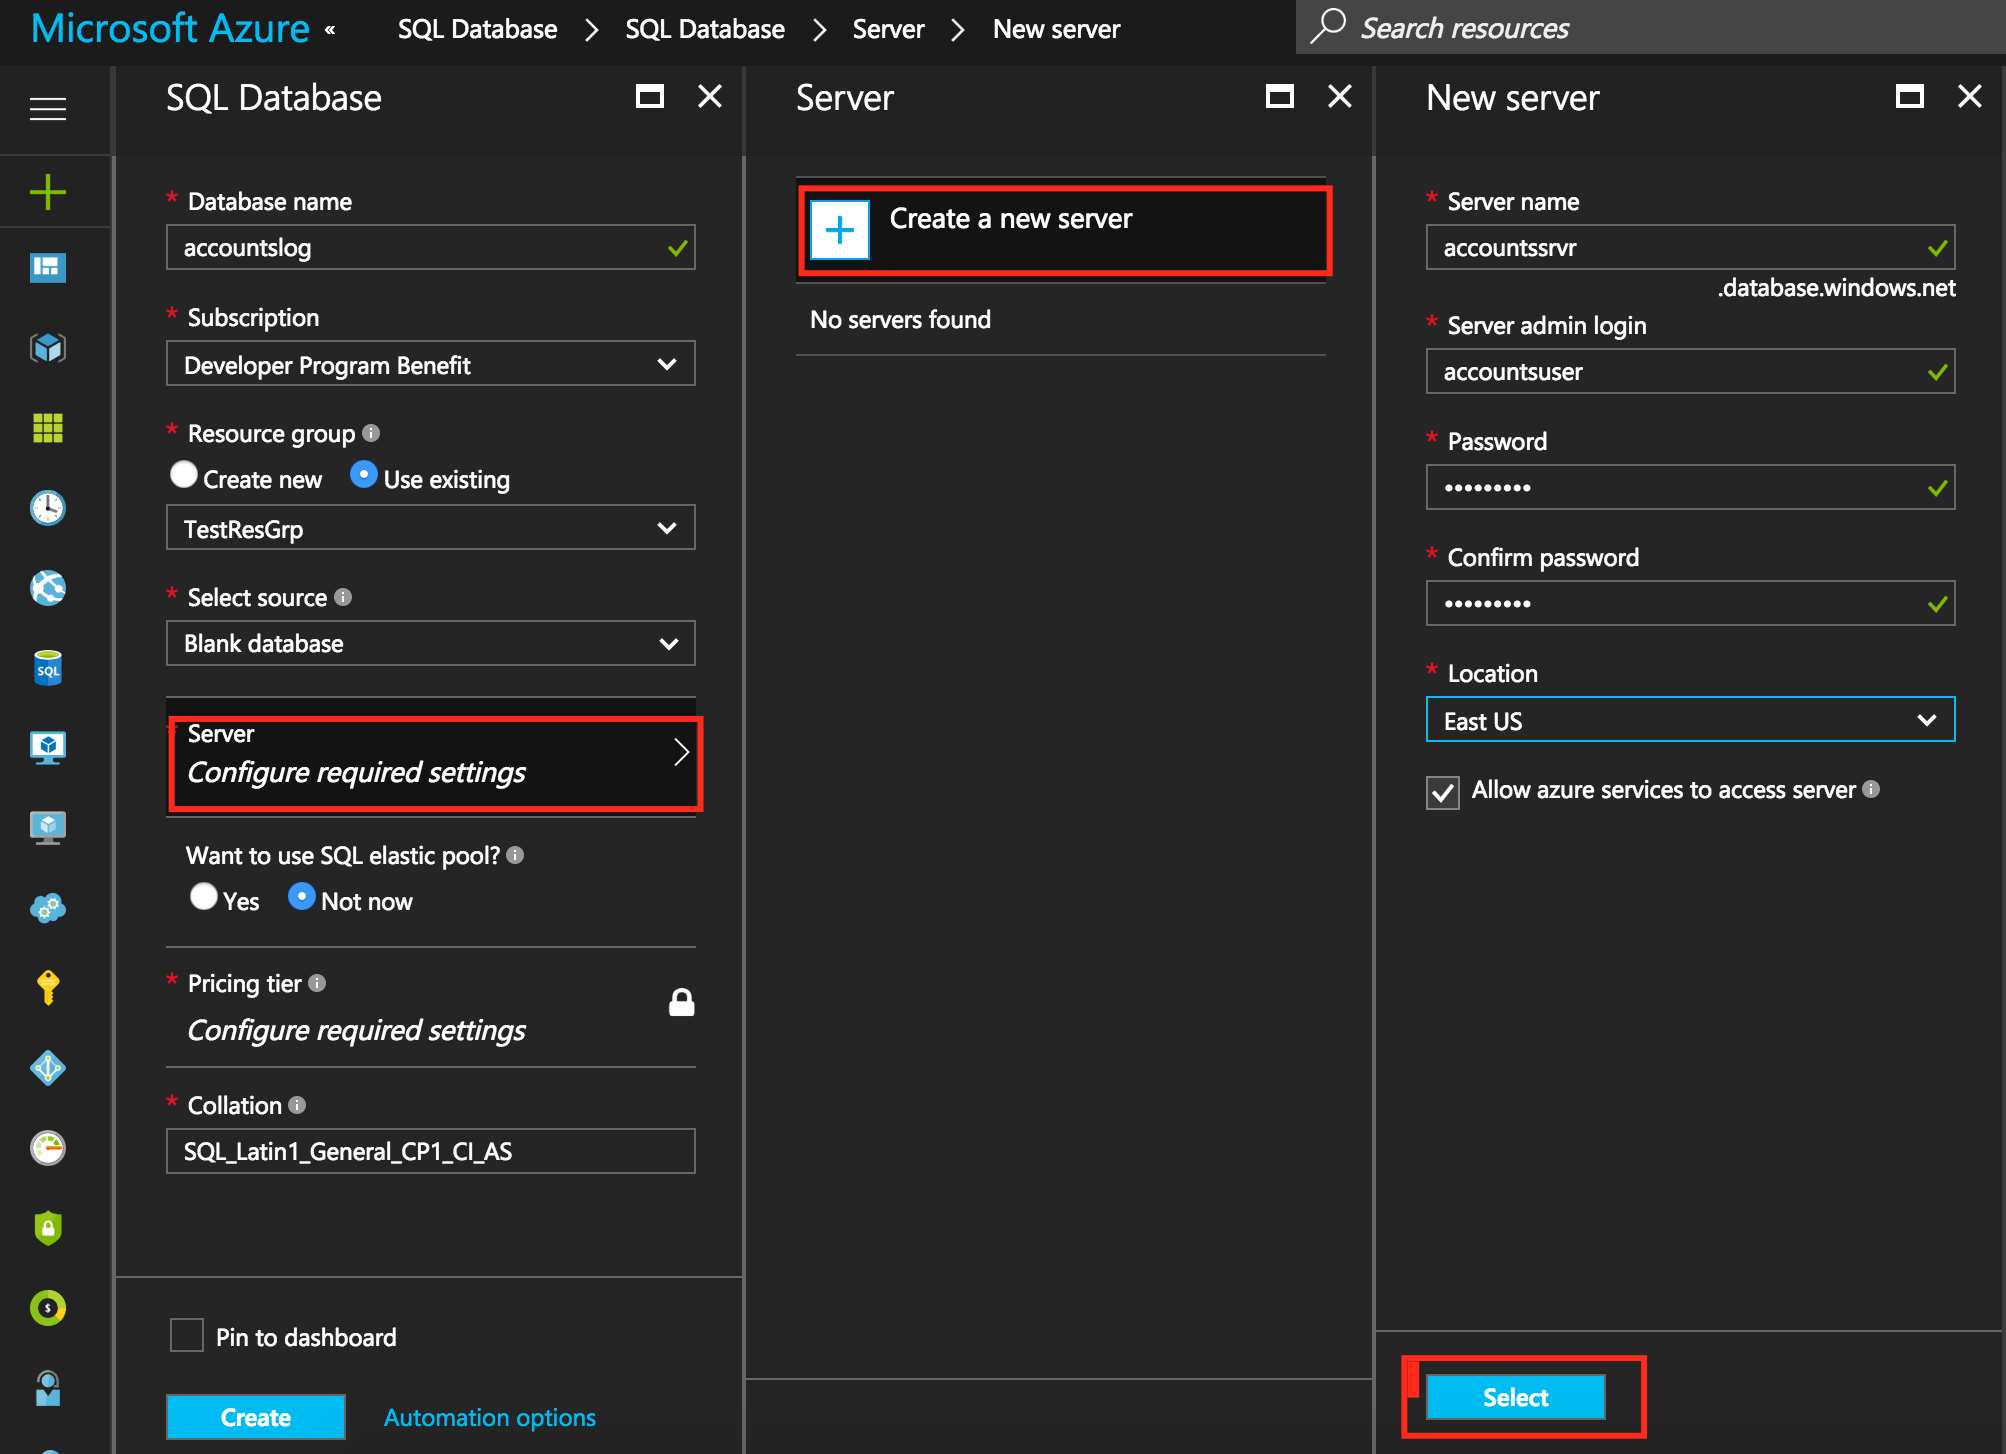
Figure 93 – Create a new SQL Server
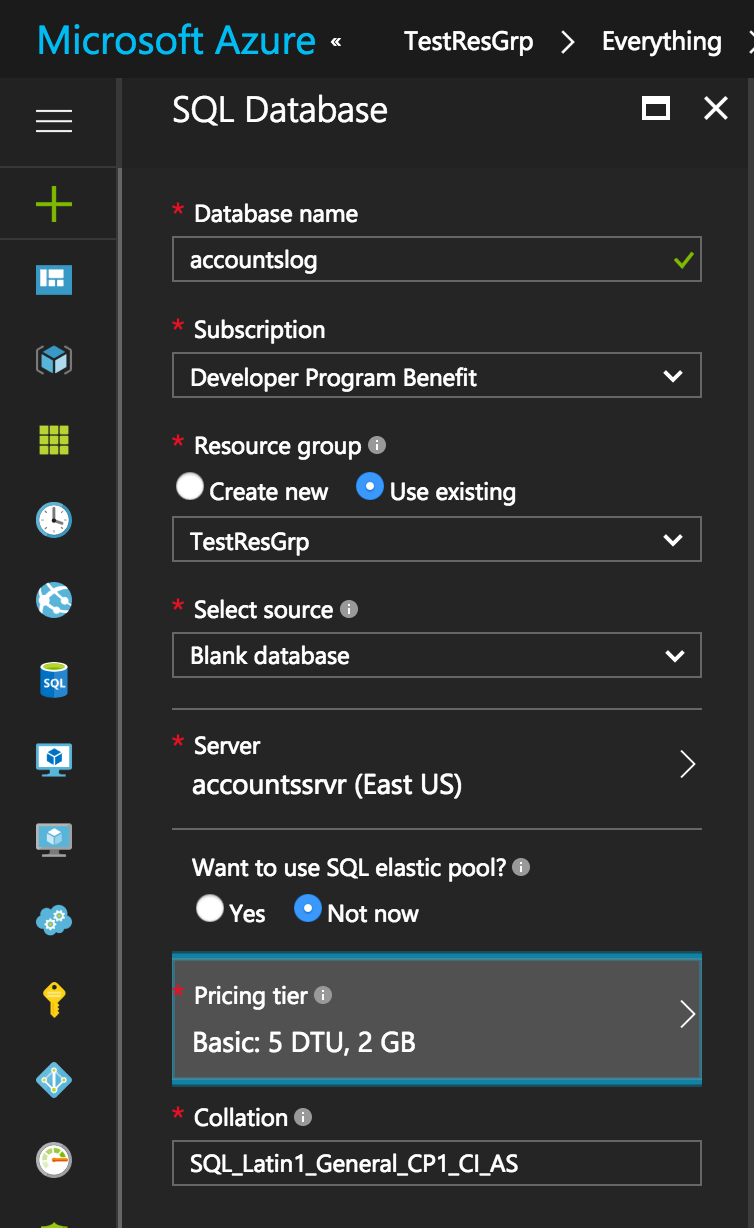
Figure 94 – Select basic pricing tier to save your credits
We will use Visual Studio to create the table in the database. Open Visual Studio and click the “Server Explorer” and map to your Azure account and you should see the database listed under “SQL Databases”.
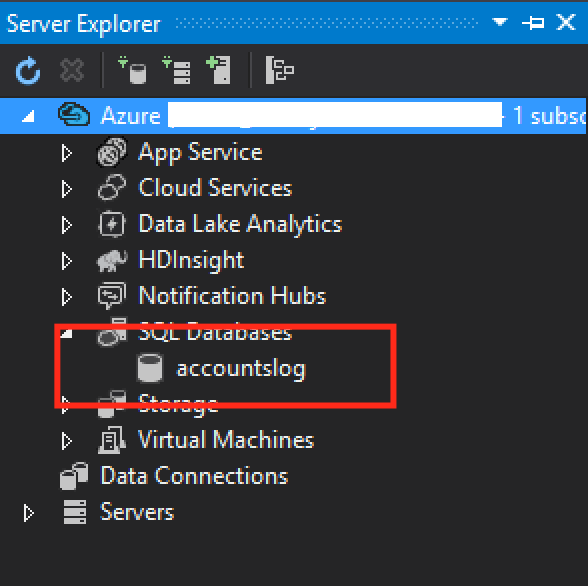
Figure 95 – Server Explorer in Visual Studio
Now right click on the database and select “Open in SQL Server Object Explorer”.
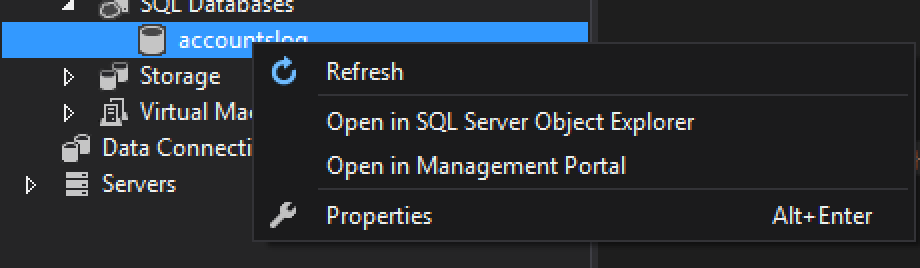
Figure 96 – Open in SQL Server Object Explorer
It should open a pop up window which asks you to enter the password. Enter the password that you have created earlier.
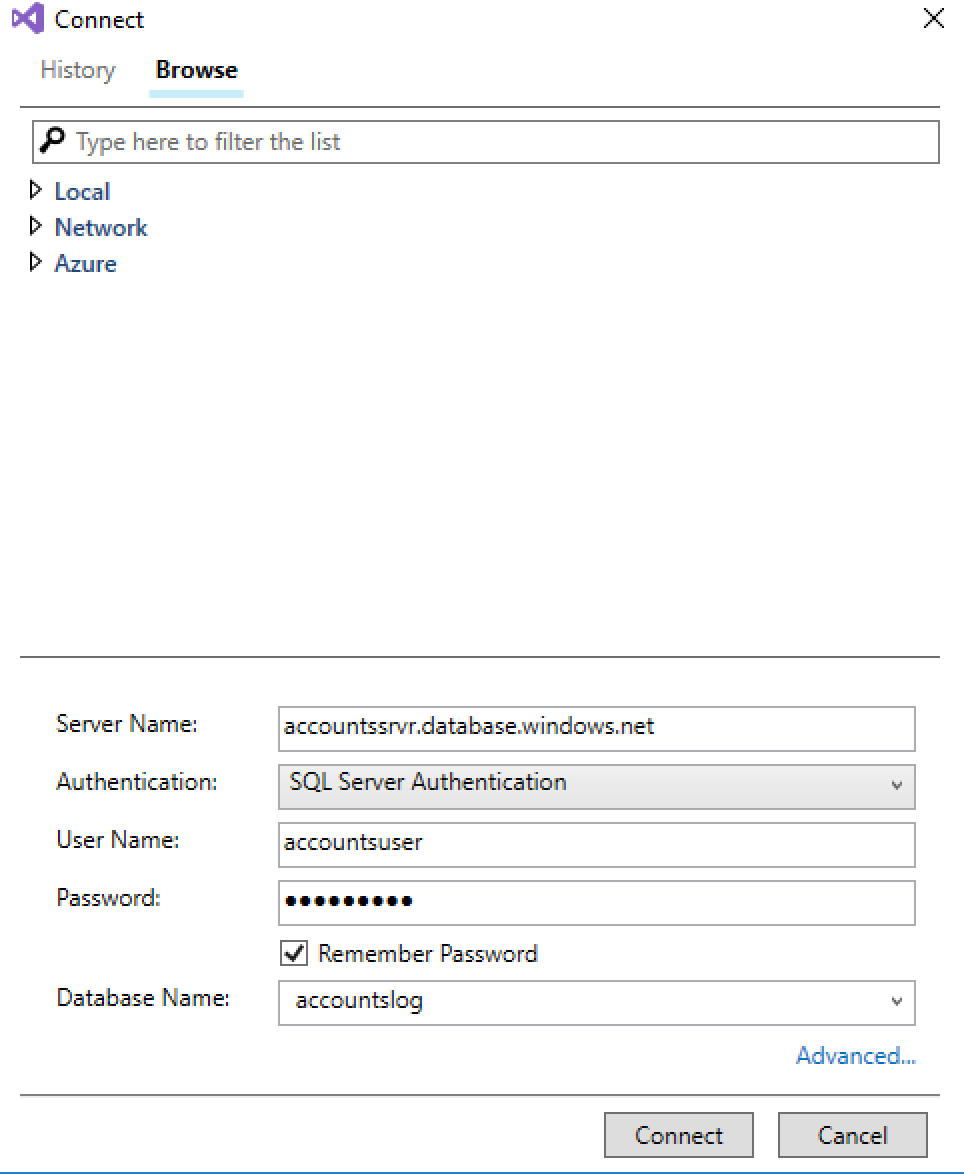
Figure 97 – Database server connection
Once you enter the password and click the “Connect” button and then it will pop up to create a new firewall rule and click the button “OK”.
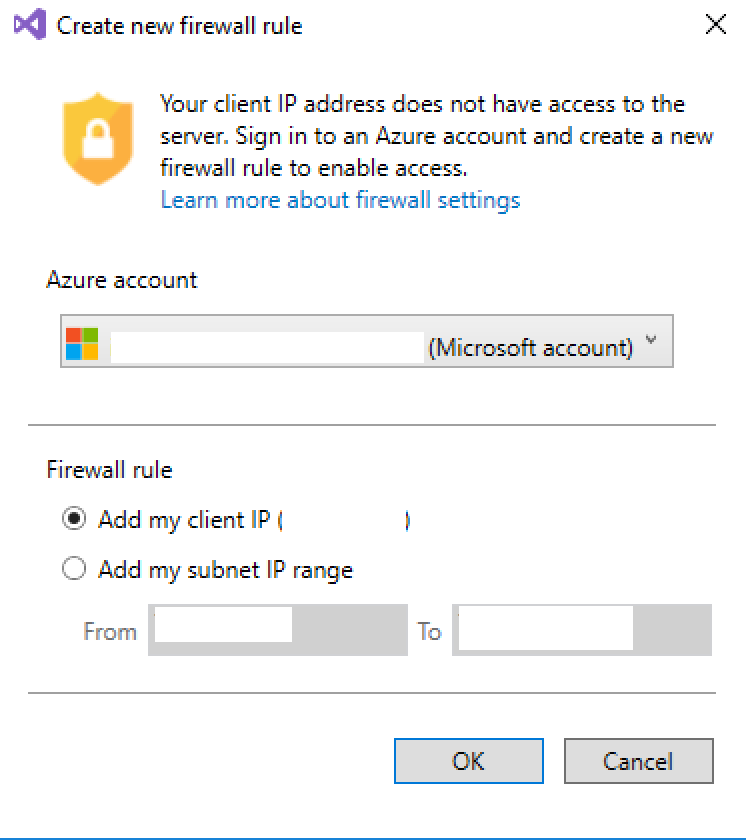
Figure 98 – Create new firewall rule
Now right click on the Tables and hit “Add New Table..”.

Figure 99 – Add new Table
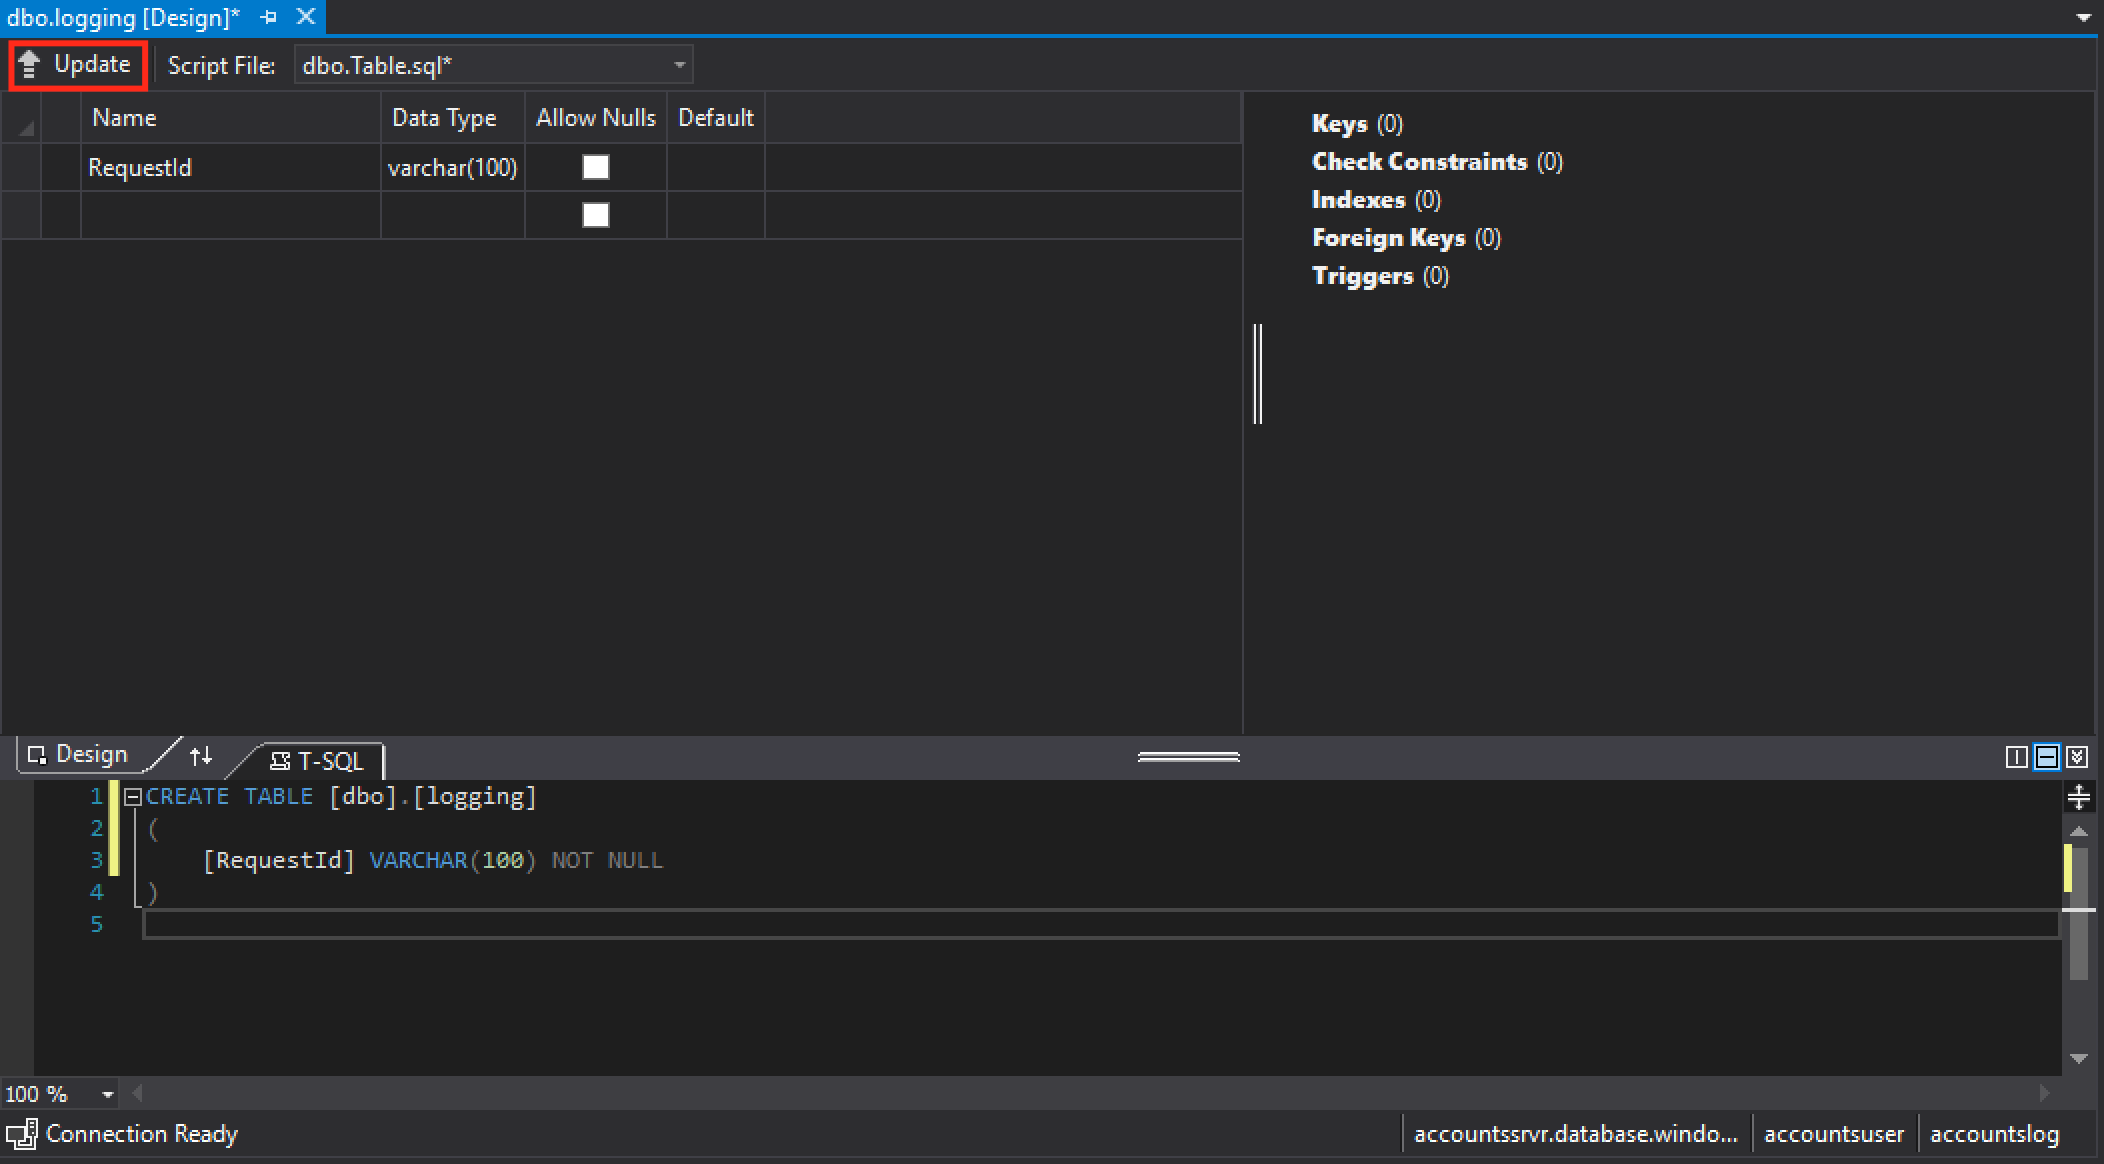
Figure 100 – Create a new table
Add a column “RequestId” and rename the table to “logging” and hit the “Update” button. You should see the table successfully created.
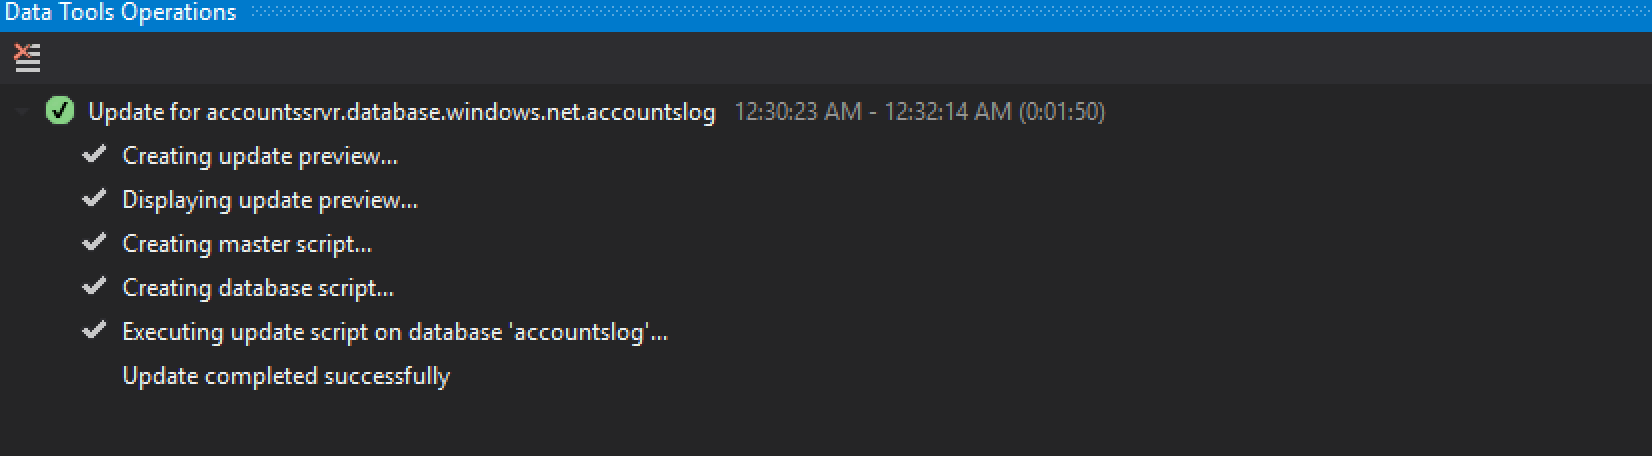
Figure 101 – Log of the Update
I have just created a simple table with one column. But in real-time scenarios, you need to take care of creating primary keys and indexes for fast retrieval of data. I am not going to discuss more on the data modeling but that is an important aspect while creating tables.
Now we need to create a Stream Analytics Job to read messages from Event Hub and publish the events to database.
Figure 102 – Stream Analytics Job
NOTE: Make sure that SQL Database, Event Hub and Stream Analytics Job are in the same location. Otherwise, you may have to incur extra cost.
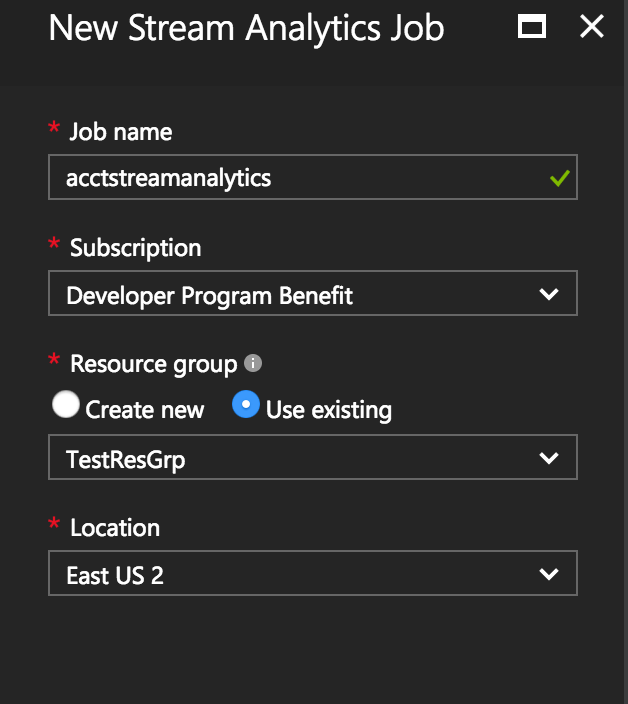
Figure 103 – Stream Analytics Job
A new job will be created as below:
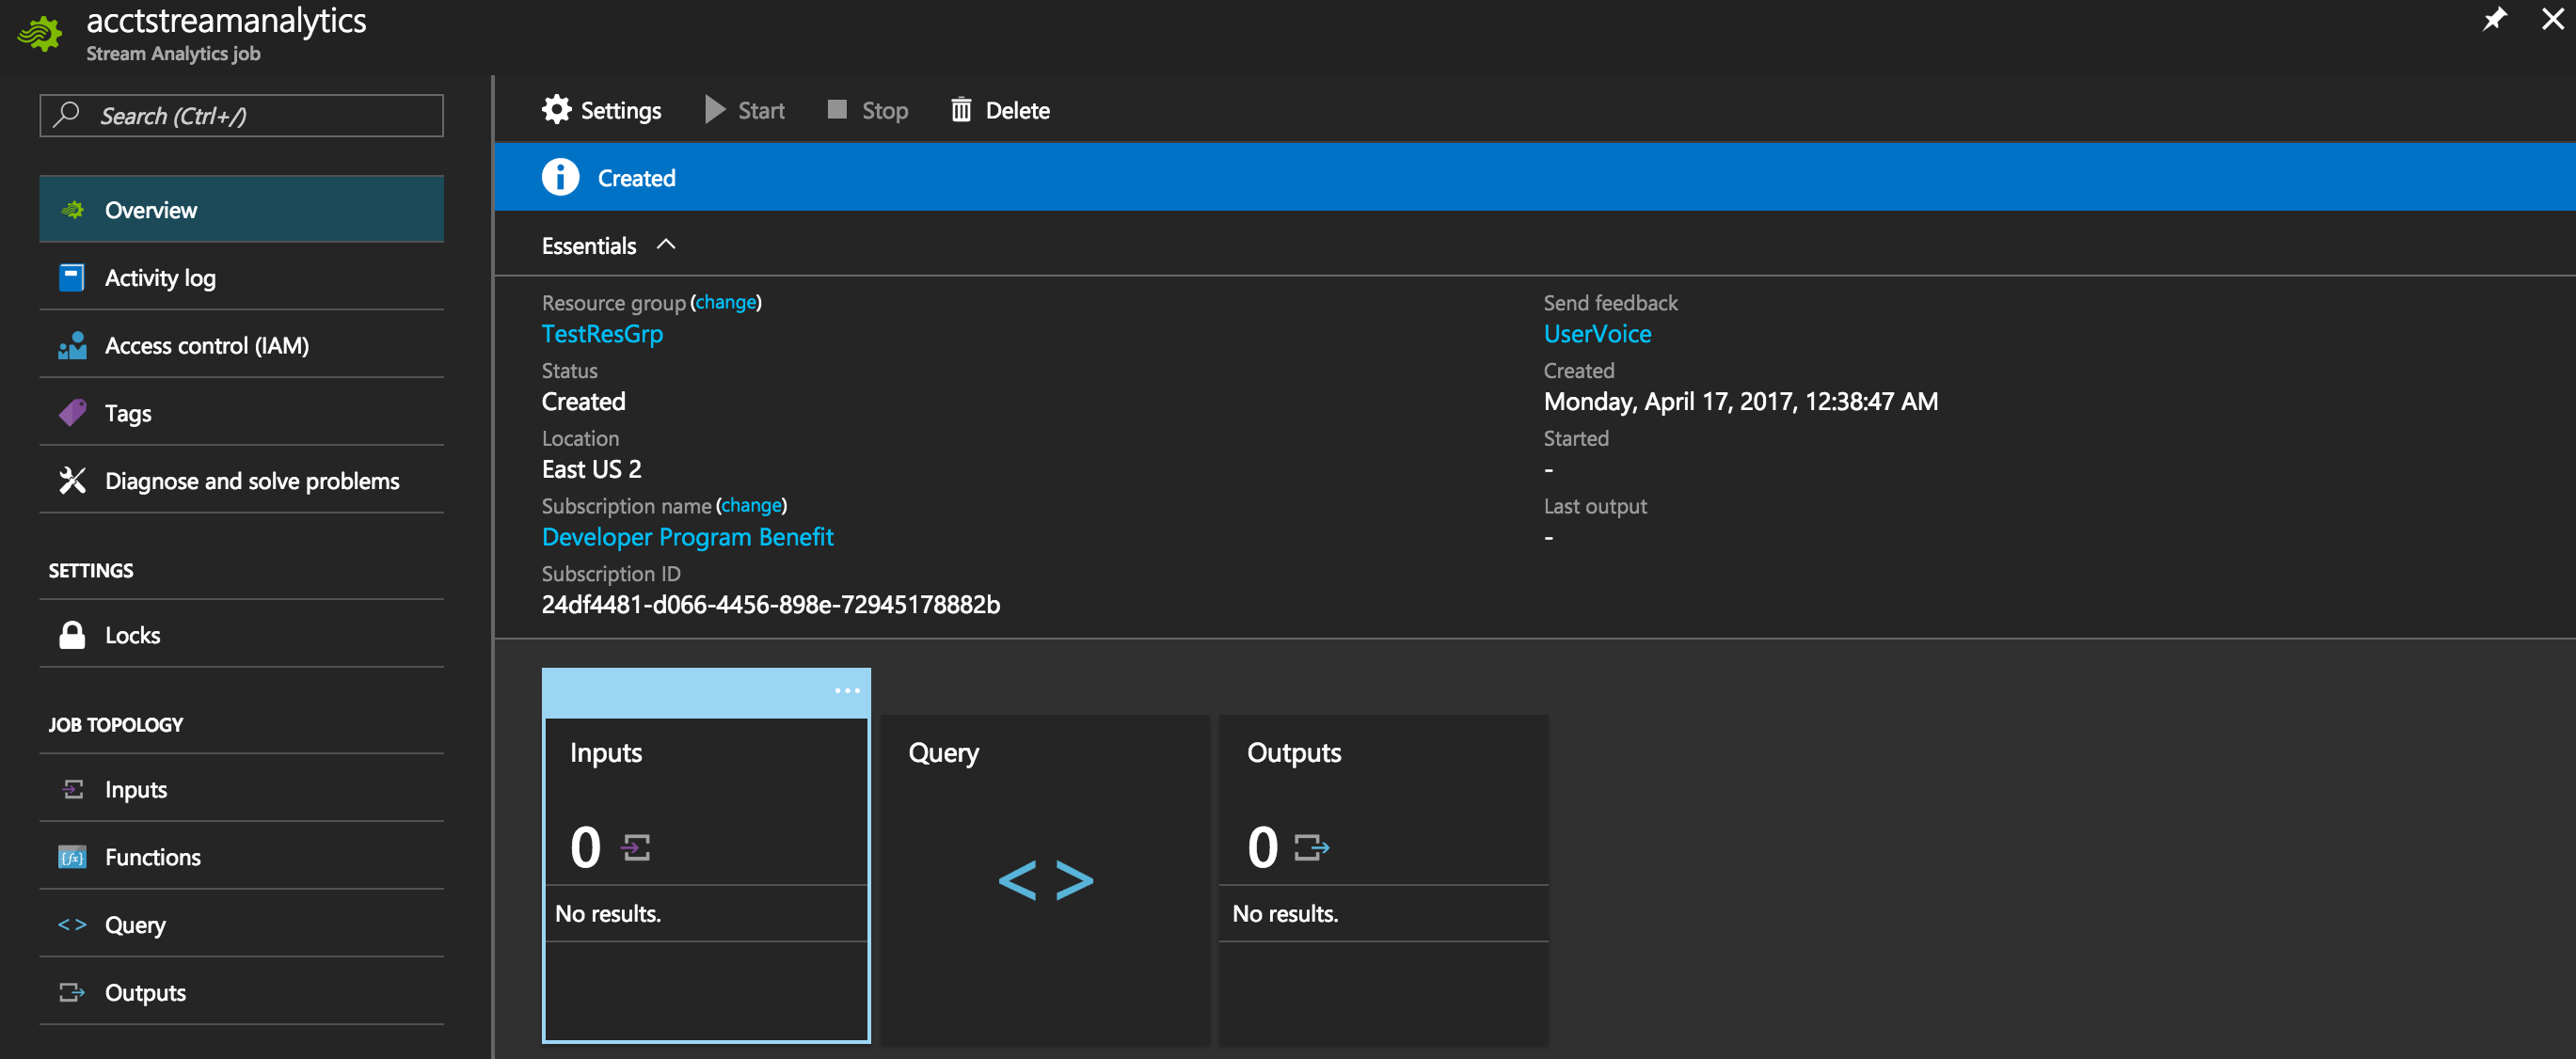
Figure 104 – Stream Analytics Job
Now go to “JOB TOPOLOGY” and click the “Inputs” and click “add”.
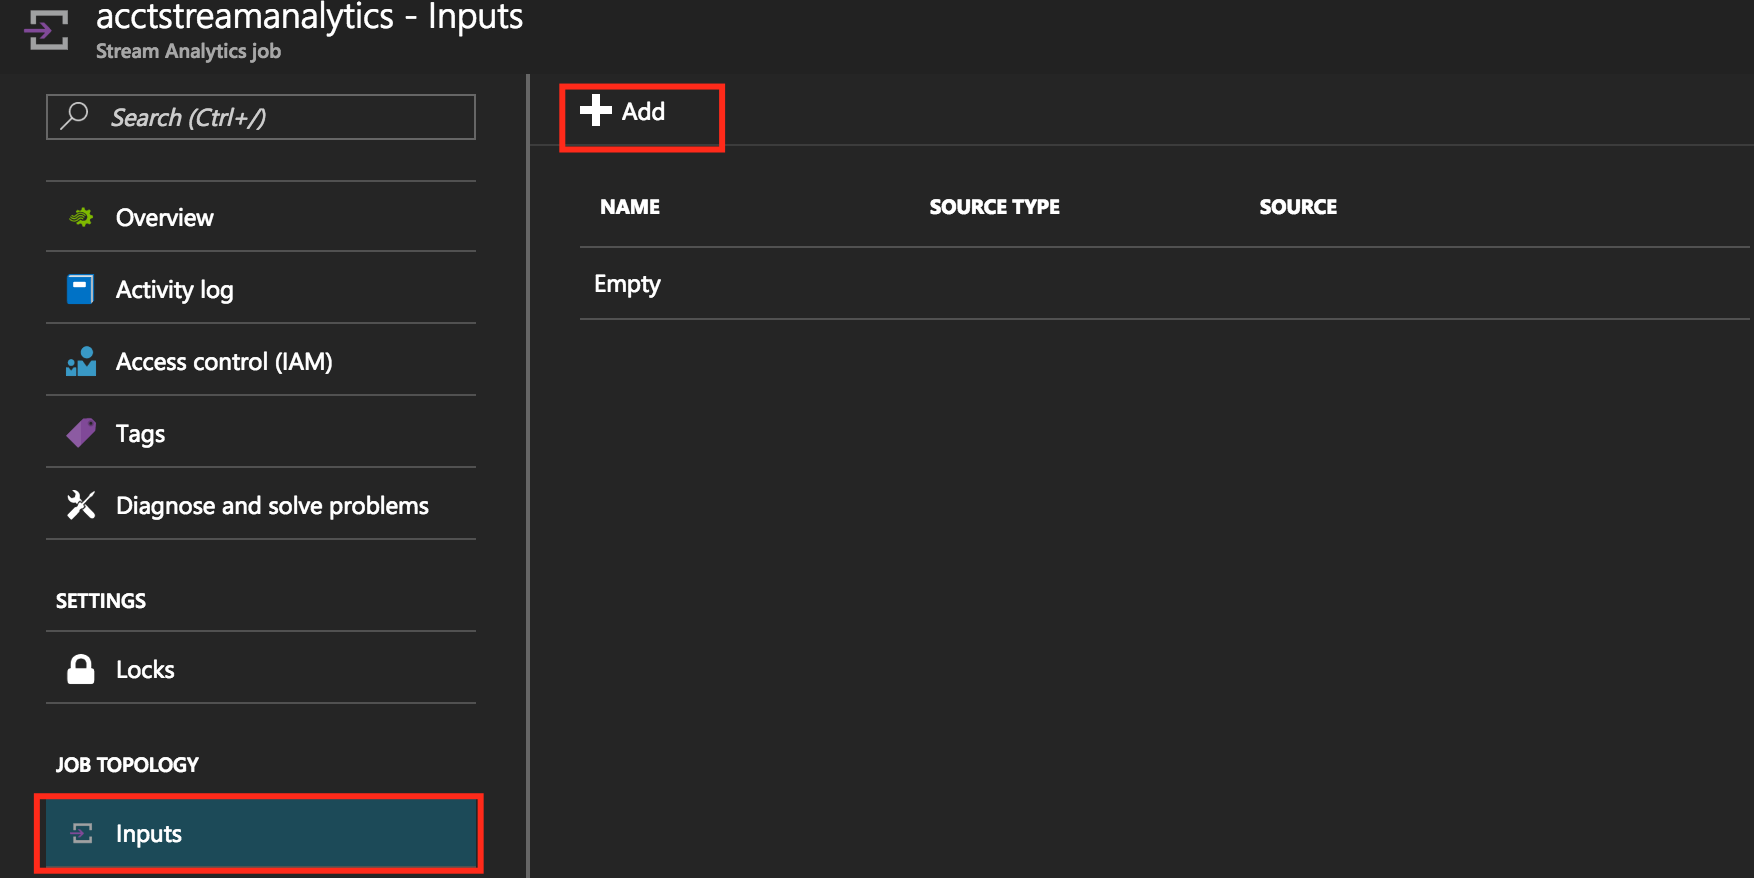
Figure 105 – Add Inputs
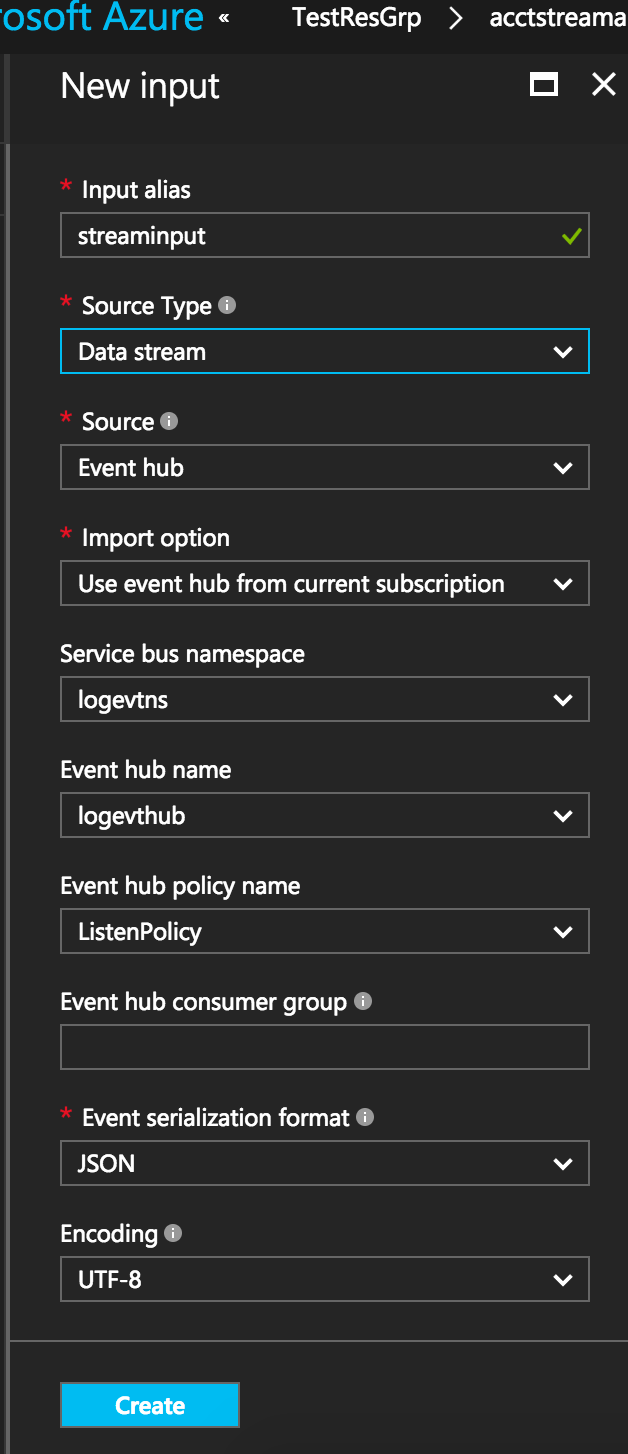
Figure 106 – Stream Input
Now create the Stream Output by clicking “Outputs” in the “JOB TOPOLOGY”. Select “SQL Database” as the Sink and enter the credentials.
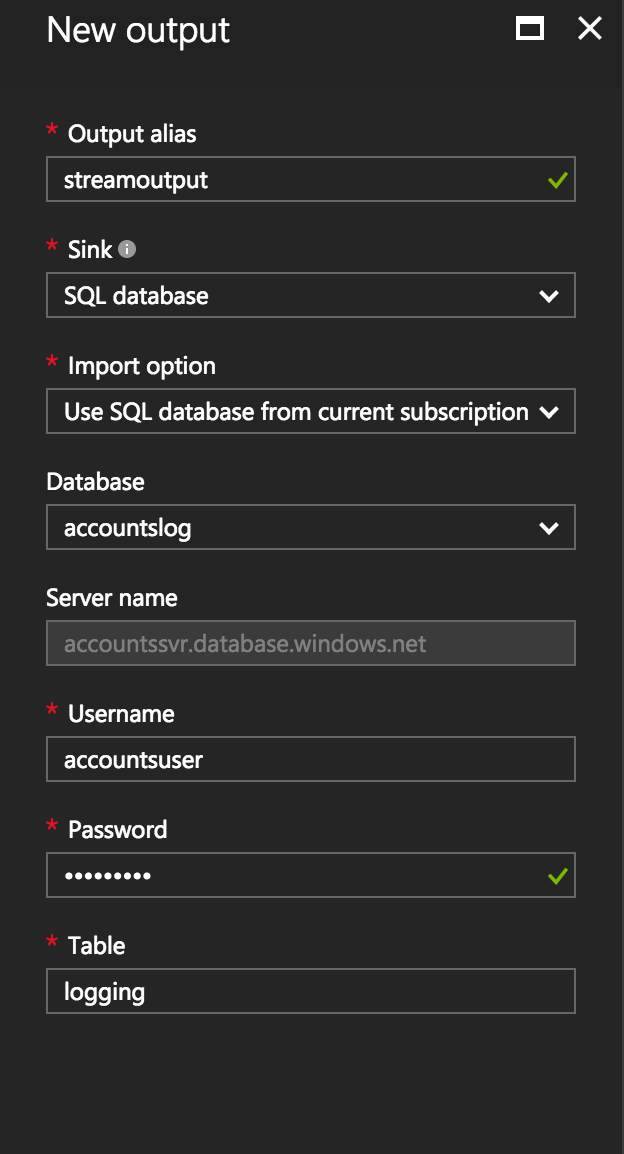
Figure 107 – New Output
Now click on the Query and update the query as below. I have modified the query to include only one column “RequestId” otherwise the Stream Analytics Job will insert its own default columns when all (*) is selected which will fail the insertion process:
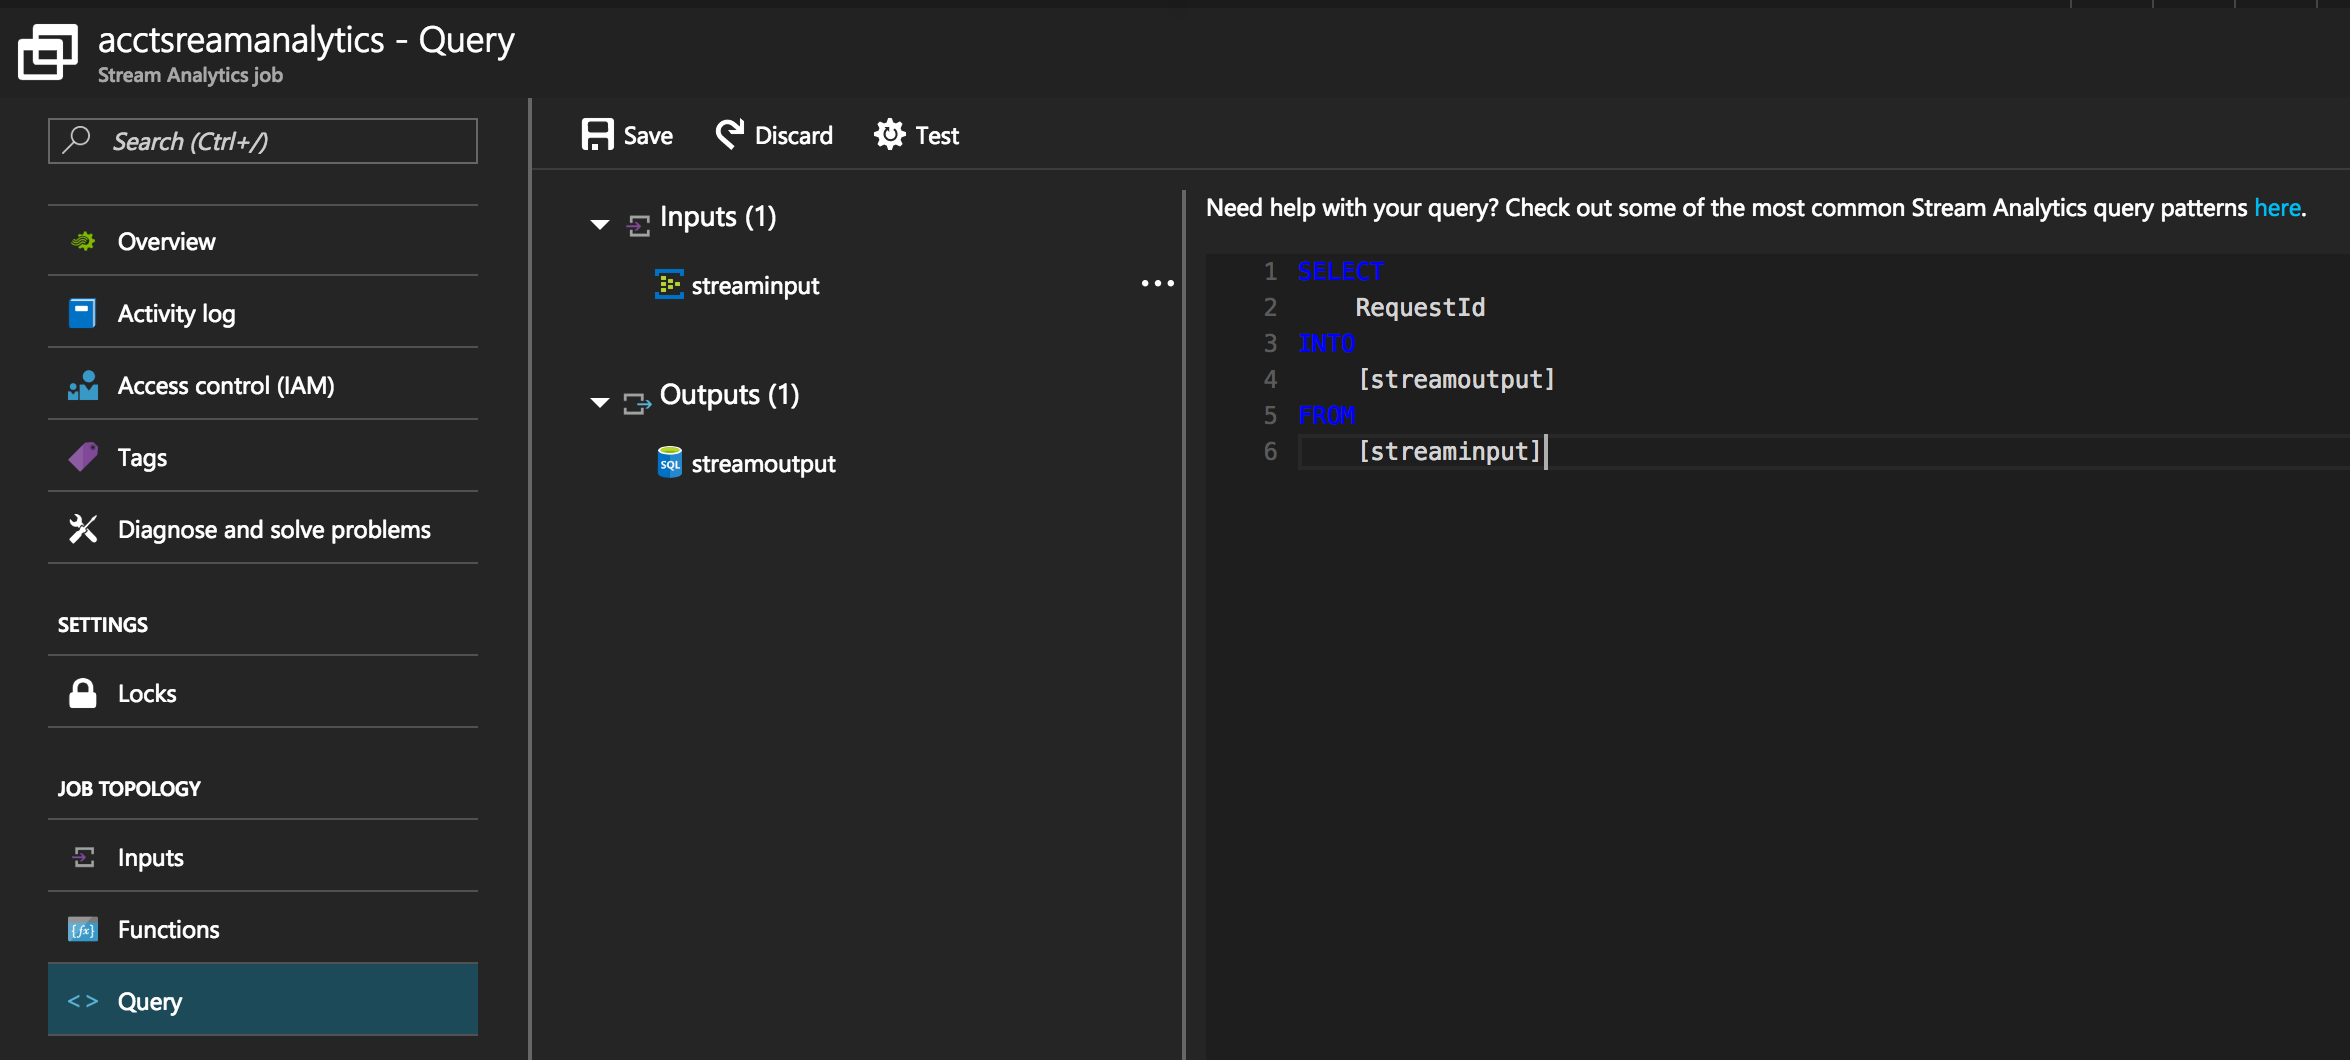
Figure 108 – Query
Now go to overview page of the Stream Analytics job and hit the start button to run the job.
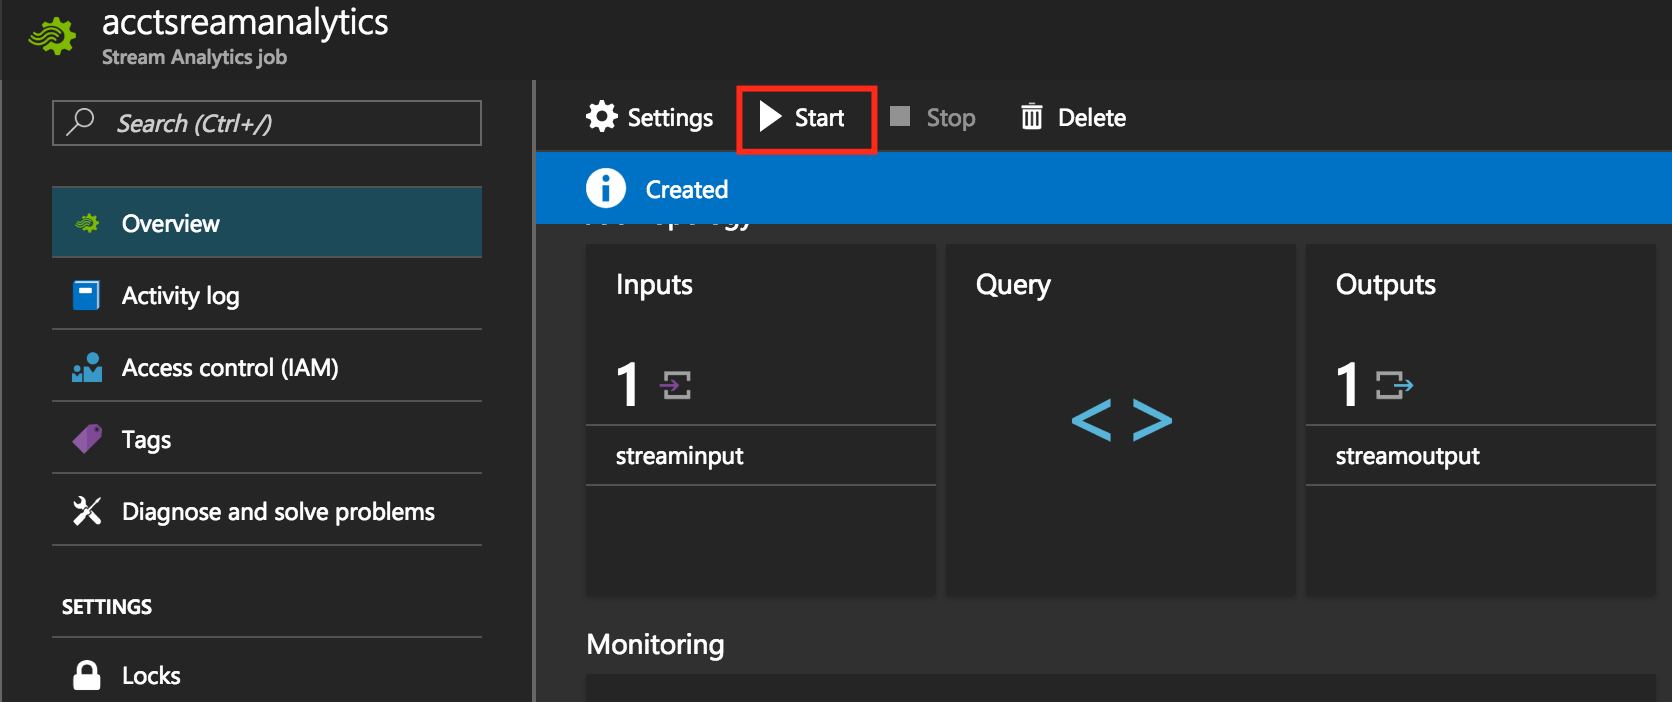
Figure 109 – Start
Once the status of the stream analytics job is “Running” then execute the operations on the accounts api request from Developer Portal and you should see the data inserted to the SQL Database.
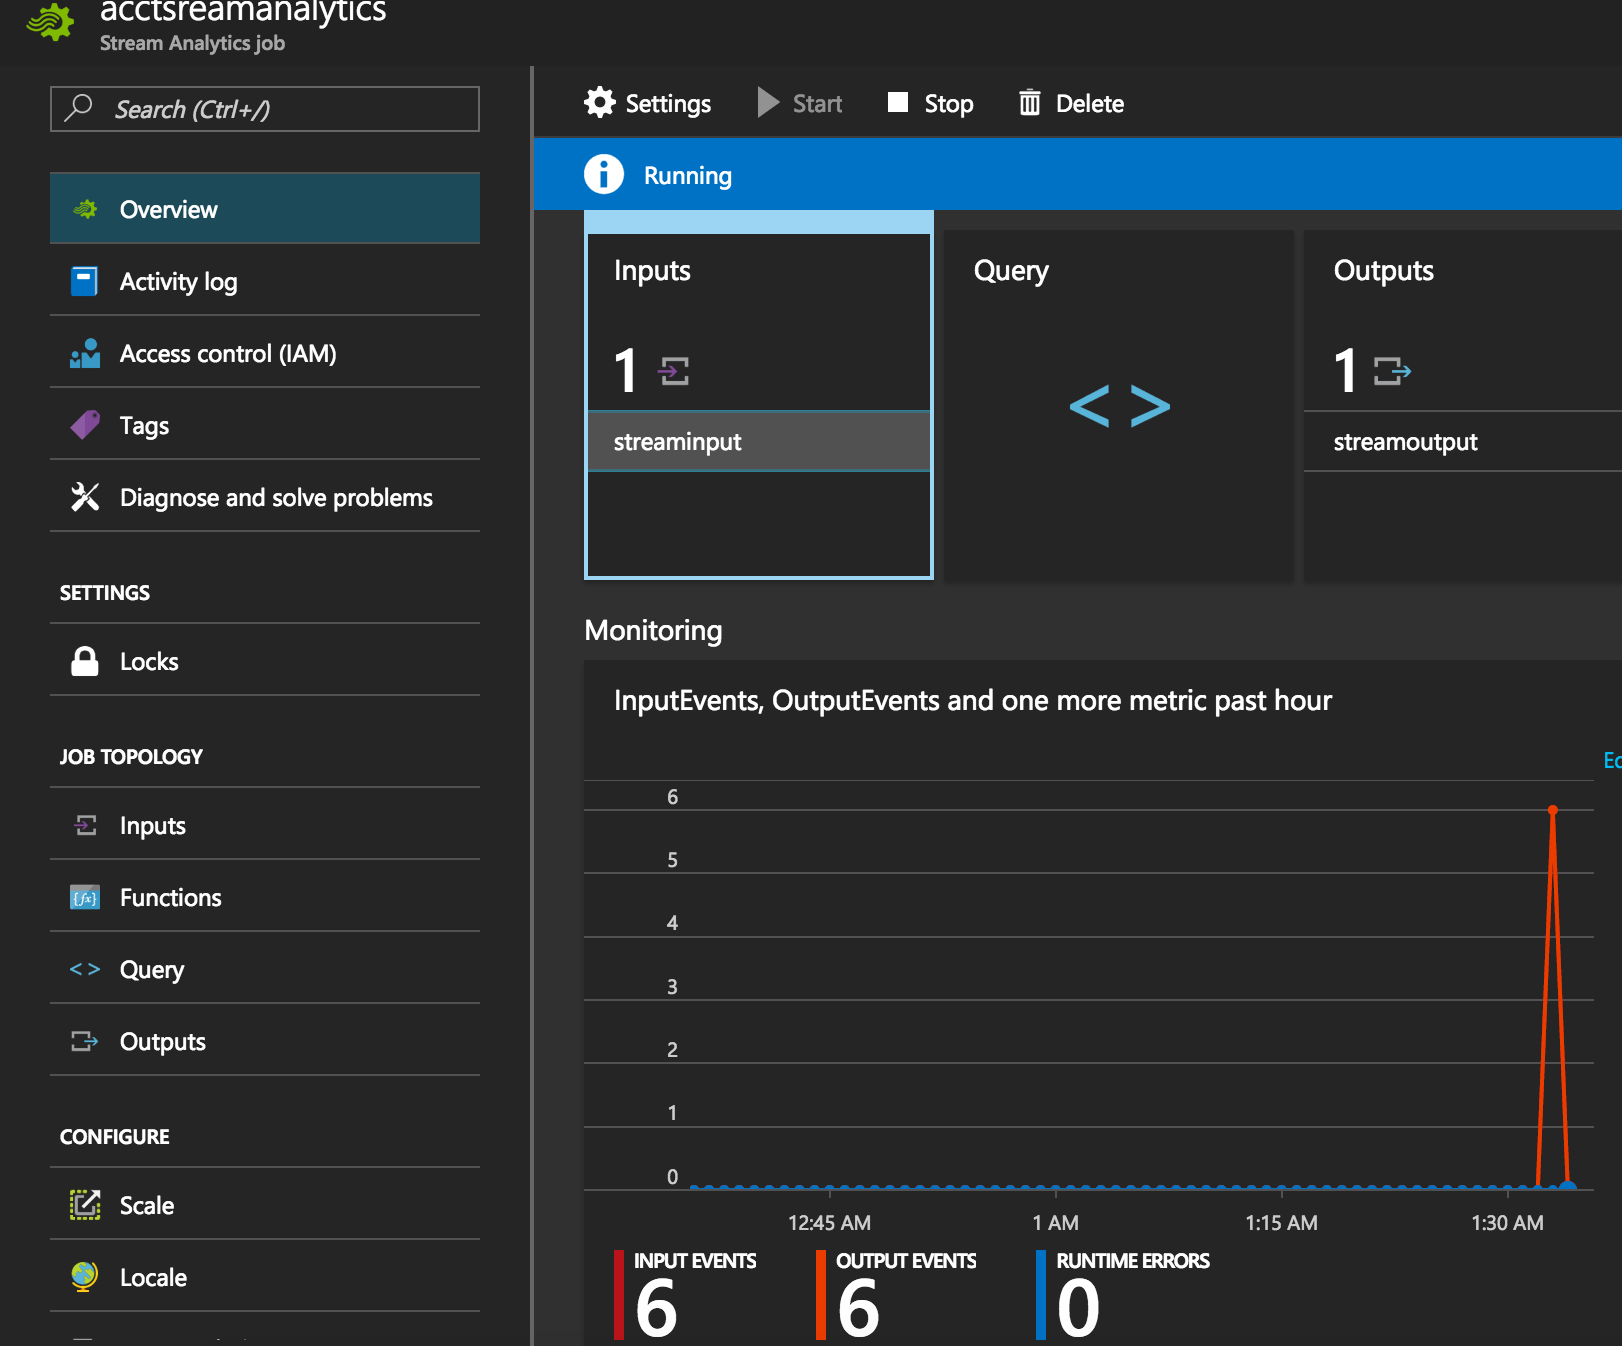
Figure 110 – Spike in the monitoring section
Now you should see the spike in the monitoring section and also find that there were some 6 input events and 6 output events.
Go back to server explorer check the records in the table.
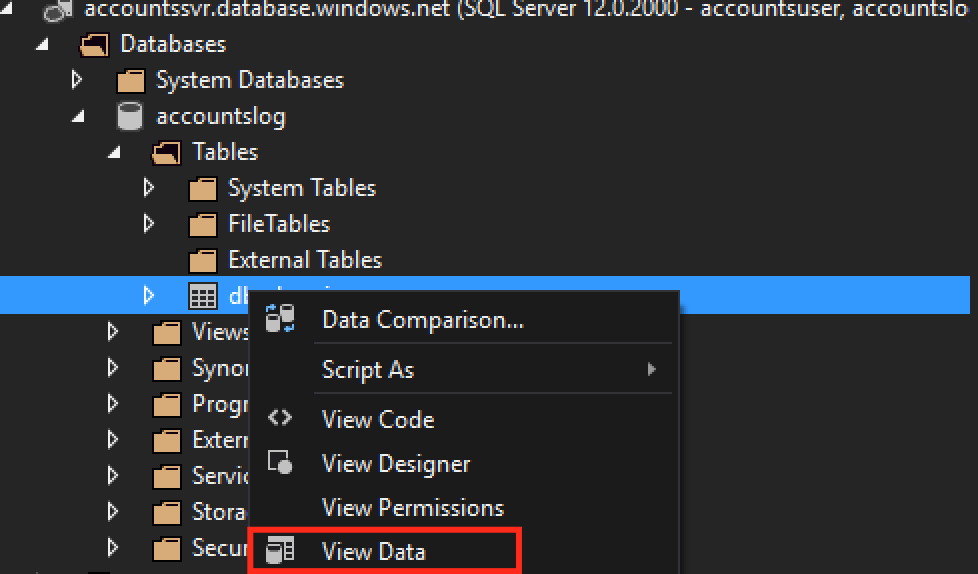
Figure 111 – View Data
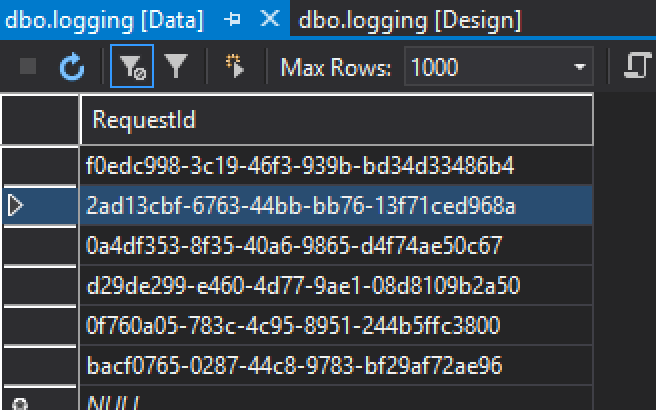
Figure 112 – Table records
Now stop the Stream Analytics Job.
Let us enhance the logging to include more fields. Go to Policies and edit the previous policy created as below:
<policies>
<inbound>
<log-to-eventhub logger-id="accountinglog">
@{
var message = new JObject(
new JProperty("DateTimeStamp", DateTime.UtcNow),
new JProperty("ServiceName",context.Deployment.ServiceName),
new JProperty("RequestId",context.RequestId),
new JProperty("IP Address",context.Request.IpAddress)
).ToString();
return message;
}
</log-to-eventhub>
<base />
</inbound>
<backend>
<base />
</backend>
<outbound>
<base />
</outbound>
</policies>
Now we have included DateTimeStamp, ServiceName, RequestId and IP Address and we are using Newtonsoft.Json.Linq.JObject which is available by default and we are returning the final message by converting the result to string.
Also we need to modify our table to add the new columns. This time, I have added a primary key which is also an identity column and added other columns to store the data as below:
CREATE TABLE [dbo].[logging] (
    [Id]            INT           IDENTITY (1, 1) NOT NULL,
    [DateTimeStamp] VARCHAR (100) NOT NULL,
    [ServiceName]   VARCHAR (100) NOT NULL,
    [RequestId]     VARCHAR (100) NOT NULL,
    [IP Address]    VARCHAR (100) NOT NULL,
    PRIMARY KEY CLUSTERED ([Id] ASC)
);
Now let us run our Stream Analytics Job again and hit the API operation. I hit 6 times and so I see the following Metrics:

Figure 113 – Metrics
Let us check our table now. It should show 6 records in the table.
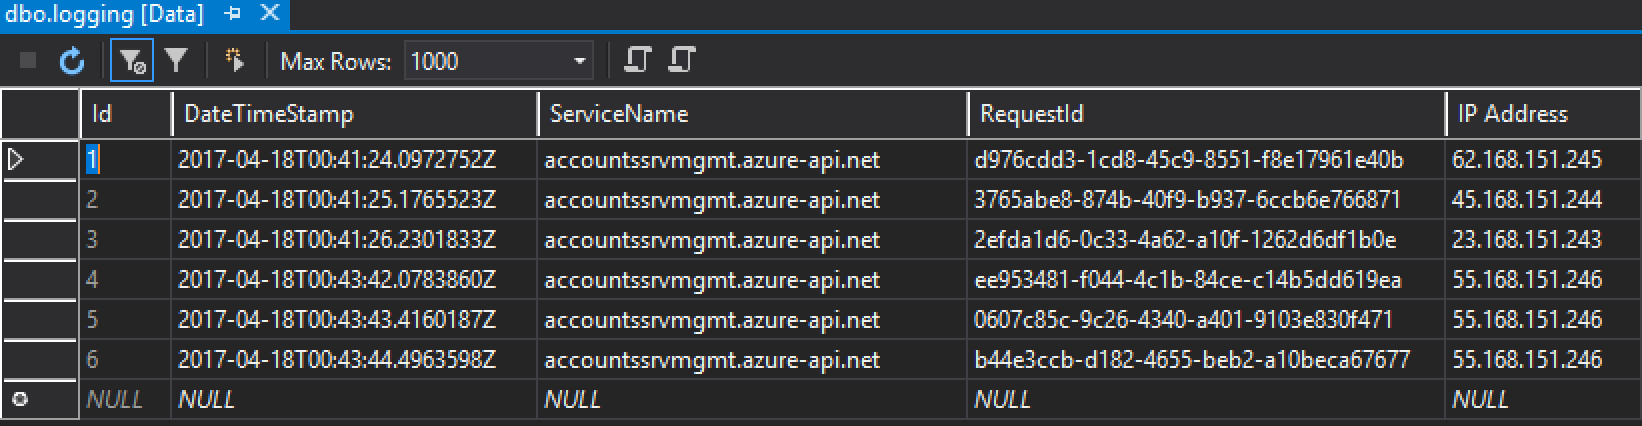
Figure 114 – Table rows
You can add meaningful logging according to your project and can generate reports using PowerBI or Excel to present it to the team or any interested parties.
hi thanks for sharing ,content is great
I have quetion in postman i am passing “type” : “AzureEventHub”,
I am getting error
“code”: “ValidationError”,
“target”: “loggerType”,
“message”: “LoggerType is not supported”
hi i solved the issue
“type” : “AzureEventHub”, to “loggerType” : “AzureEventHub”,
Cool!!! Thanks for the update!!!